Acquire to dispose end to end cycle
Fixed assets are items of value, such as buildings, vehicles, land, and equipment, which are owned by an individual or organization.
You can set up and enter acquisition information for fixed assets and then manage them by depreciating them and setting a capitalization threshold to determine depreciation. You can calculate adjustments to the fixed assets and dispose of them.
We will cover the Fixed Asset in two parts i.e., configurations part & transaction part.
This Blog will be related to Fixed Asset Transactions for Fixed assets configurations part refer to - https://msd365fo.aayushdynamics.workers.dev/posts/fixed-assets-configurations
Acquisition of Fixed Assets
The procurement process for Fixed assets will be the same as for raw materials, packaging materials, etc.
There are multiple ways to acquire Fixed assets.
- From Purchase requisition
- From Direct purchase order
- From vendor invoice journal
- From Fixed Asset Journal
Acquisition of Fixed Asset from Purchase requisition
The process for acquiring the Fixed asset: Creation of purchase requisition, approval of the purchase requisition and conversion of the approved purchase requisition into a purchase order. Everything will be the same as defined in the Procure to Pay process.
Before recording the acquisition, the fixed asset card should be created as defined above in the setup part and a non-stock item, then follow the below steps -
Step 1: Creation of Purchase Requisition
For creating a purchase requisition, Purchase Supervisor will follow the below path.
Path: Procurement and Sourcing🡪 Purchase Requisitions🡪 All Purchase Requisitions
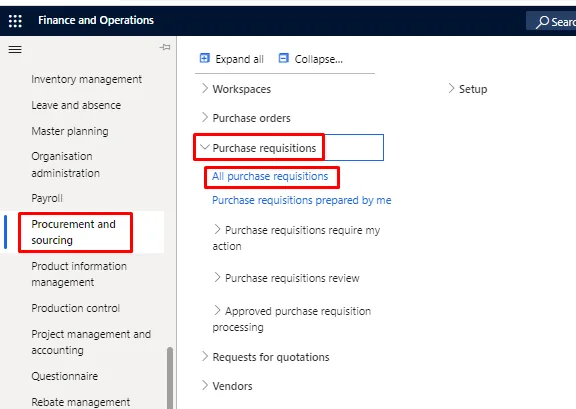
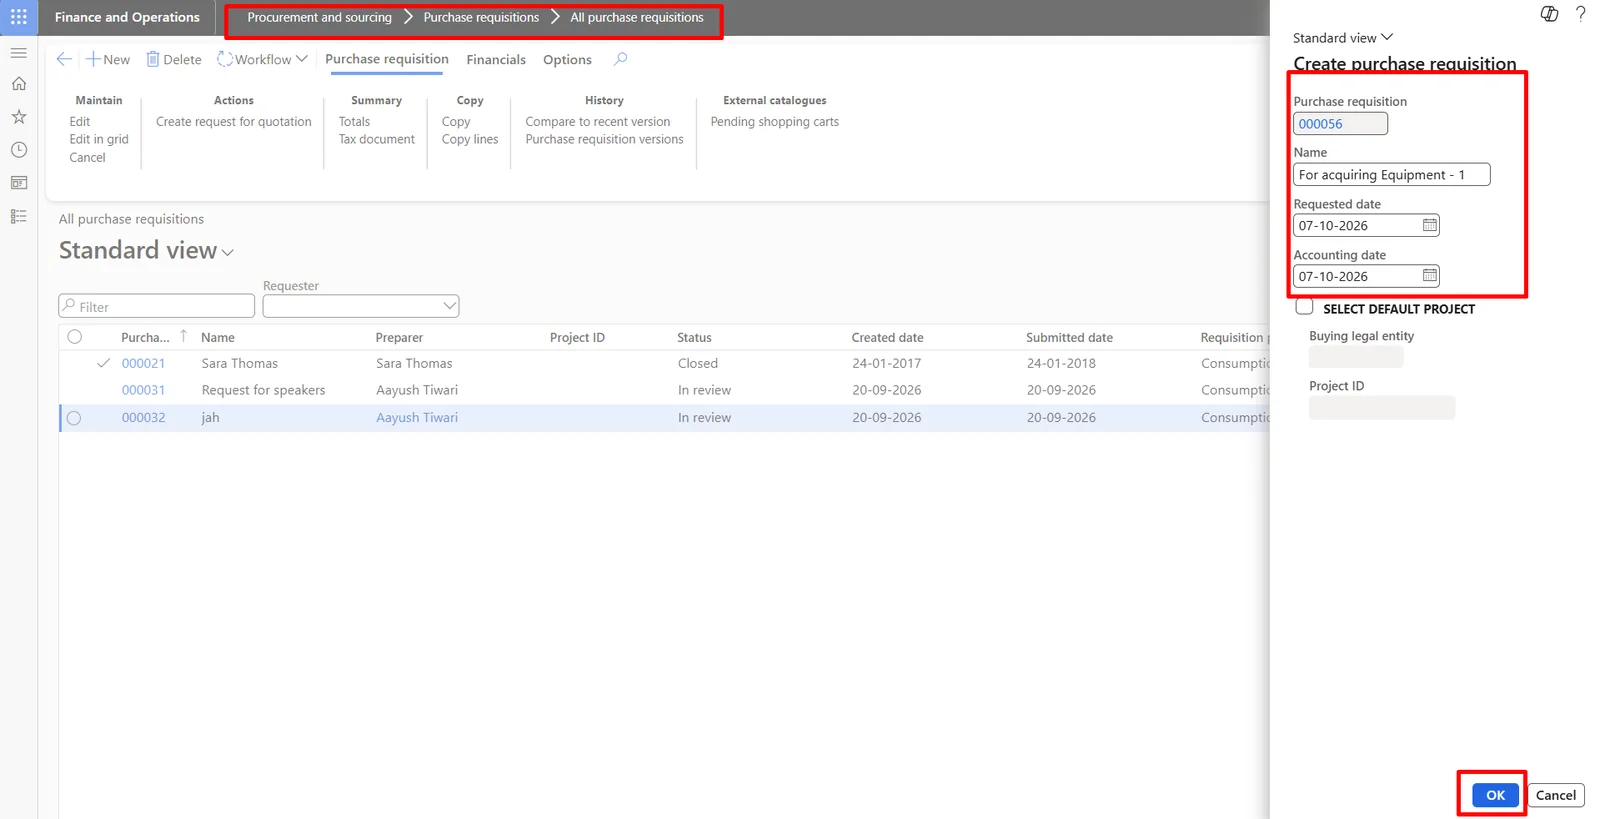
Below screen will appear. Purchase Supervisor will click on ‘New’ button.
Enter the name for PR and enter the requested date.
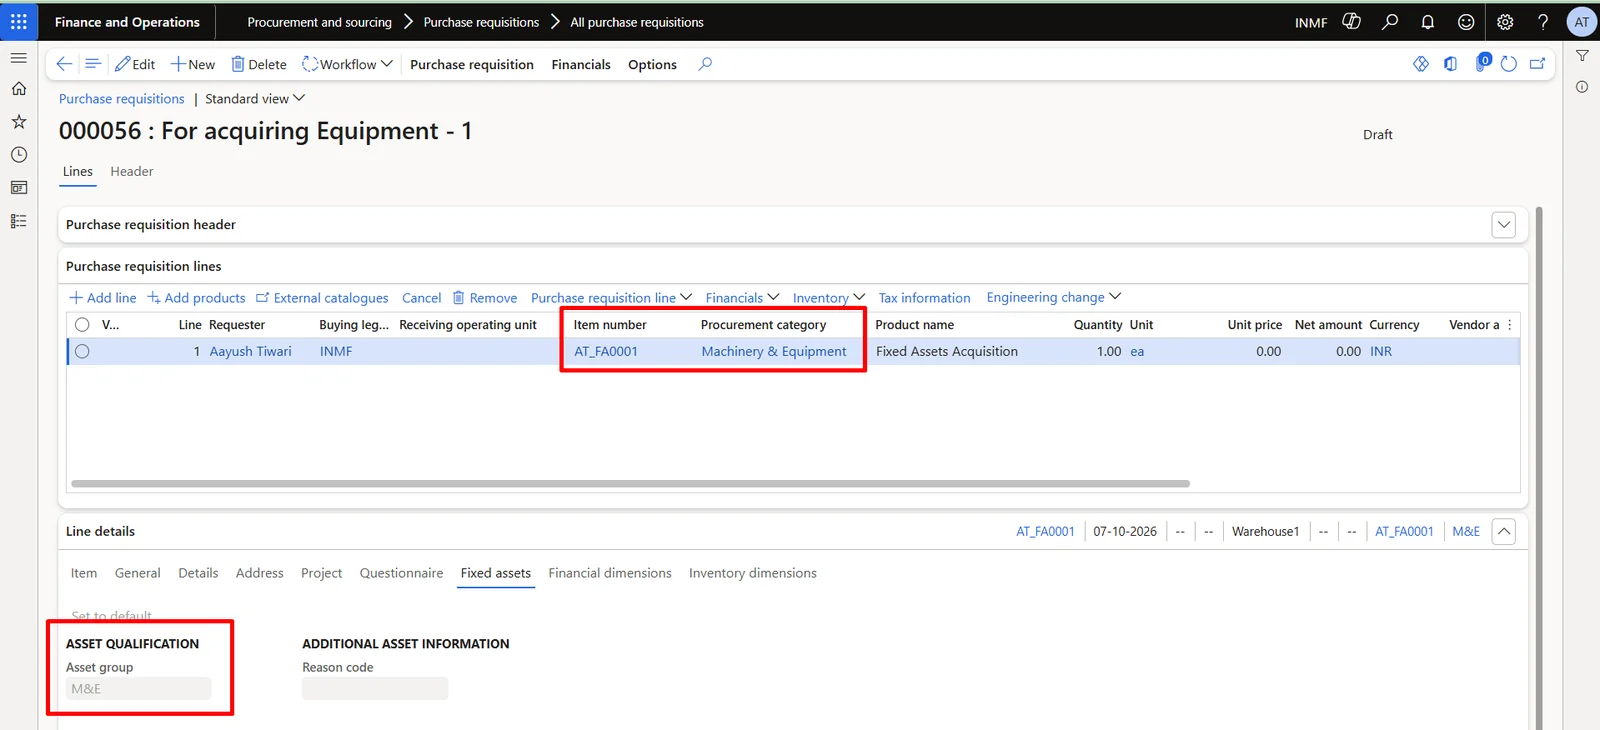
After creating the purchase requisition, requestor will select the service item in line level for procuring the fixed asset and will select the fixed asset group of which the FA is being procured as shown below.
Step 2: Submit the Purchase Requisition
After creating the PR, requestor will submit the same for approval through workflow in the system as shown below. HOD will take the necessary actions on the purchase requisition assigned to him.
For submitting the purchase requisition, click on submit button under the Workflow tab in action pane.
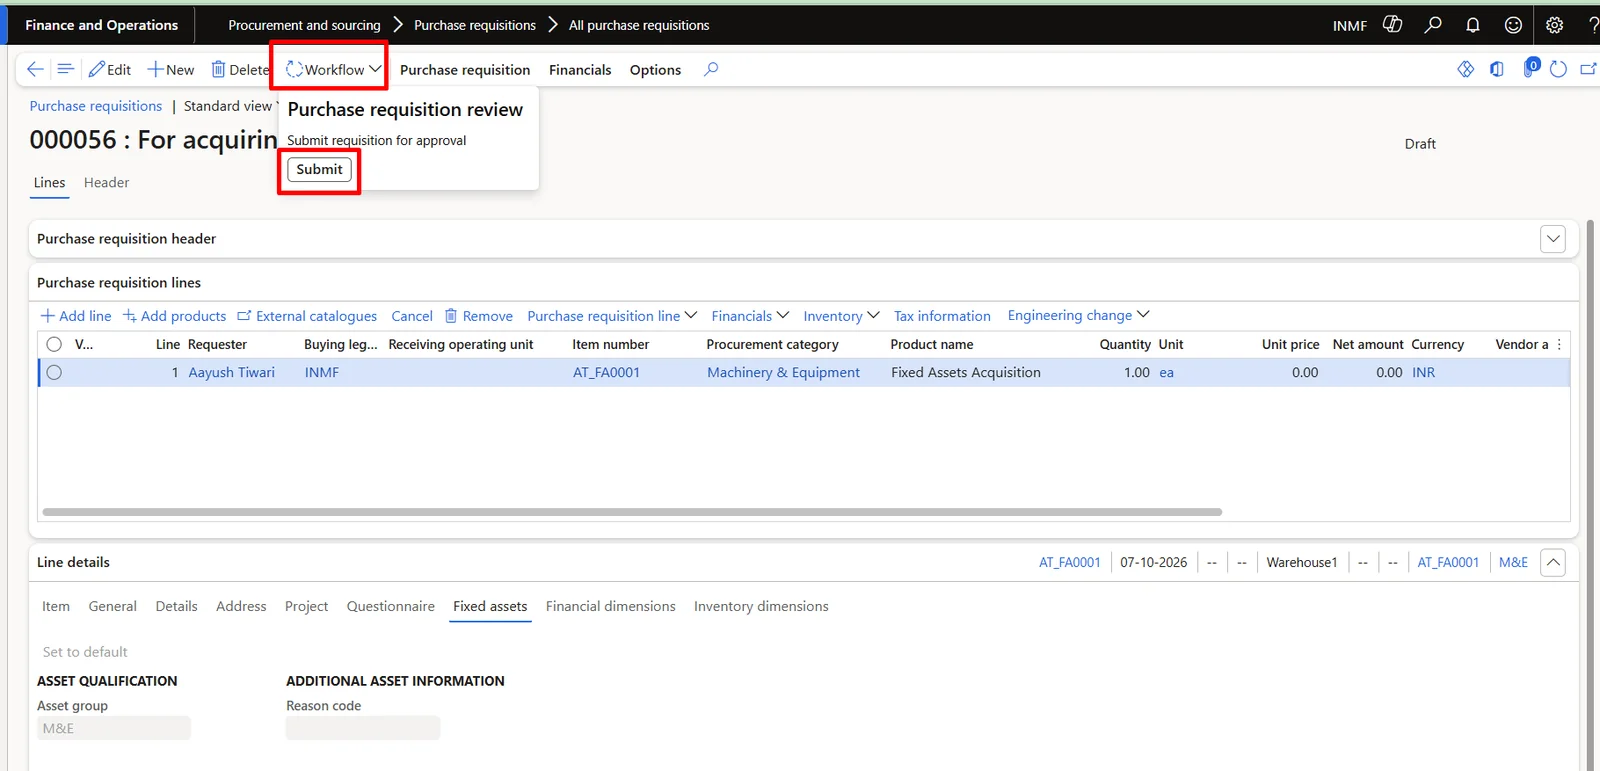
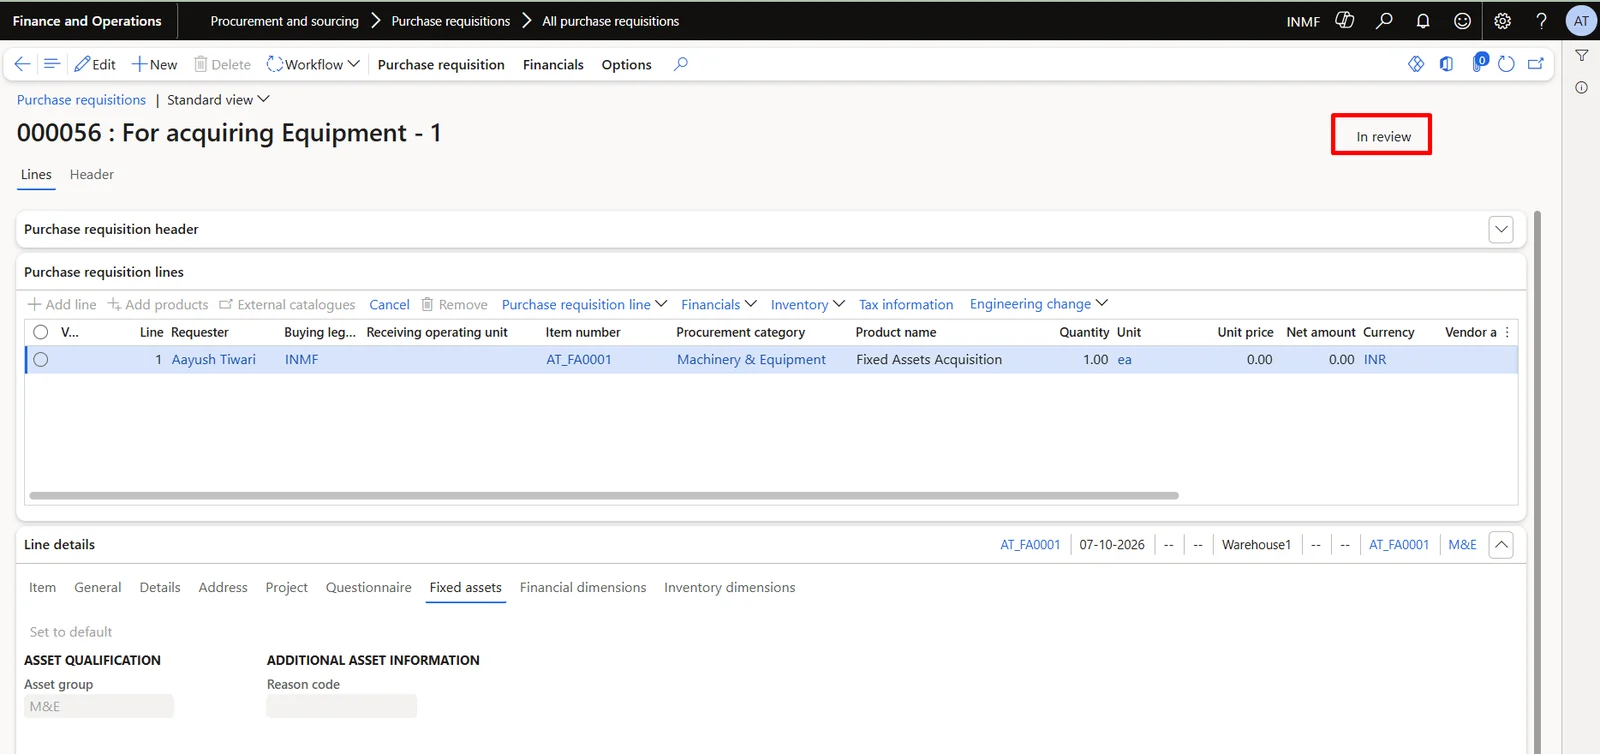
Once the purchase requisition is submitted for approval, the status of purchase requisition will change to ‘In review’.
Step 3: HOD Approval for Purchase Requisition
Path: Procurement and sourcing → Purchase requisition → Purchase requisition require my action→ Purchase requisition assigned to me.
Approver can follow the above path to take the necessary actions on the purchase requisition assigned to him.
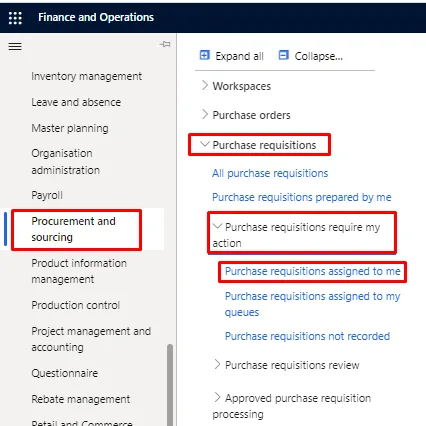
Once clicked on Purchase requisition assigned to me, select the purchase requisition which needs to be approved.
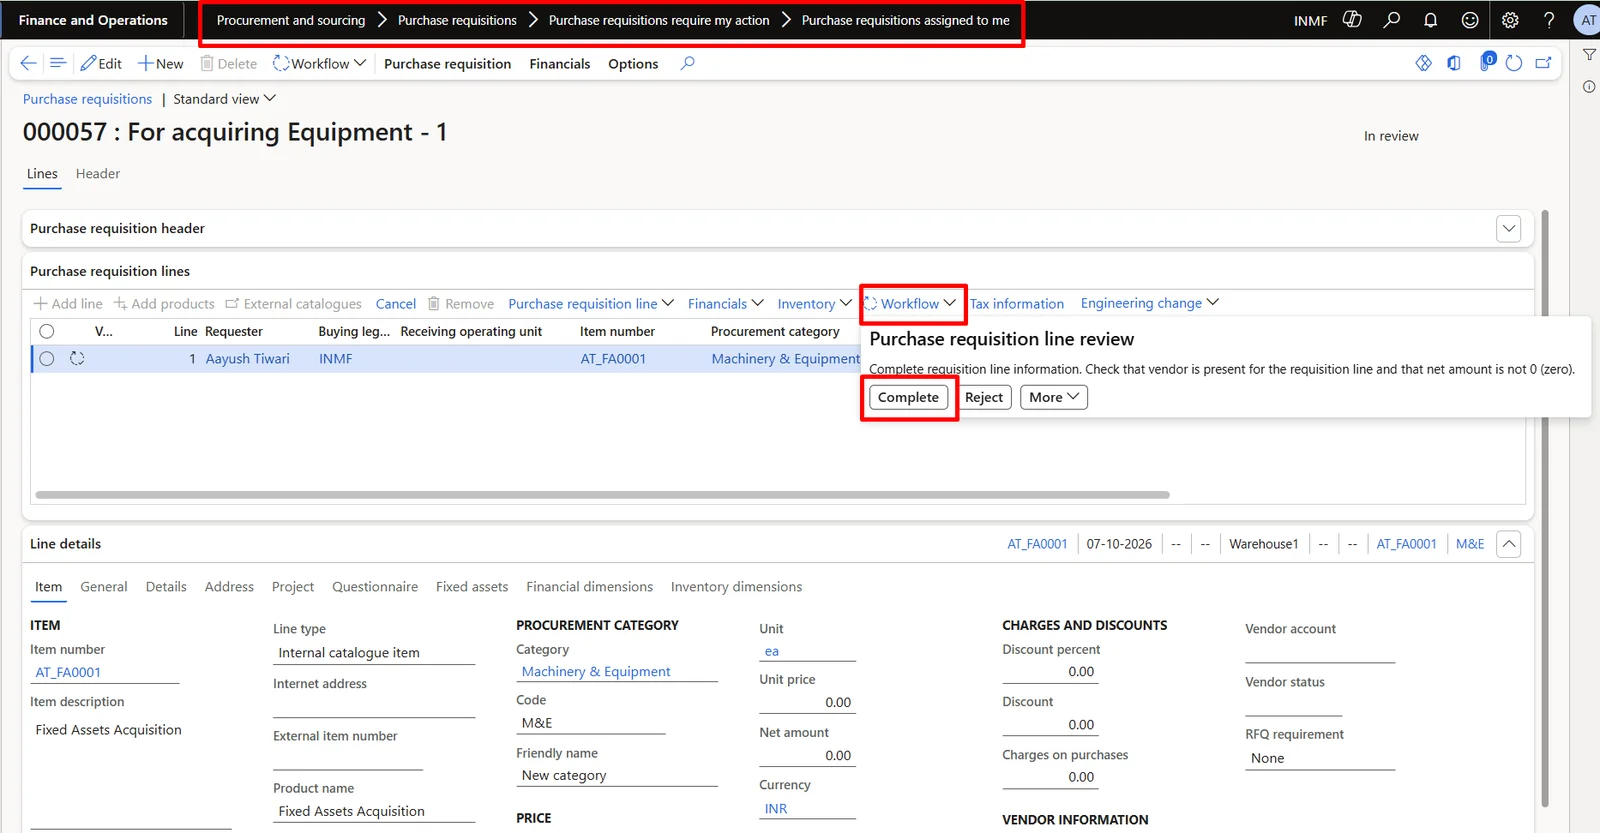
Once click on PR, below screen will appear. Click on ‘Workflow’ and then click on ‘Complete’ to approve the purchase requisition.
Step 4: Creation of Purchase Order
Once the purchase requisition is approved, the Purchase Supervisor will convert the purchase requisition to a purchase order.
Path: Procurement and sourcing Purchase requisition Approved purchase requisition processing Released Approved purchase requisition.
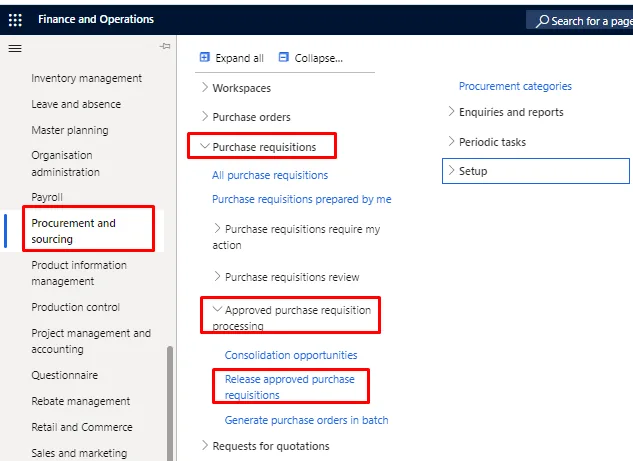
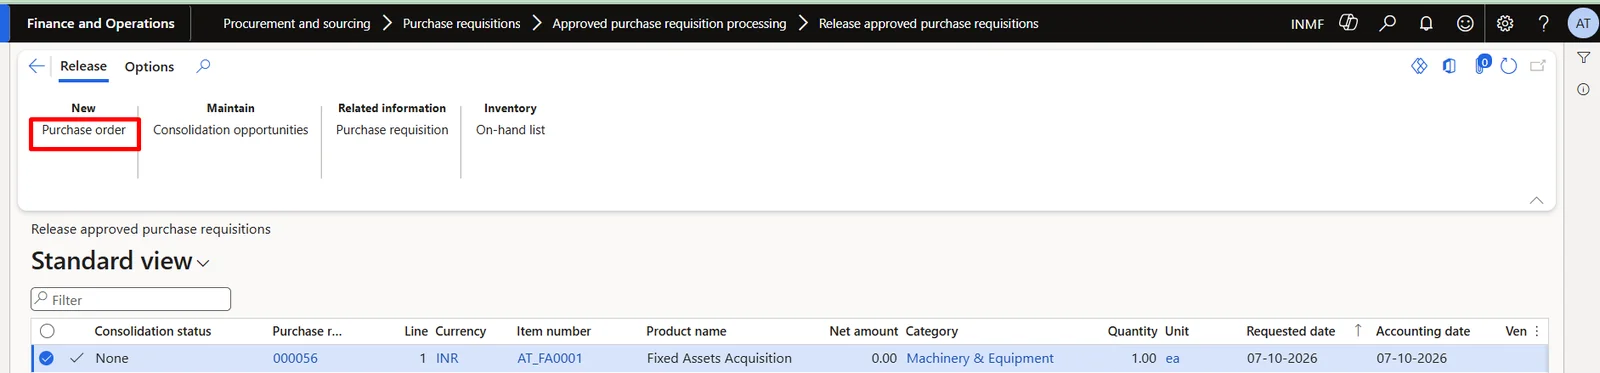
Below screen will appear. Purchase Supervisor will select the approved purchase requisition and click on purchase order as shown in the below screen.
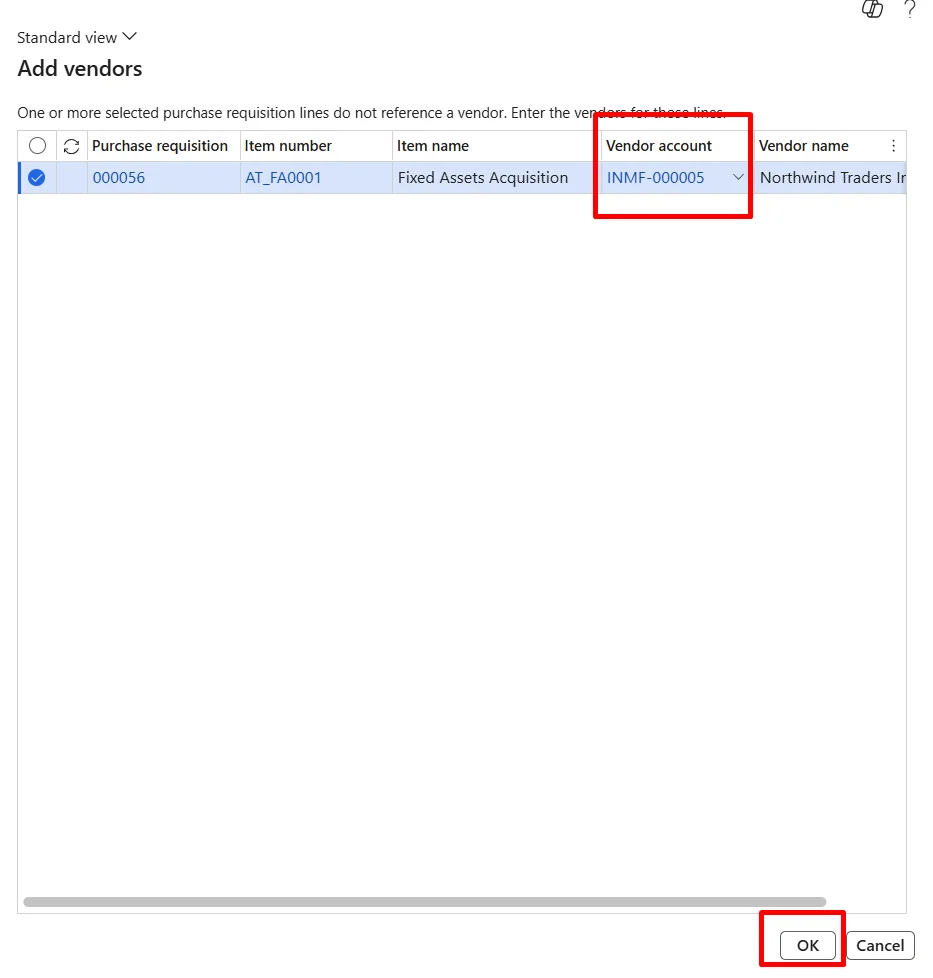
As the vendor is not defined on the purchase requisition line, the system will ask to add the vendor. Select the vendor account & then click on ok.
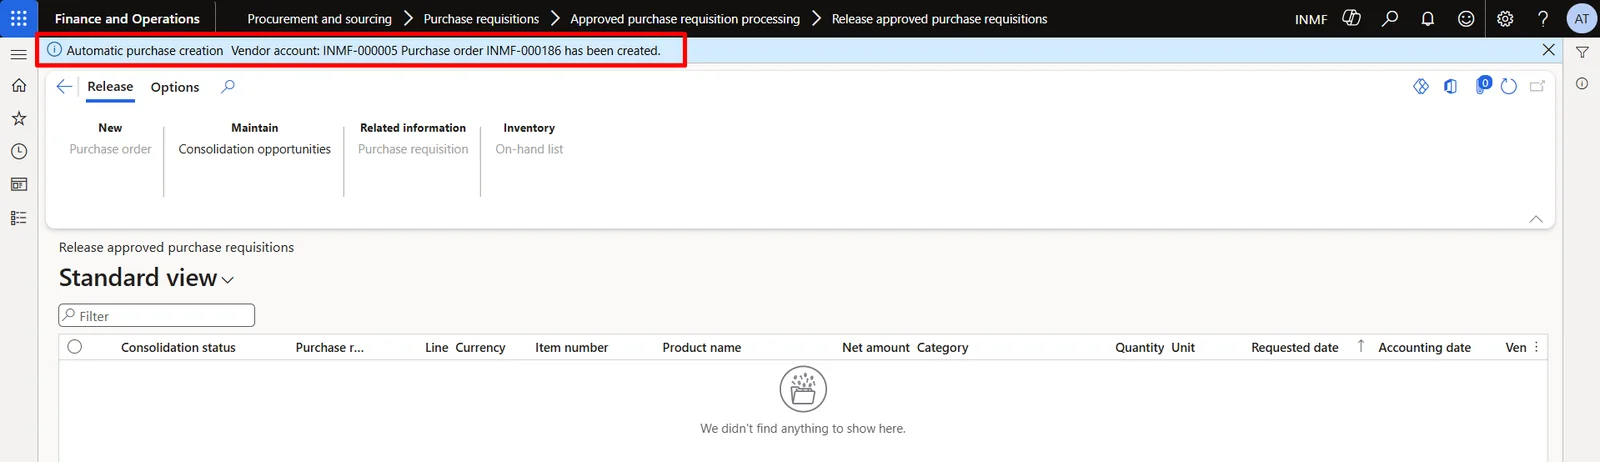
The below message will pop up as purchase order is raised.
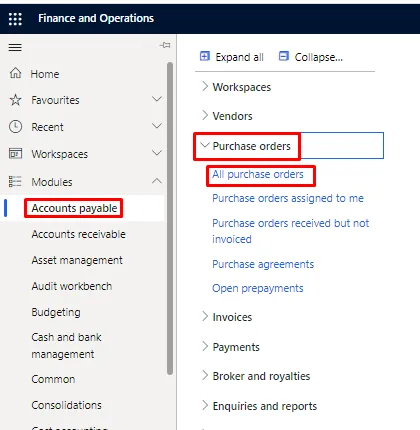
Path for viewing the purchase order created: - Accounts payable > Purchase orders > All purchase orders.
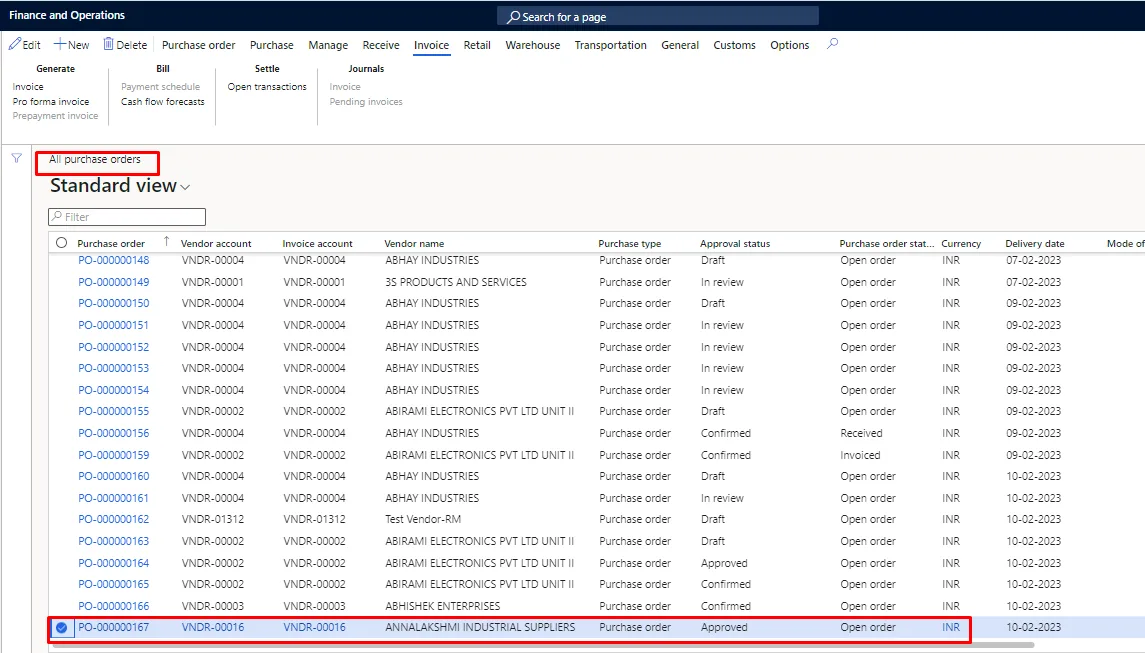
Below screen will appear. Select and open the purchase order created through the approved purchase requisition.
Step 5: Purchase Order Confirmation
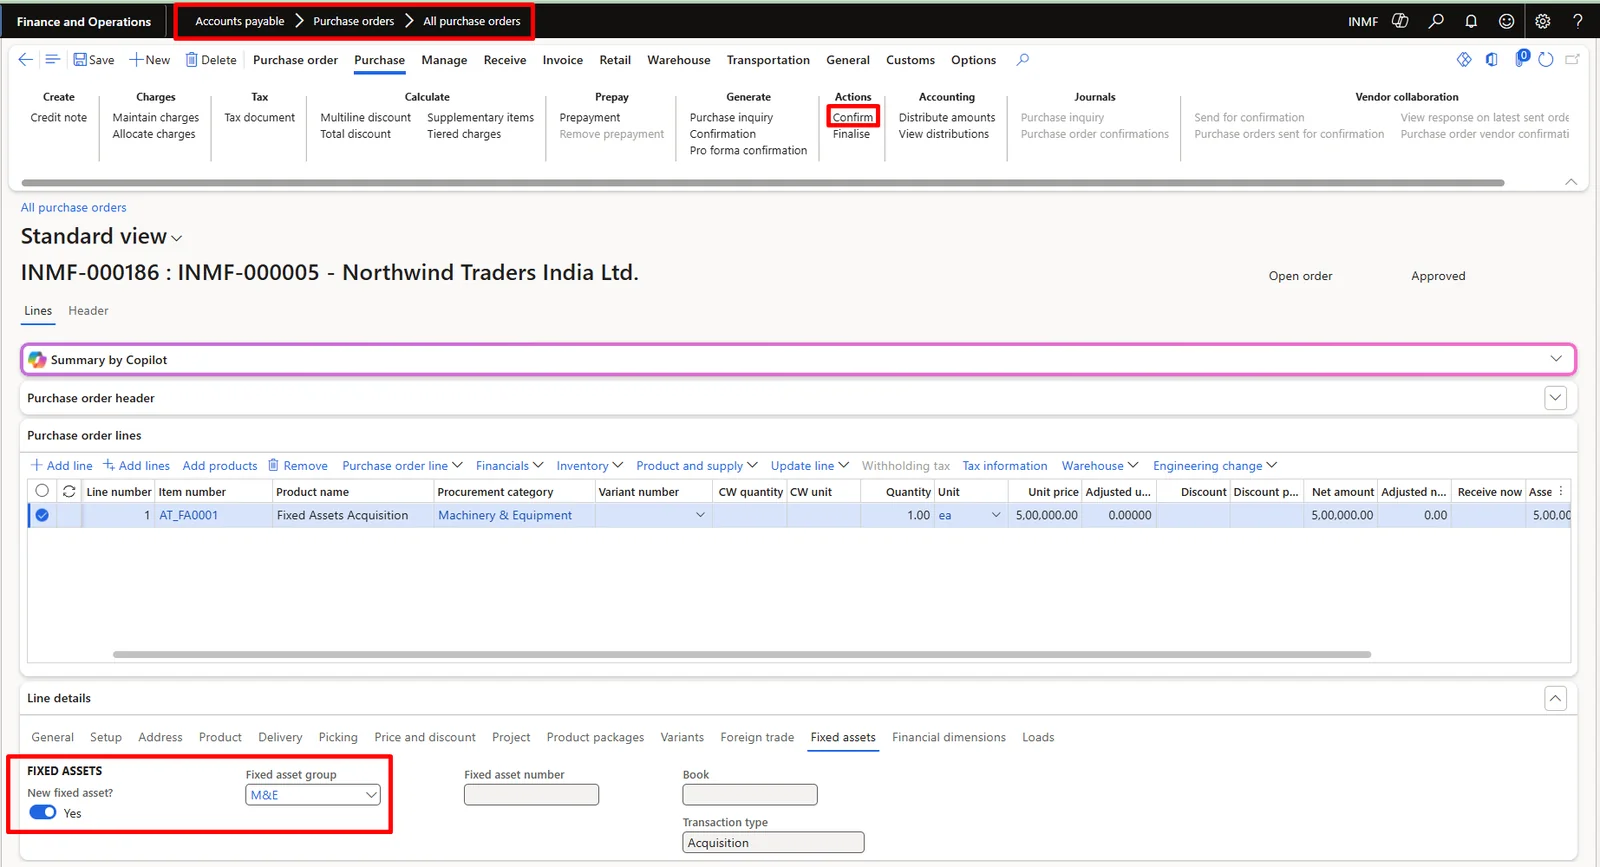
To confirm the purchase order, open the required purchase order & then click on ‘Confirm’ button under the purchase tab in action pane.
Step 6: Product Receipt
Once the purchase order is confirmed, the product receipt will be posted to record the receipt of the fixed asset.
Path: Procurement and sourcing > Purchase orders > Receiving products > Post product receipt
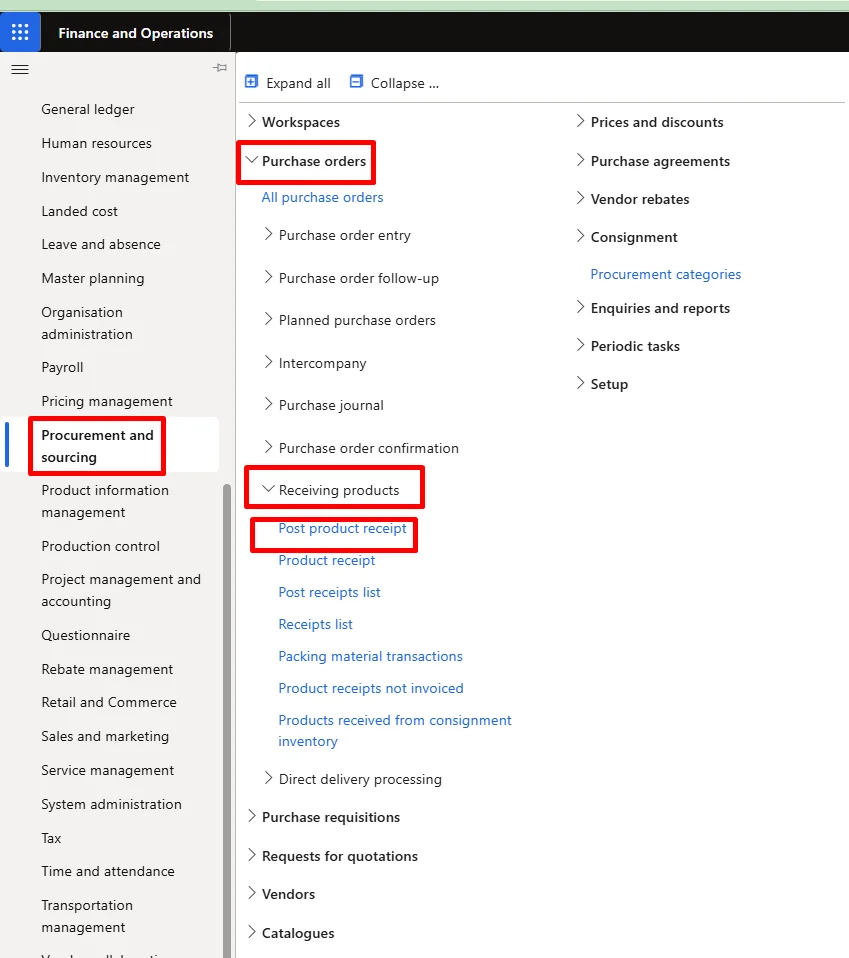
Below screen will appear. Select the purchase order, enter the product receipt number & then click on ok to post the product receipt.
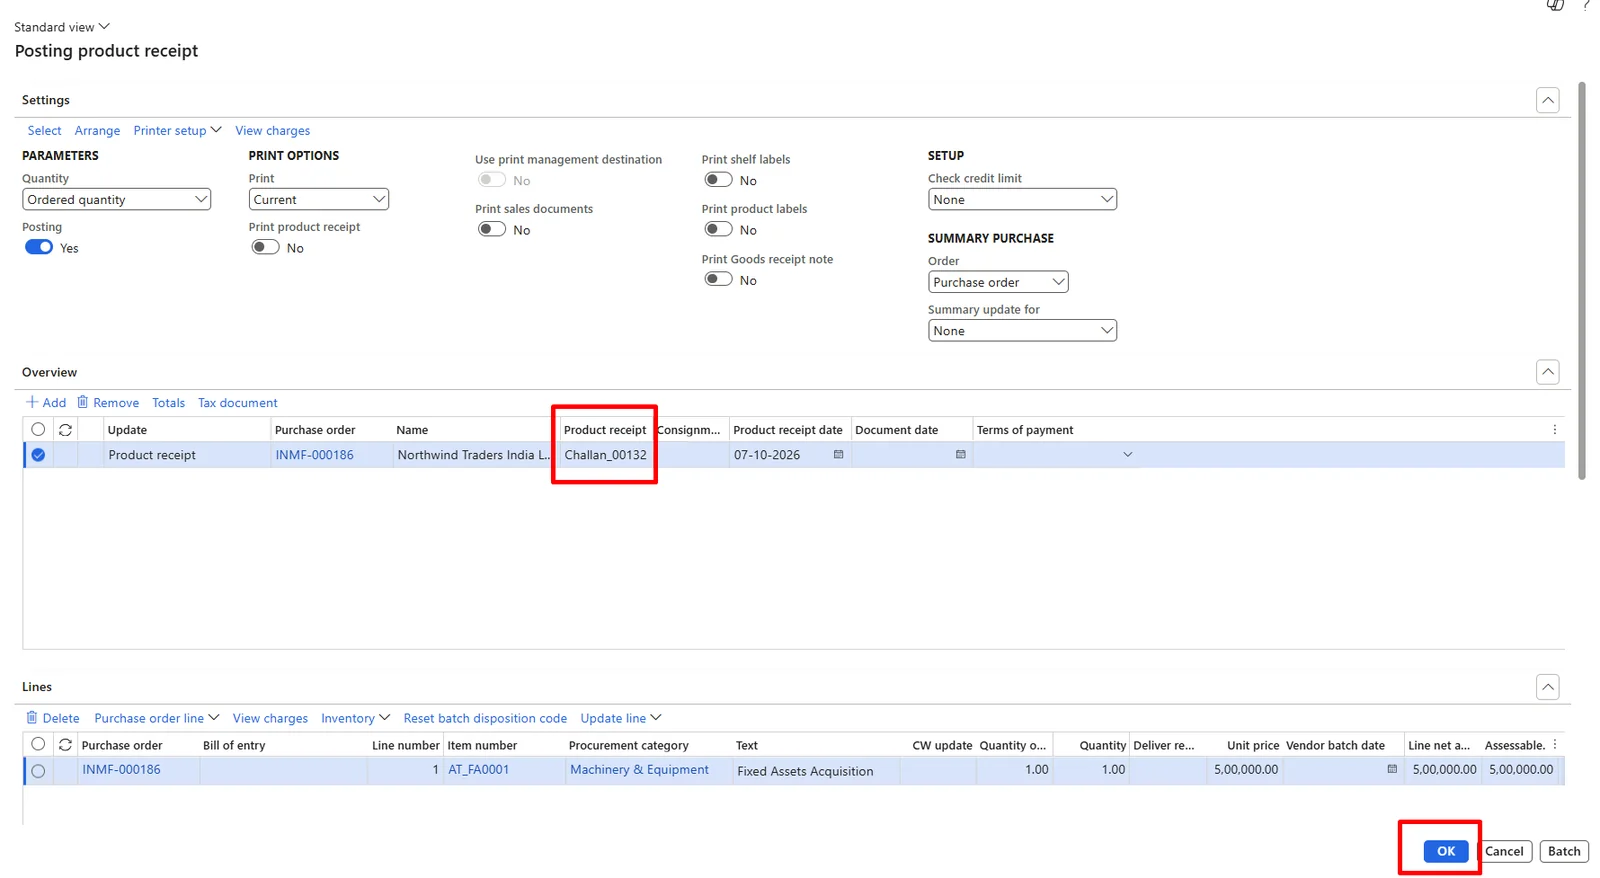
Product receipt voucher: - On posting the product receipt, the system debits Fixed assets – receipt and credits Accrued Purchases with 5,00,000.00 (voucher INMF-100000018).

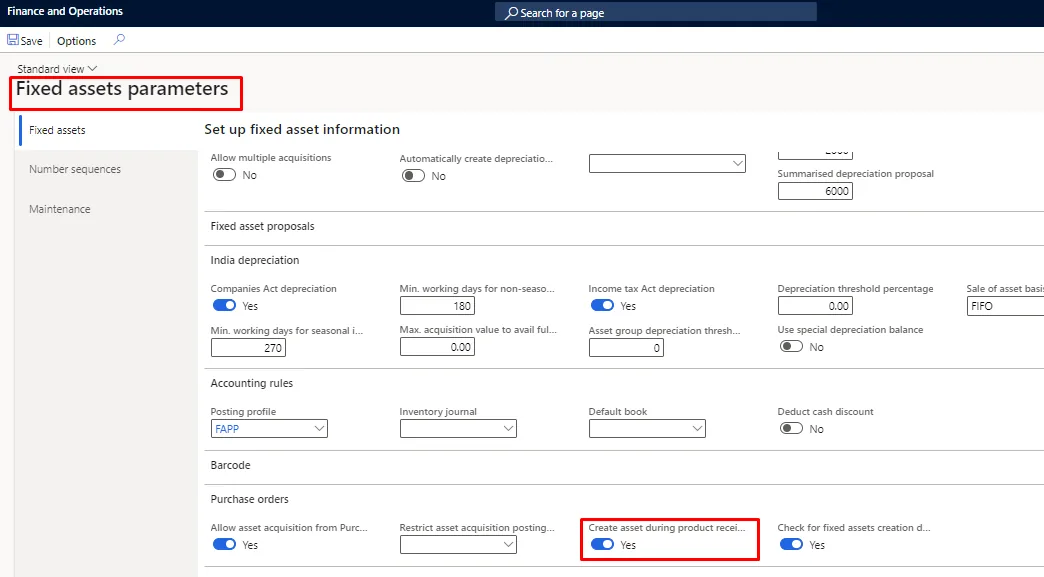
Note: - As in the Fixed assets parameters, we have enabled the ‘create asset during product receipt’ Boolean, the Fixed asset is created in the system once the product receipt has been posted.
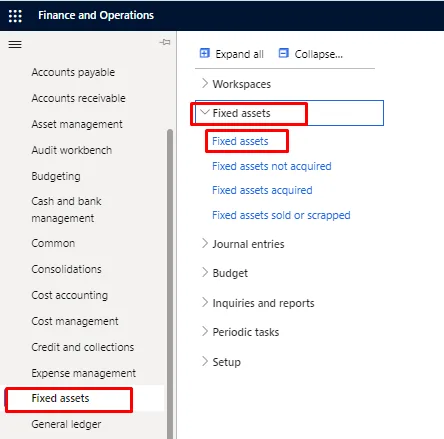
For viewing the fixed asset: - Go to the fixed asset module, click on fixed assets under the fixed Assets section.
Below screen will appear. Here we can see the fixed asset created after posting the product receipt.
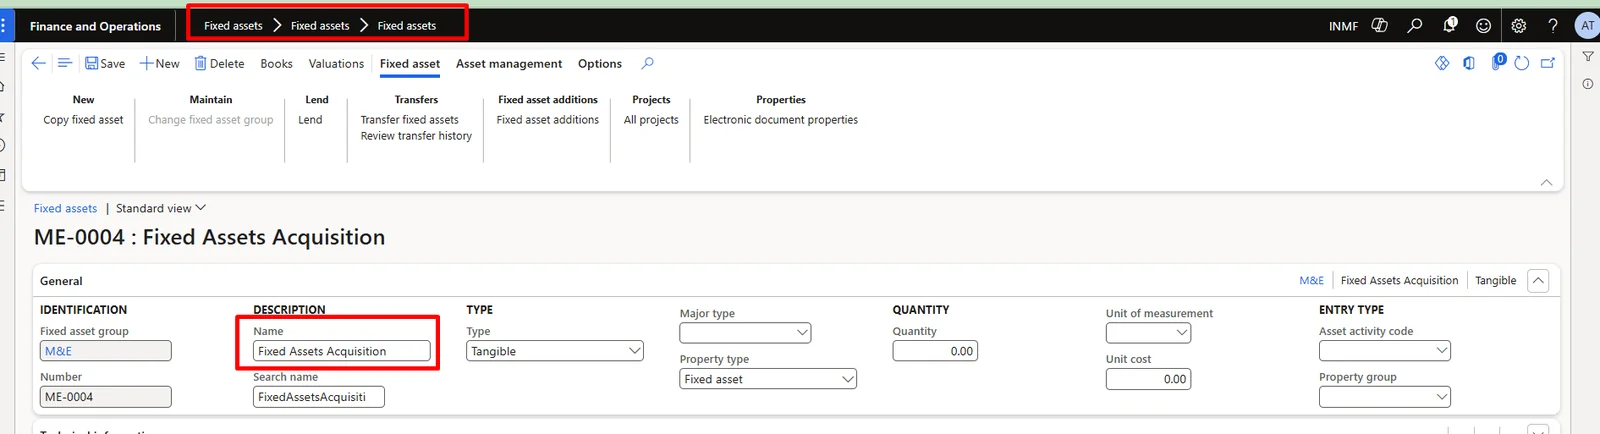
Note: - In the above screenshot we can see that the name of the Fixed asset created by the system will be the name of the service item selected at the Purchase requisition. In our case the name of the service item was ‘Fixed Assets Acquisition’.
User can change the name of fixed asset according to their requirement. For editing the name of the fixed asset, click on edit button at the action pane.
Once clicked on edit button, the fixed asset name can be edited. We changed the name of the fixed asset from ‘Fixed Assets Acquisition’ to ‘Equipment - 2’. After changing the name click on save button.
Step 7: Invoicing
Once the product receipt has been posted, the invoice will be booked to record the vendor liability. For posting the purchase invoice against the product receipt follow the below path.
Path: - Accounts payable > Invoices > Pending vendor invoices
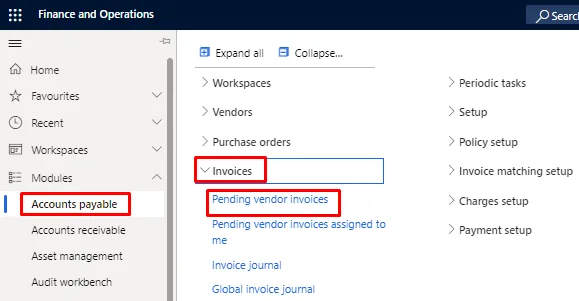
Below screen will appear. Click on ‘From product receipt’ button under the vendor invoice tab in action pane.
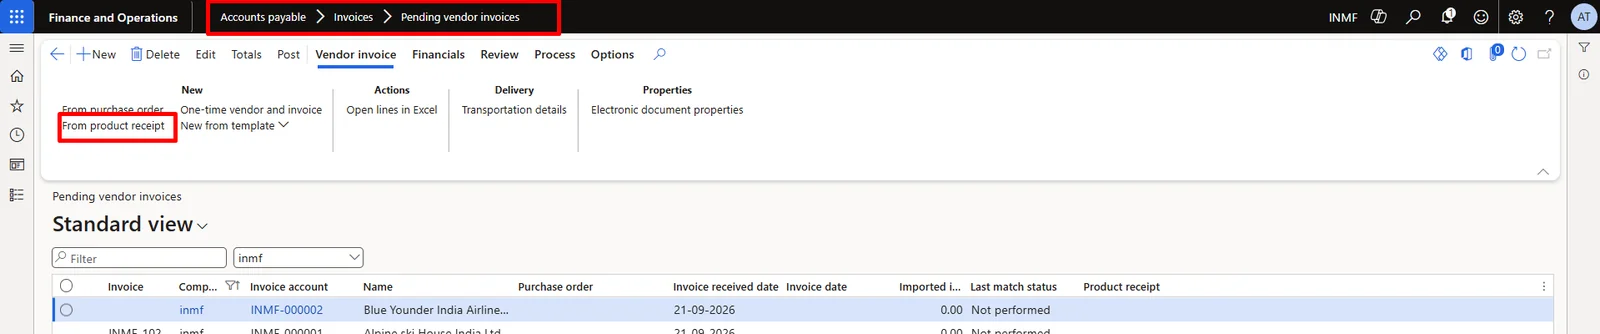
Below screen will appear. Select the product receipt against which the vendor invoice is to be posted & then click on ok button.
Enter the vendor invoice number & invoice date & then click on post to post the vendor invoice.
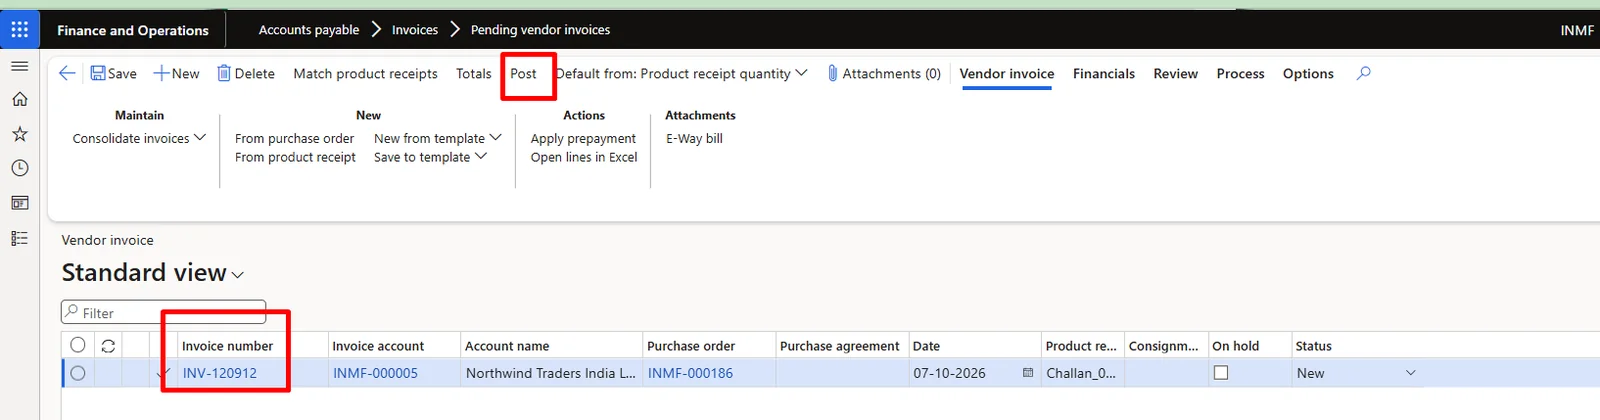
Once the vendor invoice is posted, the FA will be acquired in both books i.e., Company Act & Income Tax Act. The voucher posted for both the books is attached for reference.
Posted voucher: - The lines with posting layer ‘Current’ are the posting for the Company Act book: Machine & Equipment is debited with 5,00,000.00 and IGST recoverable with 90,000.00 against Accounts Payable – Domestic of 5,90,000.00, and the product receipt accrual is reversed. The lines with posting layer ‘Tax’ are the posting for the Income Tax Act book, where Machine & Equipment is debited and Fix assets control GL is credited with 5,00,000.00.
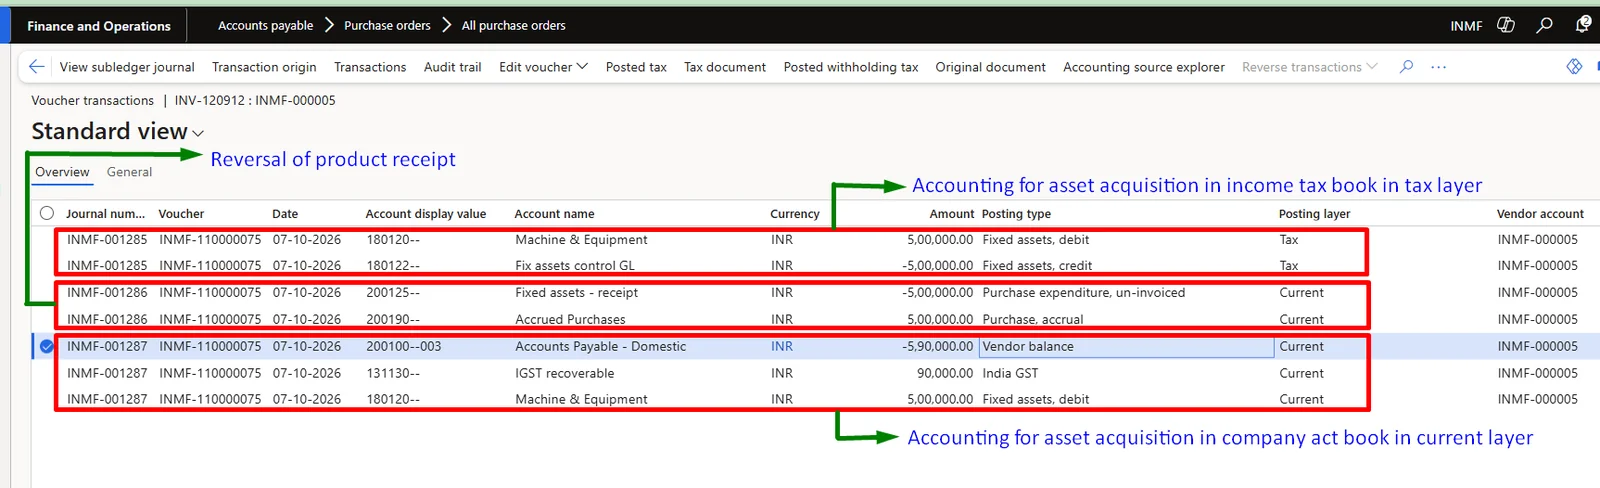
Note: - As mentioned in the setup part, by defining the derived book (IT Act Book) at Company Act book for Acquisition, fixed asset will be acquired at both the books i.e., Company Act as well as Income Tax Act.
For viewing the valuation of the fixed asset acquired, follow the below path.
Path: - Go to the fixed asset module, click on fixed assets under the fixed Assets section.
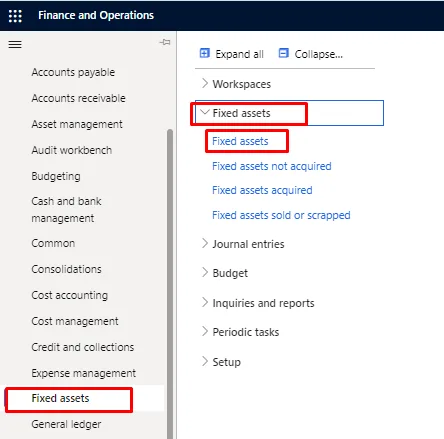
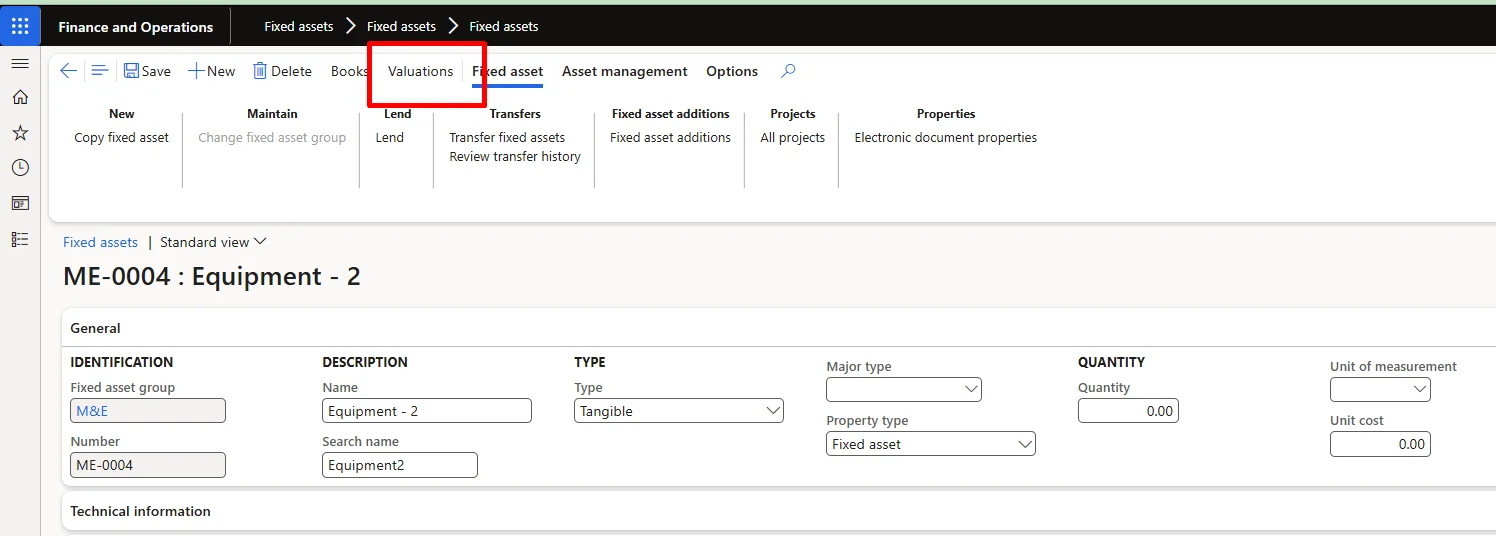
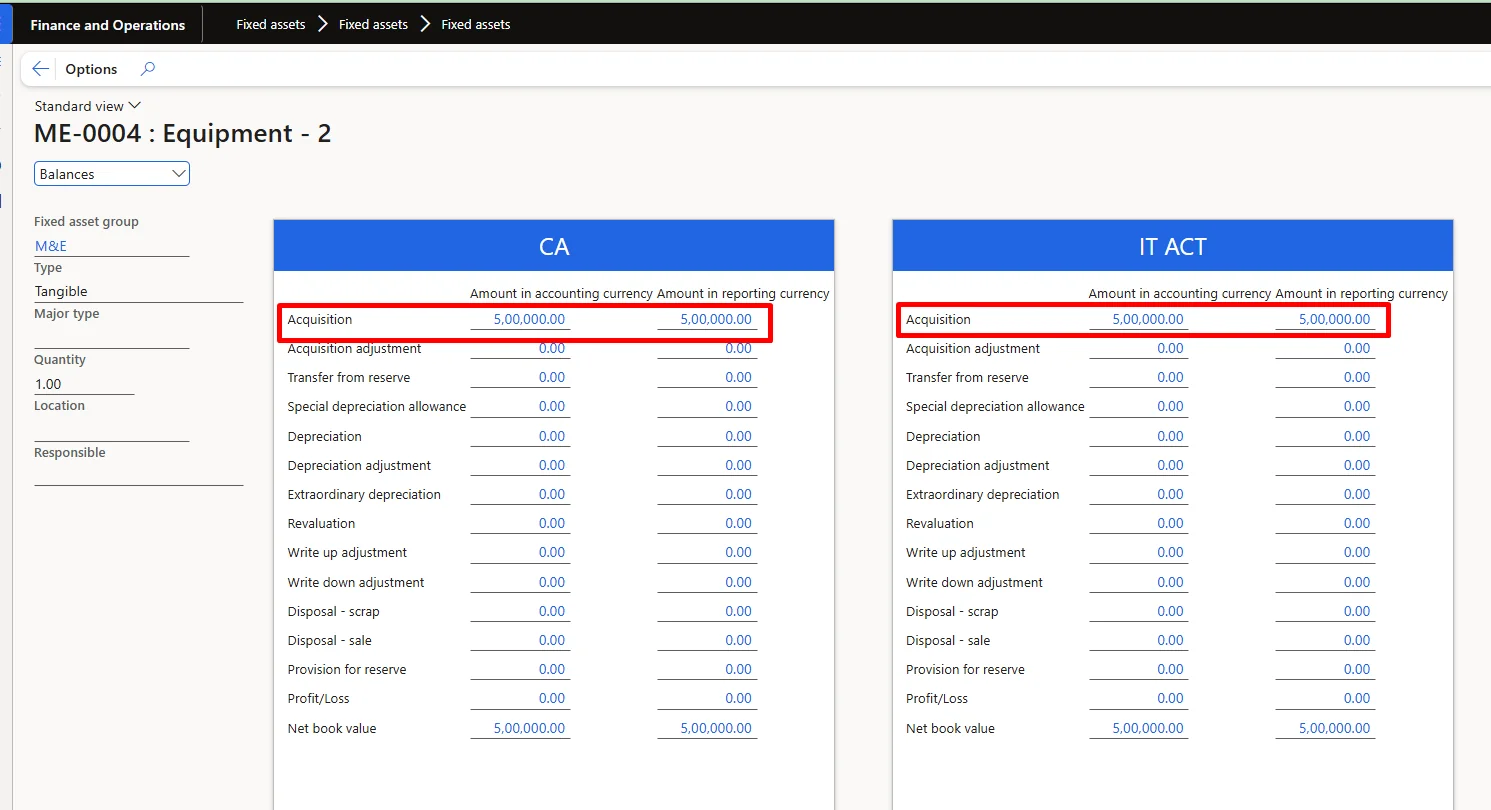
Below screen will appear. Select the Fixed asset and then click on ‘Valuations’ tab at the action pane.
Valuation of the Fixed asset
Acquisition of Fixed Asset from Purchase order.
The process for acquiring the Fixed asset: In the case of acquiring the Fixed asset directly from the purchase order, there is no need to create a purchase requisition. A direct purchase order will be created & after creating the purchase order, the purchaser will select the service item in line level for procuring the fixed asset and will select the fixed asset group of which the FA is being procured as shown below.
Step 1: Creation of Purchase Order
For the manual creation of a purchase order, follow the below path.
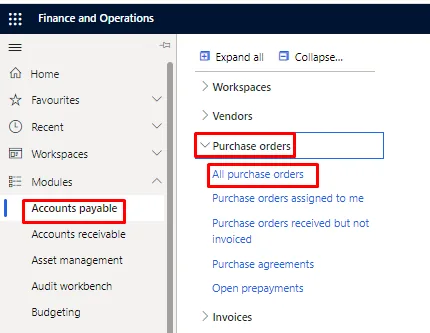
Path: - Accounts payable > Purchase orders > All purchase orders
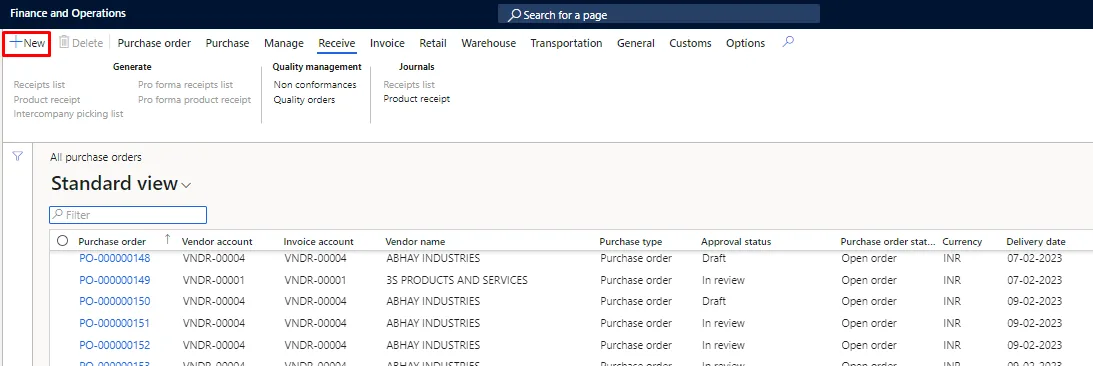
Below screen will appear. Click on new to create a new purchase order.
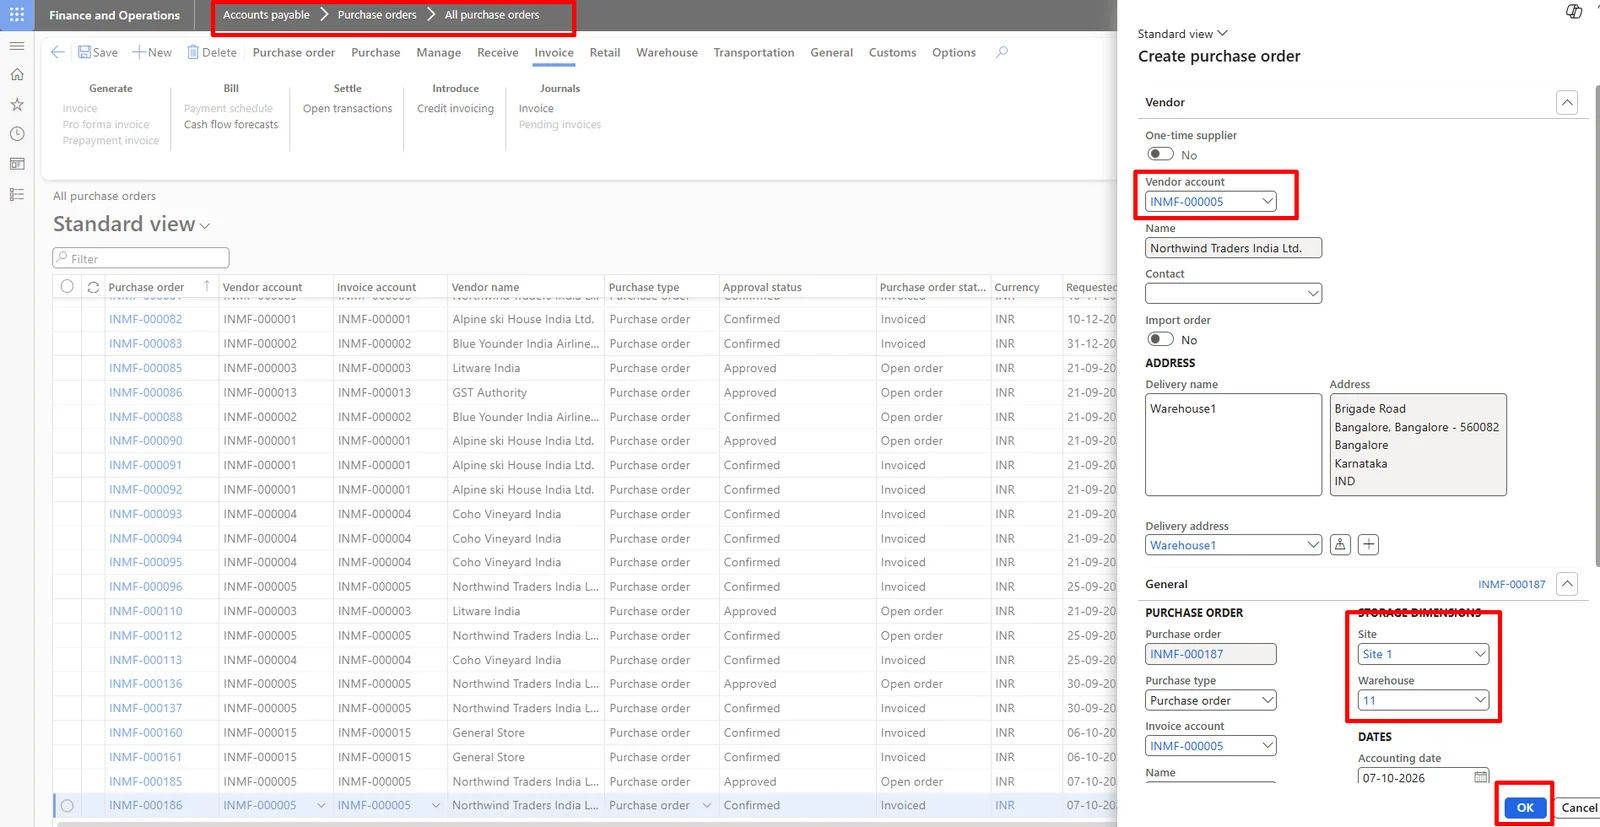
Fill in the required details such as vendor account, site, warehouse, etc., then click on ok.
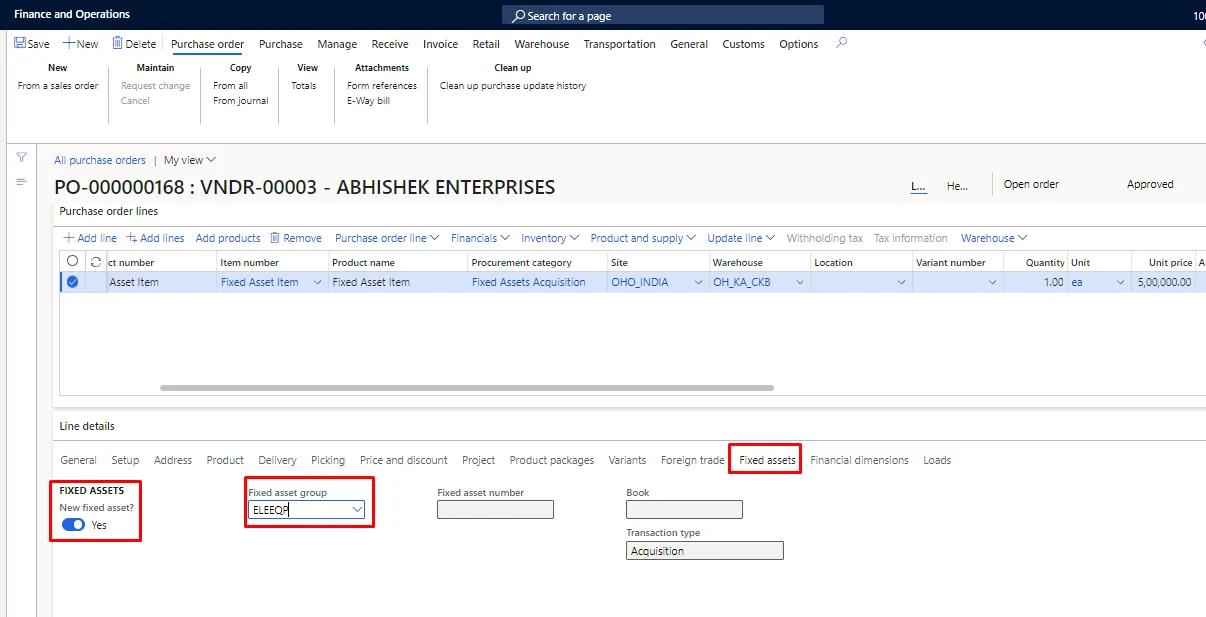
Below screen will appear. Select the service item for fixed asset at line level.
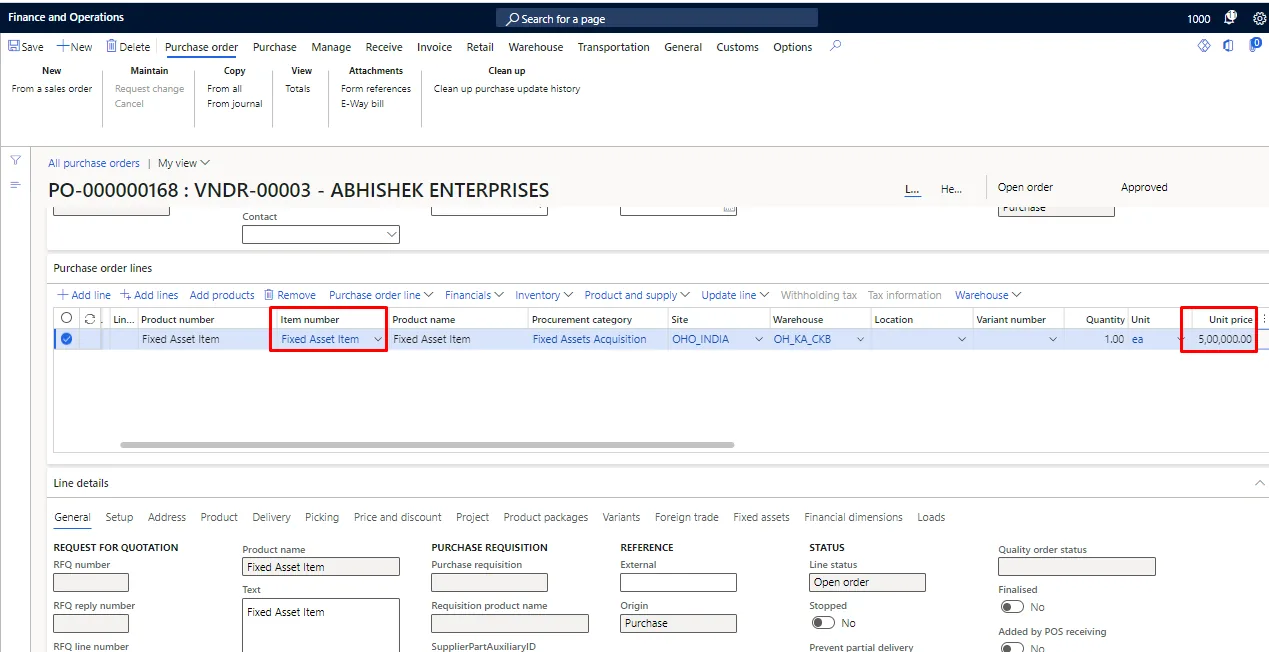
Enable the ‘new fixed asset?’ Boolean & add the Fixed asset group at the Fixed assets section at line details.
Notes: -
- While acquiring the Fixed asset directly from the purchase order, there is option to define the Fixed asset card as was not available while acquitting the fixed asset through purchase requisition.
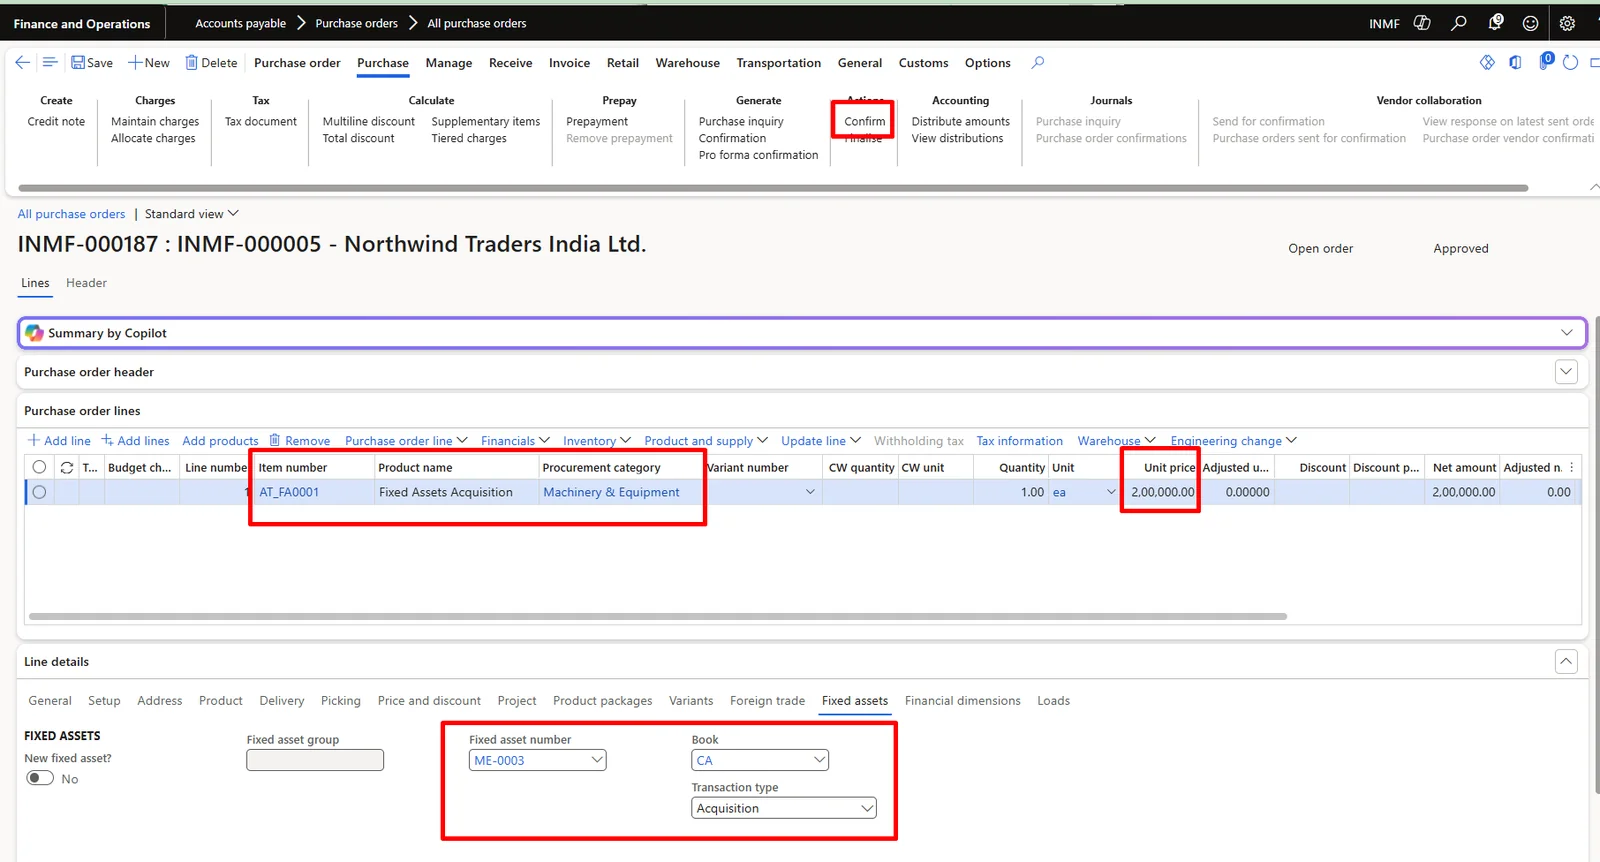
- The Fixed asset will be created manually & will be added on the purchase order lines.
- In this case there is no need to change the fixed asset name as the fixed asset is created in advance and is added on the purchase order lines for acquisition.
- In case of attaching the fixed asset card at line details, there is no need to enable the ‘new fixed assets?’ Boolean. Only the Fixed asset number is required to attach at line details.
Step 2: Purchase Order Confirmation
Refer step 5 of section a (Acquisition of fixed asset from purchase requisition).
Step 3: Product Receipt
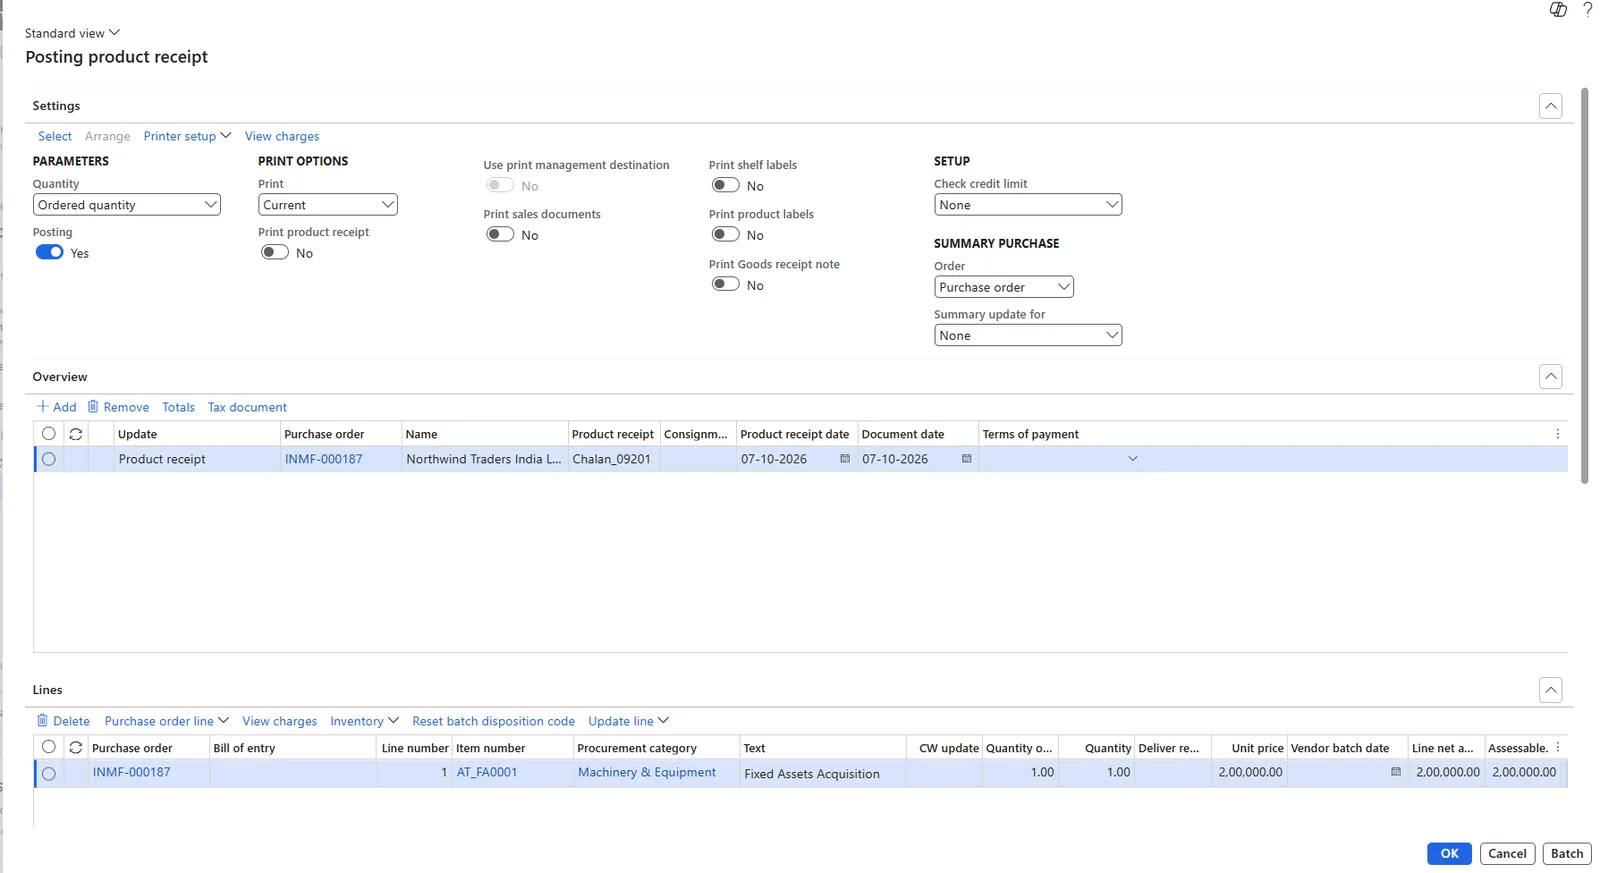
Refer step 6 of section a (Acquisition of fixed asset from purchase requisition). Below screen shows the product receipt posted for purchase order INMF-000187.
Step 4: Invoicing
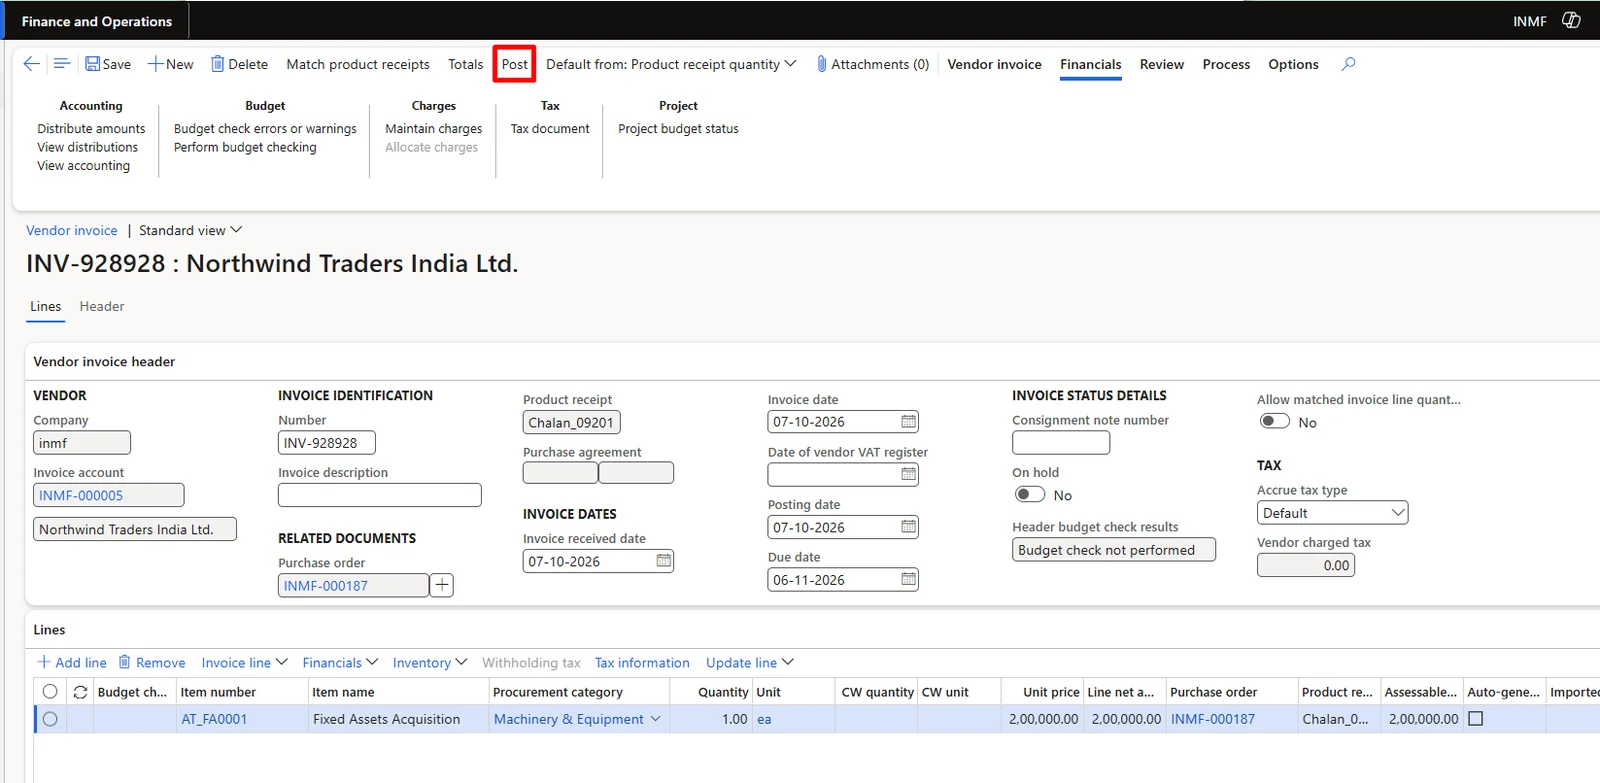
Refer step 7 of section a (Acquisition of fixed asset from purchase requisition). Below screen shows the vendor invoice posted against the product receipt. Machine & Equipment is debited with 2,00,000.00 and IGST recoverable with 36,000.00 against Accounts Payable – Domestic of 2,36,000.00 in the current layer, with the same acquisition of 2,00,000.00 posted in the tax layer (voucher INMF-110000077).
Acquisition of Fixed Asset from vendor invoice journal
In case, the business doesn’t want to go through the lengthy process of acquiring the fixed asset through Purchase requisition to purchase order or direct purchase order, they can use the vendor invoice journal to acquire the fixed asset. The user must create the Fixed asset first so that it can be attached to the vendor invoice journal.
Step 1: Creation of Vendor Invoice journal
For creating the vendor invoice journal, follow the below path.
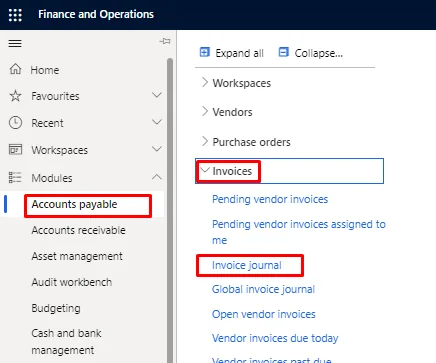
Path: - Accounts payable > Invoices > Invoice journal
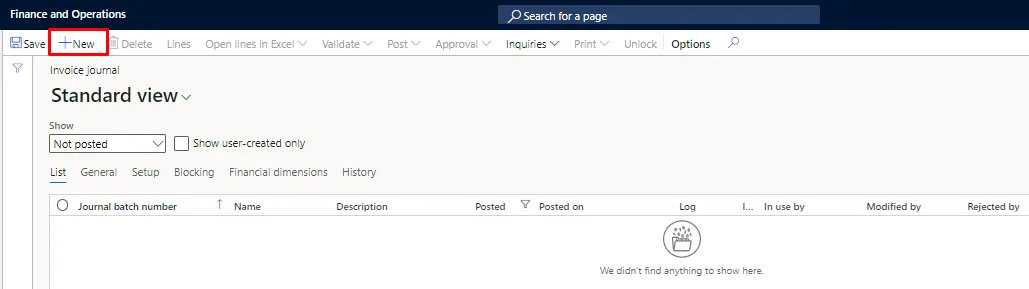
Click on the new button.
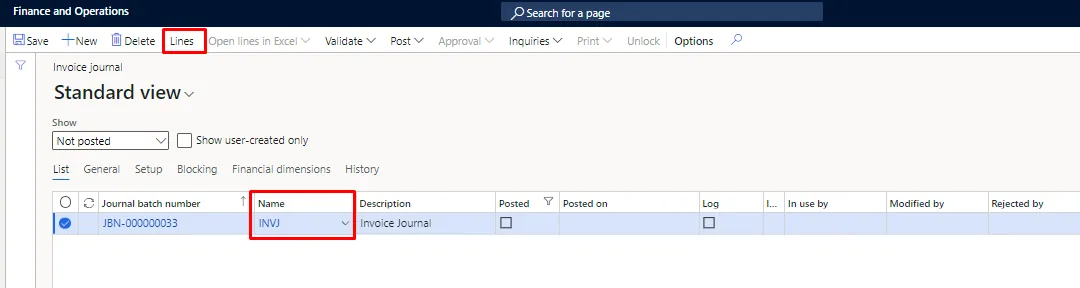
Select the journal lines & then click on lines.
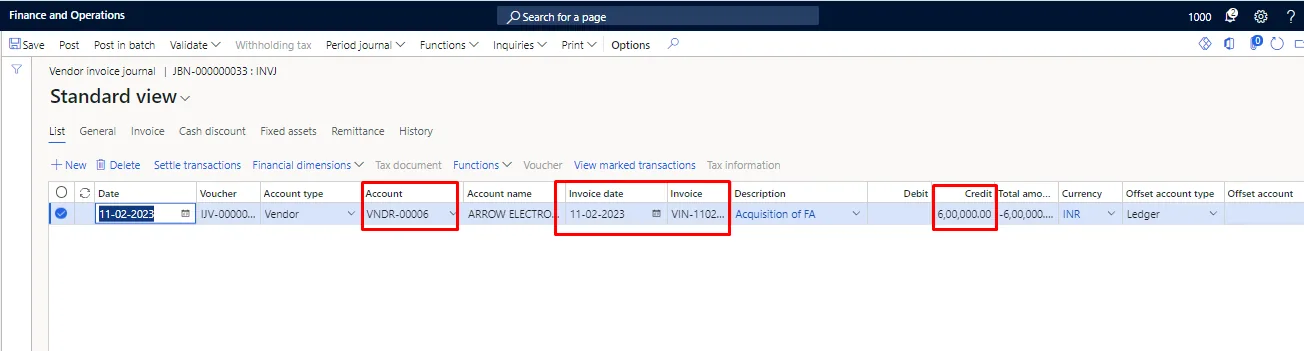
Below screen will appear. Select the vendor code, enter the invoice date, invoice number & invoice amount.
Change the offset account type from ledger to ‘Fixed assets’
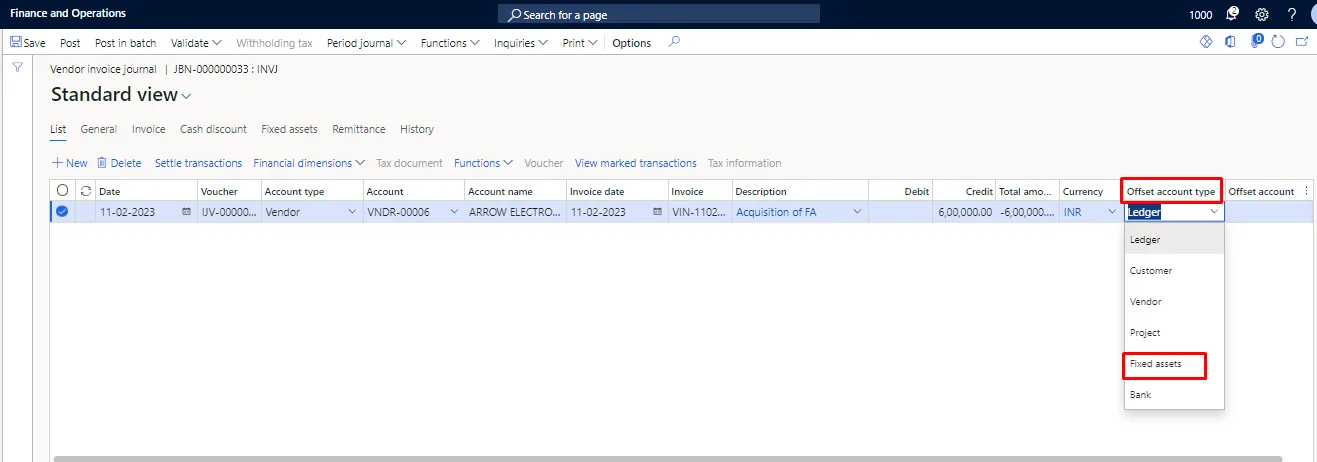
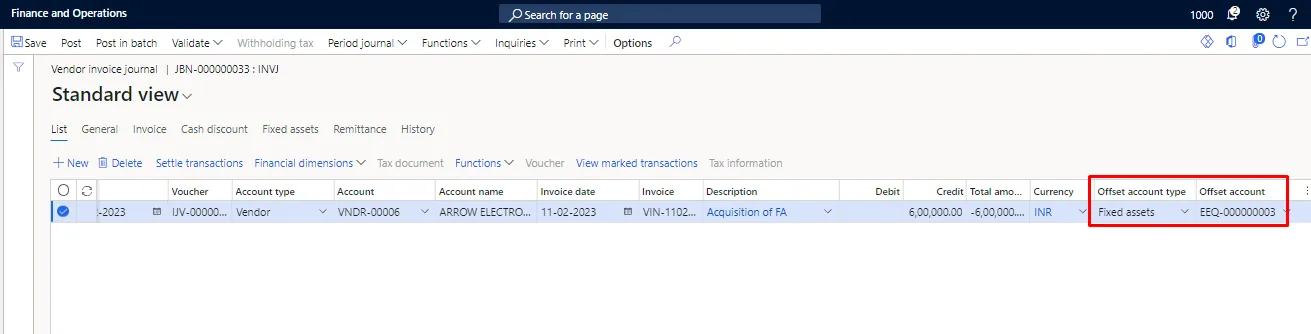
Select the fixed asset card in the offset account.
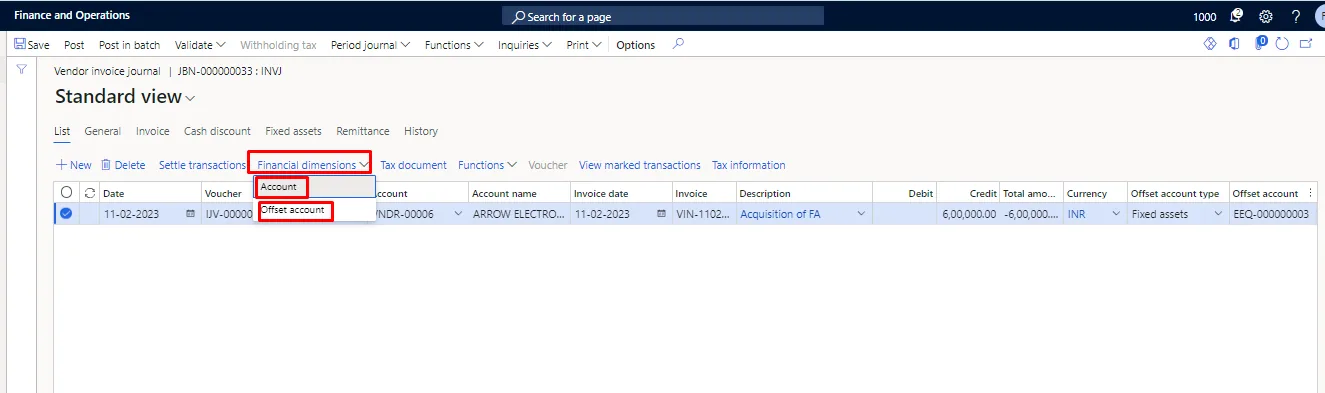
Enter the financial dimensions for an account and the offset account.
Step 2: Validate and post the vendor invoice journal.
After entering all the required details, validate the vendor invoice journal & then post it.
For validating the journal, click on ‘simulate posting’ under the validate tab in the action pane.
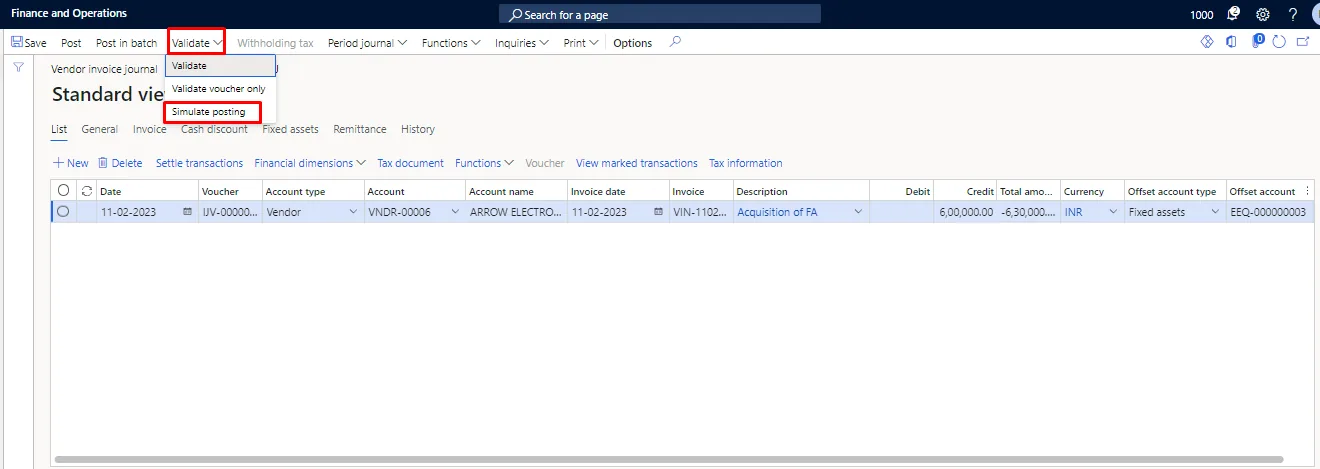
Once simulated, the system will reflect the error if any otherwise the operation will be completed.
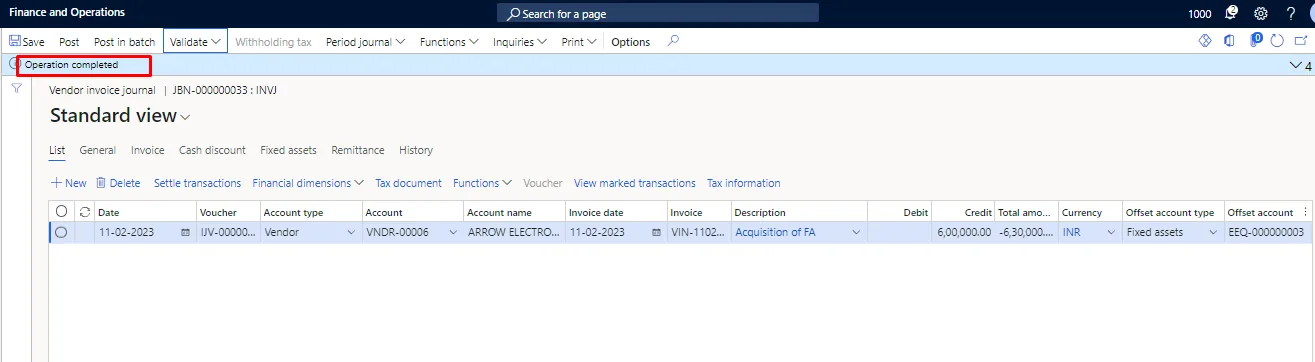
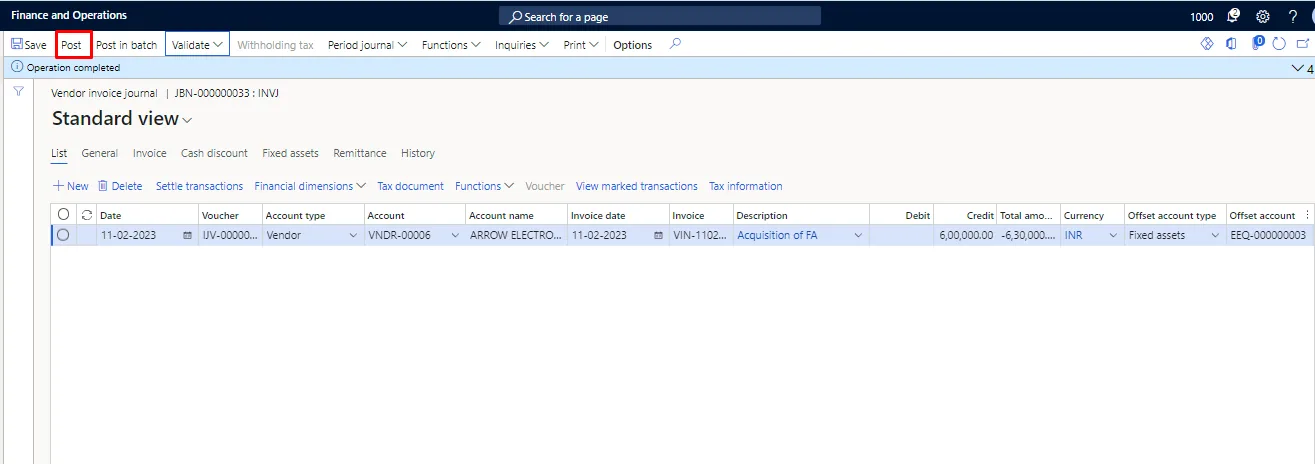
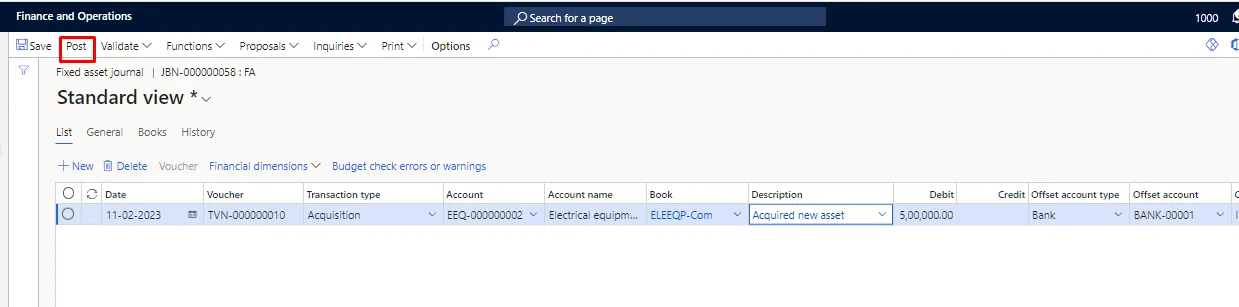
Once stimulated, post the fixed asset journal. For posting the journal, click on post button in the action pane.
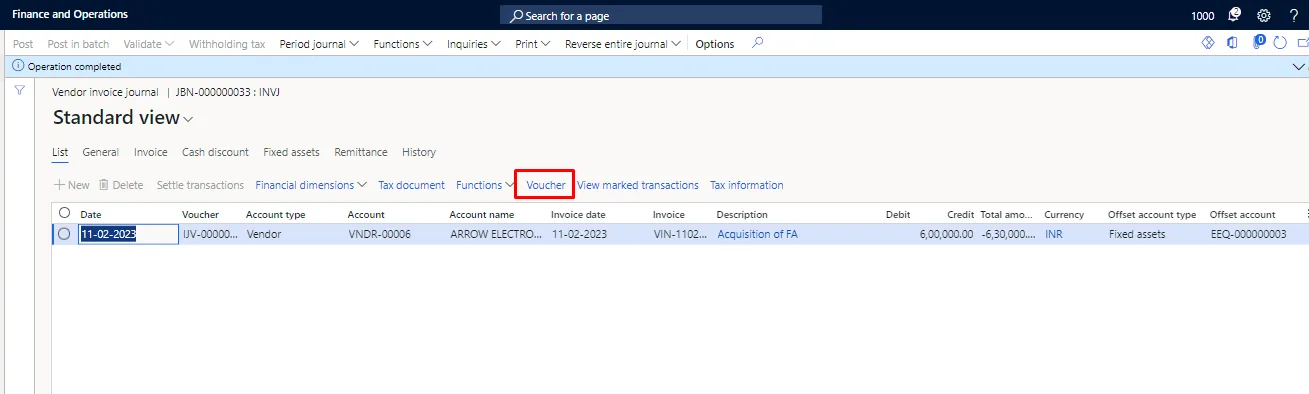
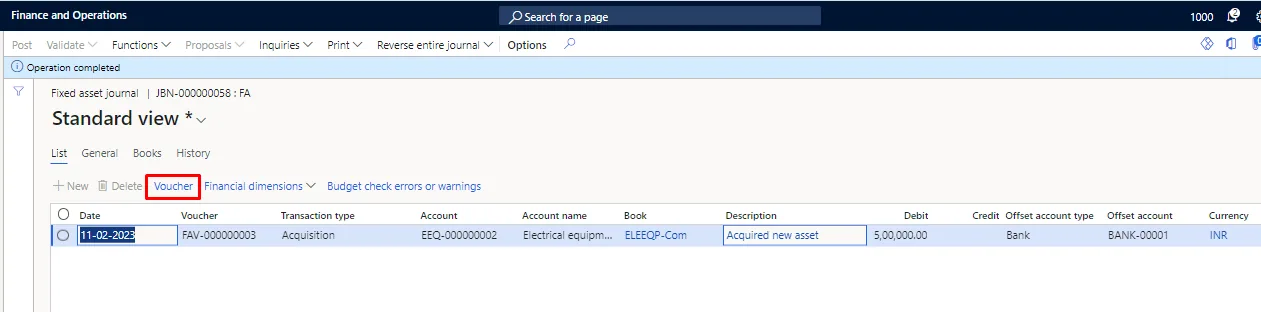
For viewing the voucher posted for acquisition, click on the voucher.
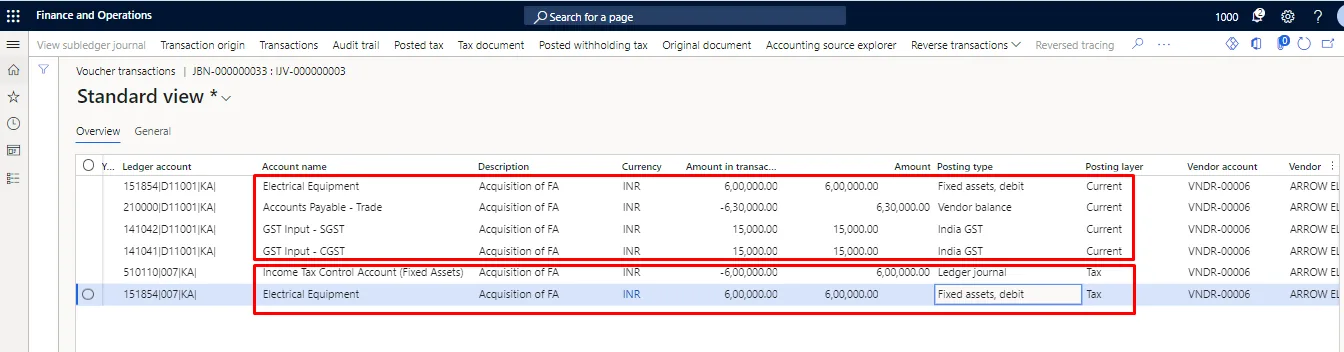
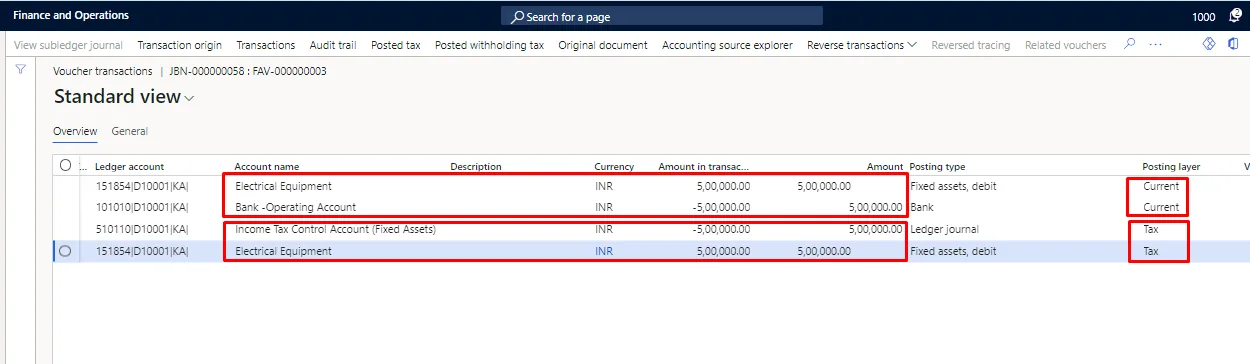
Posted voucher: In the below screenshot we can see that the system has posted the accounting entry in the current layer as well as the tax layer based on which the fixed asset has been acquired in both the Books i.e., Company Act & Income Tax Act.
Valuation of the Fixed asset
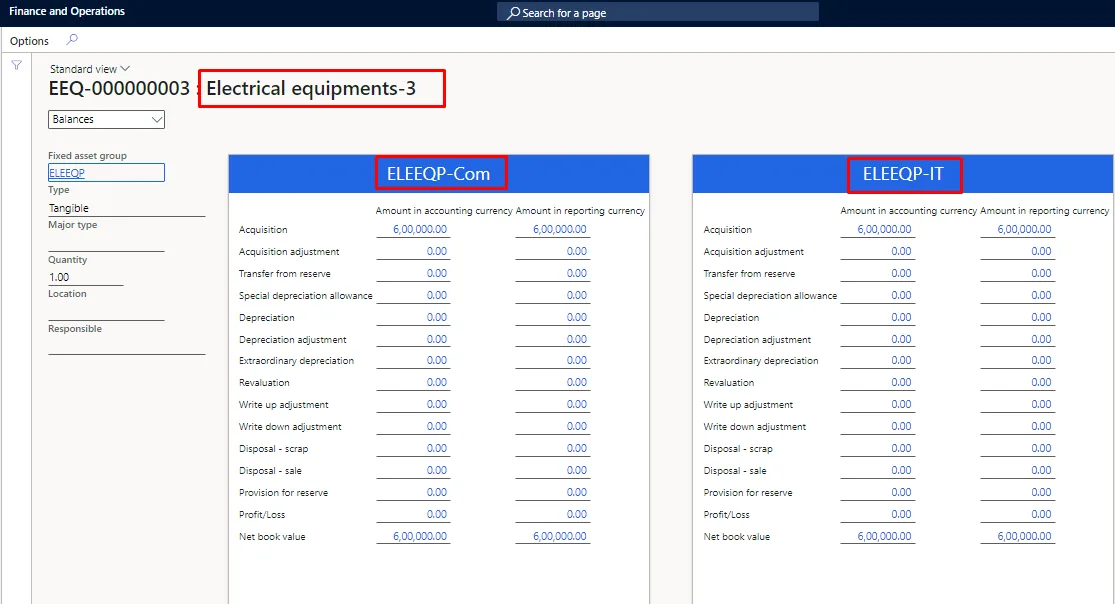
Acquisition of Fixed Asset from Fixed Asset journal
Apart from acquiring the Fixed asset from Purchase requisition to Purchase order or direct purchase order, the same can be acquired through the Fixed asset journal. The user must create the Fixed asset first so that it can be attached to the Fixed asset journal.
In our scenario, we create a new fixed asset with the name ‘Electrical equipments-2’.
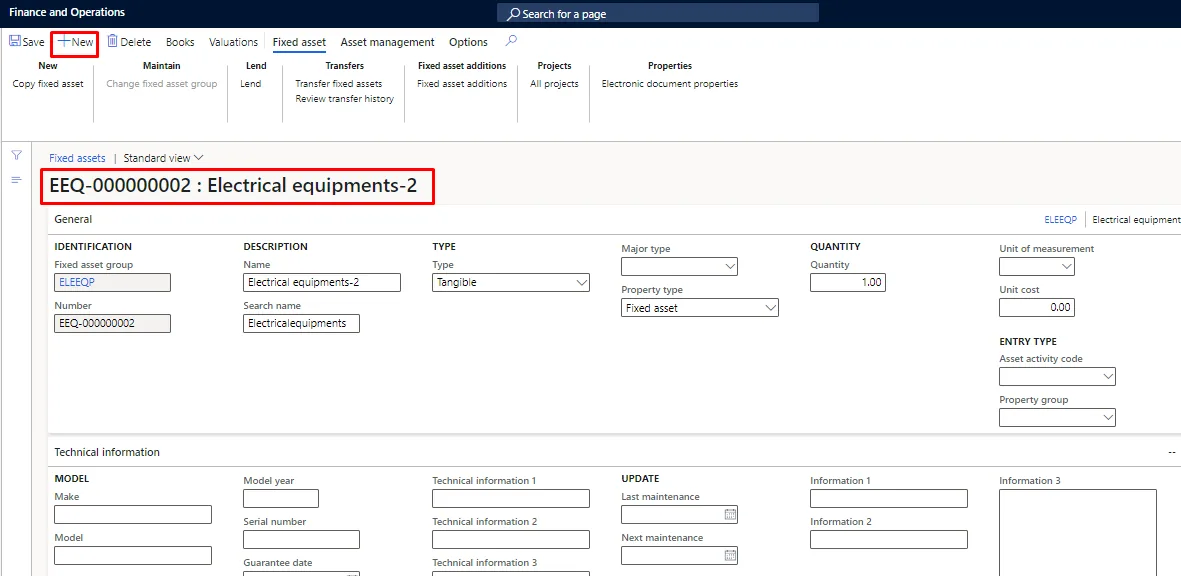
Step 1: Creation of Fixed asset journal
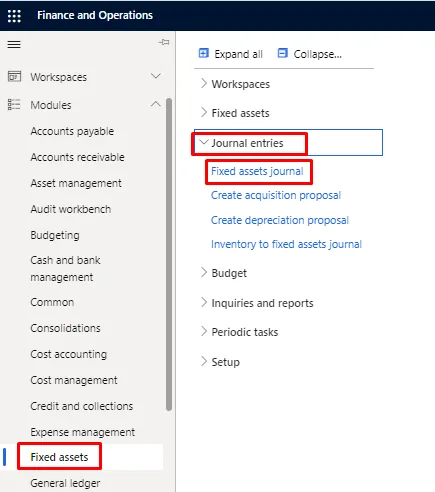
For creating the fixed asset journal, follow the below path.
Path: - Fixed Assets > Journal entries > Fixed assets journal
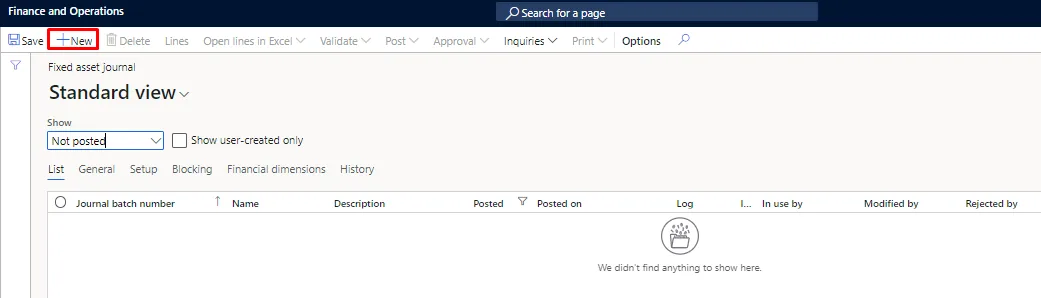
Click on New button.
Select the journal lines & then click on lines.
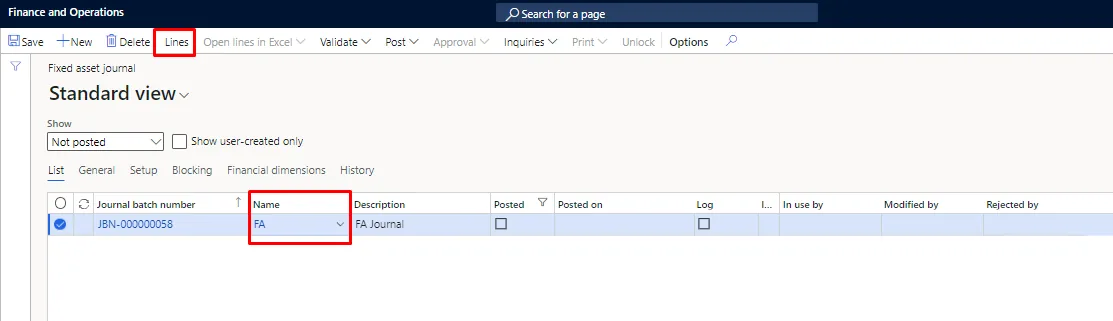
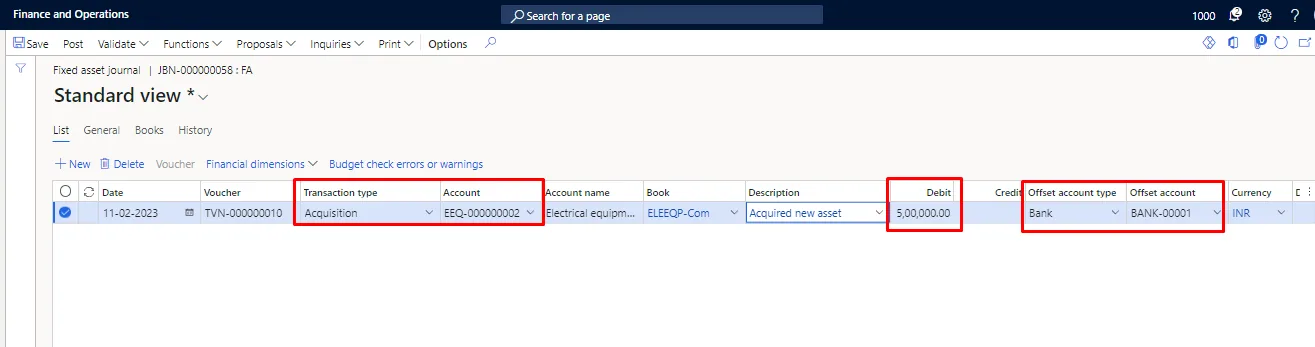
Below screen will appear. Enter the acquisition Select the transaction type as ‘Acquisition’, and select the Fixed asset in the account section. Enter the amount & define the offset account type & offset account.
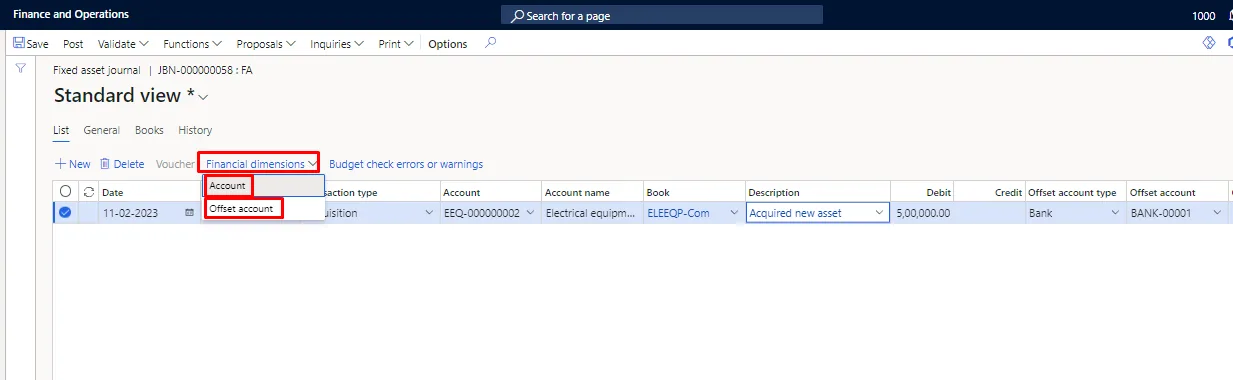
Enter the financial dimensions for an account and the offset account.
Step 2: Validate and post the Fixed asset journal.
After entering all the required details, validate the fixed asset journal & then post it.
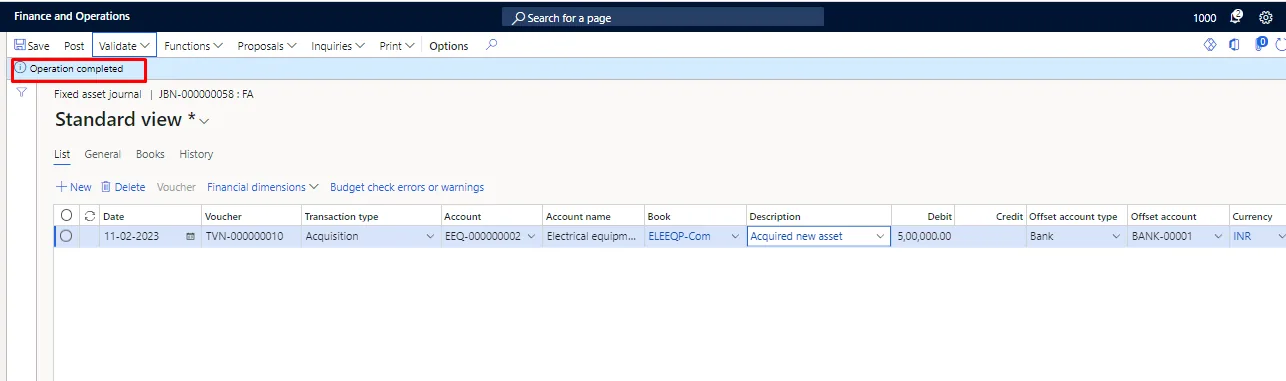
For validating the journal, click on ‘simulate posting’ under the validate tab in the action pane.
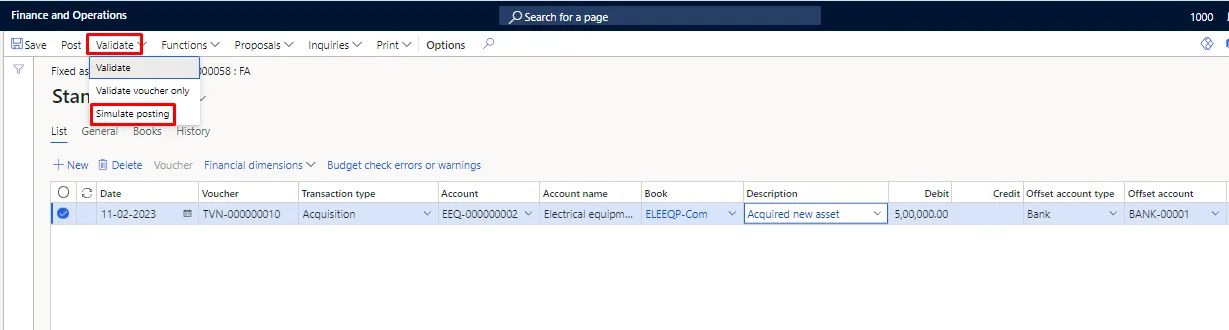
Once simulated, the system will reflect the error if any otherwise the operation will be completed.
Once stimulated, post the fixed asset journal. For posting the journal, click on post button in the action pane.
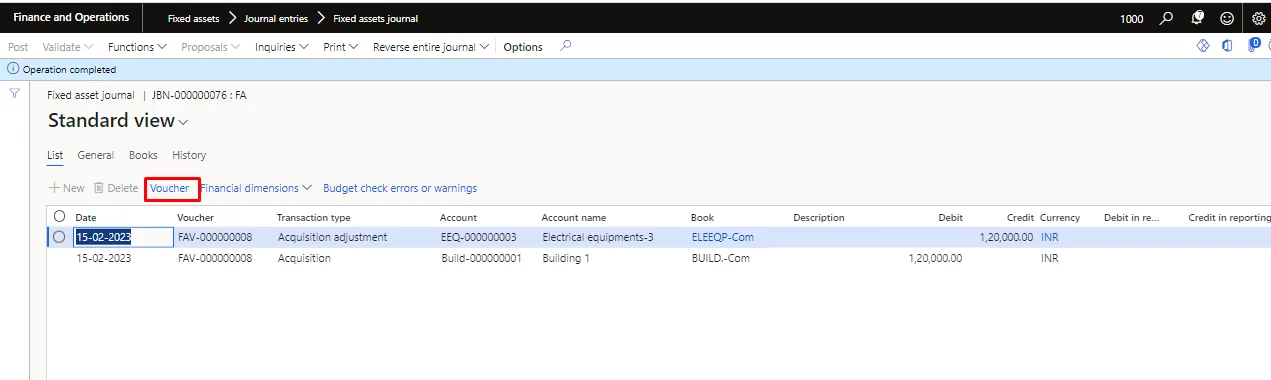
For viewing the voucher posted for acquisition, click on the voucher.
Posted voucher: In the below screenshot we can see that the system has posted the accounting entry in the current layer as well as the tax layer based on which the fixed asset has been acquired in both the Books i.e., Company Act & Income Tax Act.
Valuation of the Fixed asset
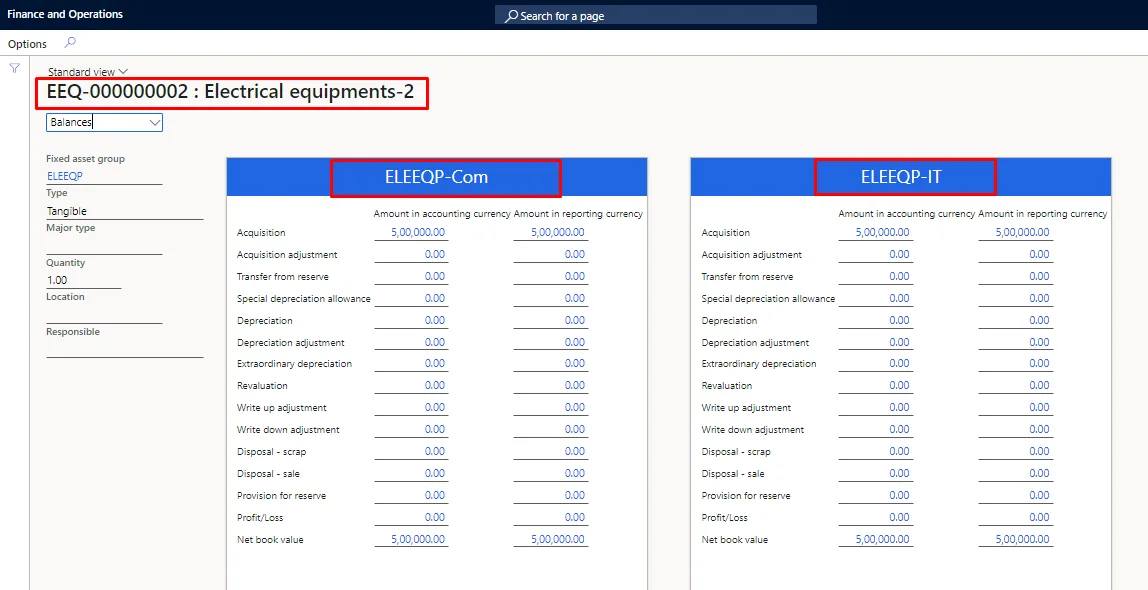
Note: - In the Fixed asset journal, we do not get the option to attach the HSN code. In other words, while using the Fixed asset journal to acquire the fixed assets, we cannot calculate GST. In case the Company is acquiring the fixed asset without GST, in that case, fixed asset journal can be used.
Depreciation on Fixed Assets
Depreciation is a periodic transaction that typically reduces the value of the fixed asset on the balance sheet, and is charged as an expenditure to a profit and loss account. Therefore, a main account is typically used to credit the periodic depreciation on the balance sheet i.e., accumulated depreciation account. An offset account is an account in the profit and loss part of the chart of accounts i.e., depreciation expenses account.
As the depreciation for Company Act & Income Tax Act is different, derived book for depreciation can’t be defined for the depreciation and as a result of which the depreciation proposal for Company Act as well as Income Tax Act will have to be posted in 2 separate journals.
Depreciation on Fixed Assets for Company Act Book
Step 1: Creation of Fixed asset journal
For creating the fixed asset journal, follow the below path.
Path: - Fixed Assets > Journal entries > Fixed assets journal
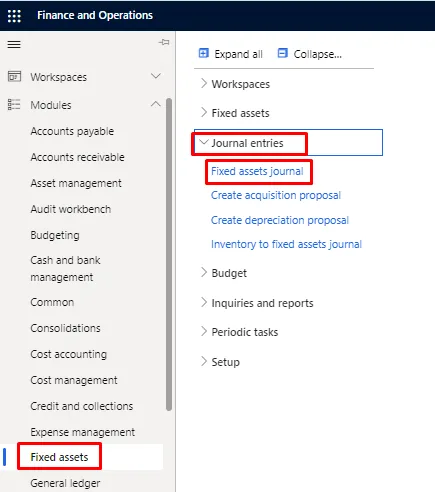
Click on New button.
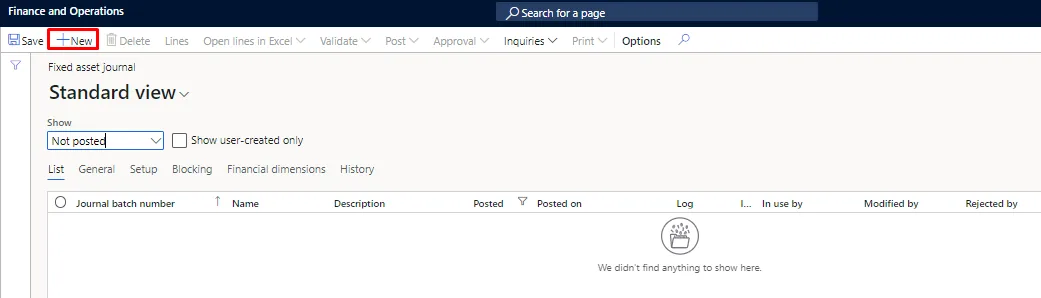
Select the journal lines & then click on lines.
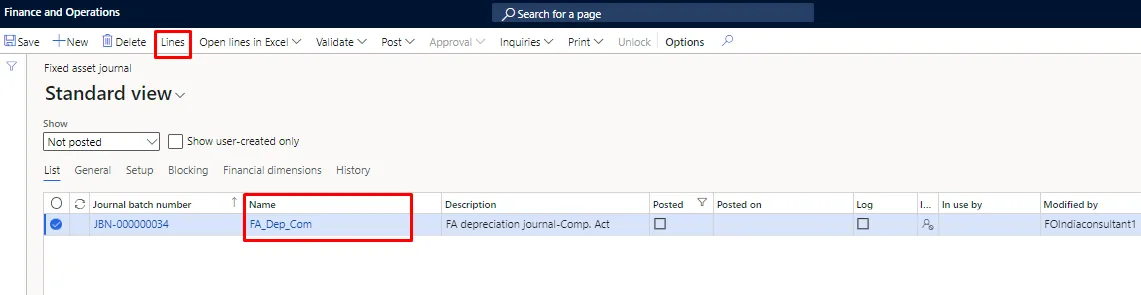
Step 2: Creation of Depreciation proposal
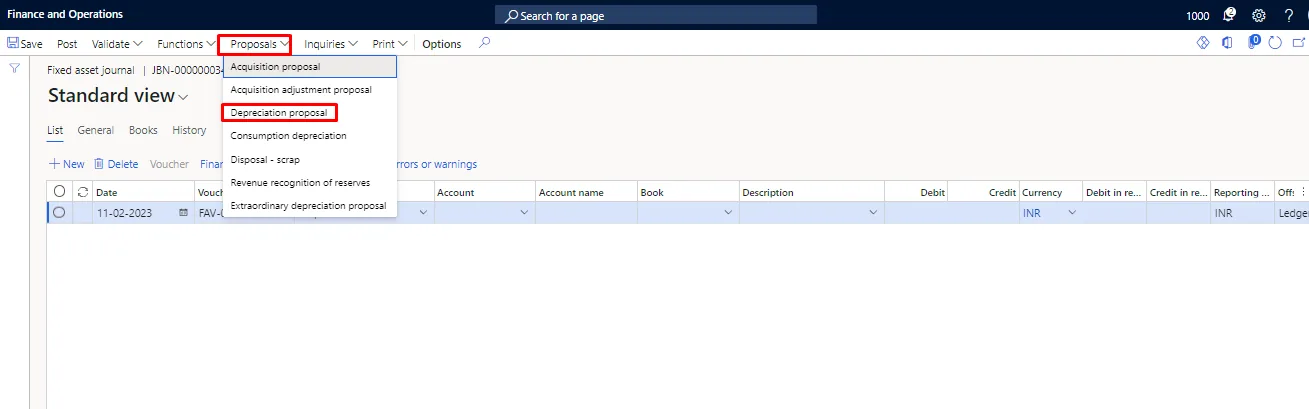
After clicking on the lines tab as defined above, below screen will appear. Click on ‘Depreciation proposal’ under the proposal tab in action pane.
Enter the necessary details & then click on ok button. As we are posting depreciation for Company Act book, we have filter the depreciation proposal for ‘current’ posting layer as shown below.
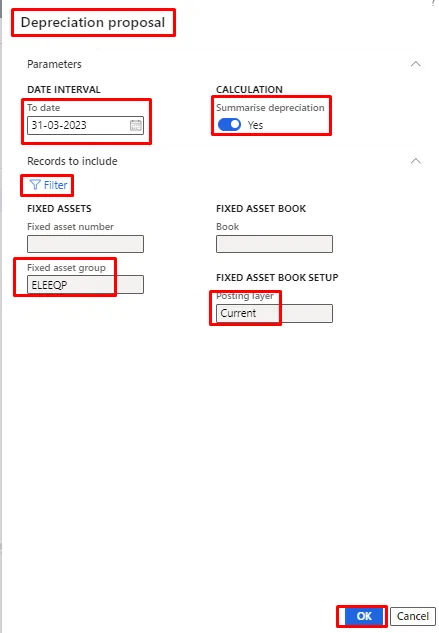
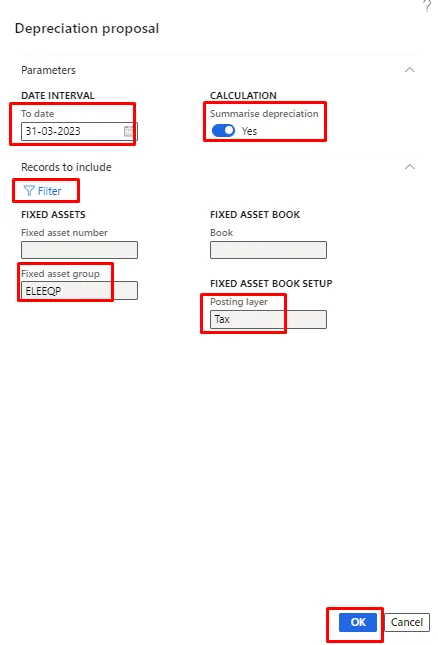
- To date means the date upto which the depreciation is to be calculated.
- Summarize depreciation boolean is used to summarize depreciations into one journal line.
- The depreciation proposal can be filtered by asset, asset group, or other criteria using the Filter option.
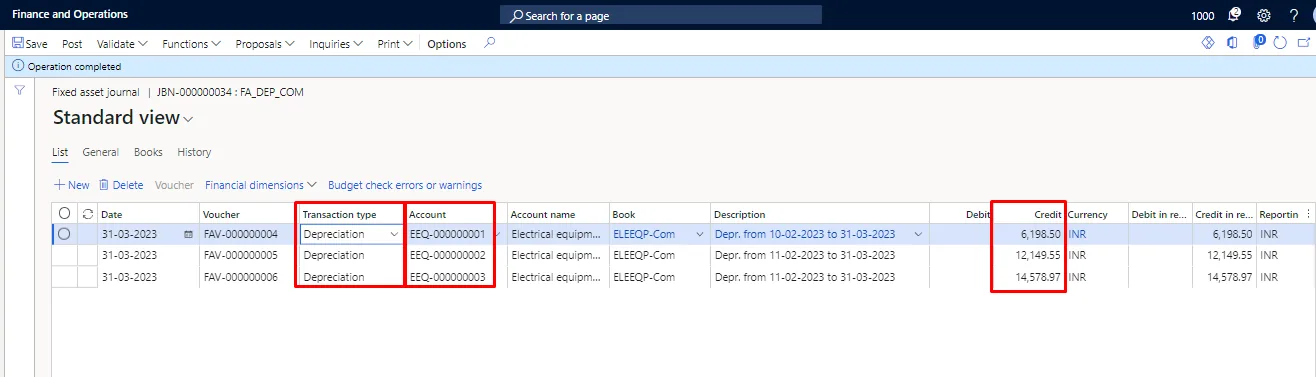
Once clicked on ok button for creating depreciation proposal, below screen will appear in which the depreciation lines will be created asset wise upto the period defined in the ‘to date’ field.
Step 3: Validate and post the Fixed asset journal.
After checking the depreciation amount calculated by the system, validate the fixed asset journal & then post it.
For validating the journal, click on ‘simulate posting’ under the validate tab in the action pane.
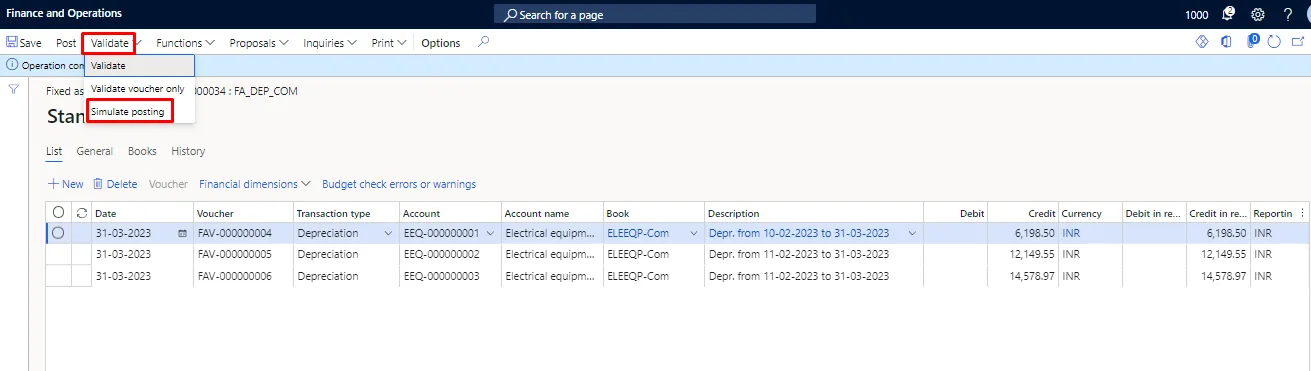
Once simulated, the system will reflect the error if any otherwise the operation will be completed.
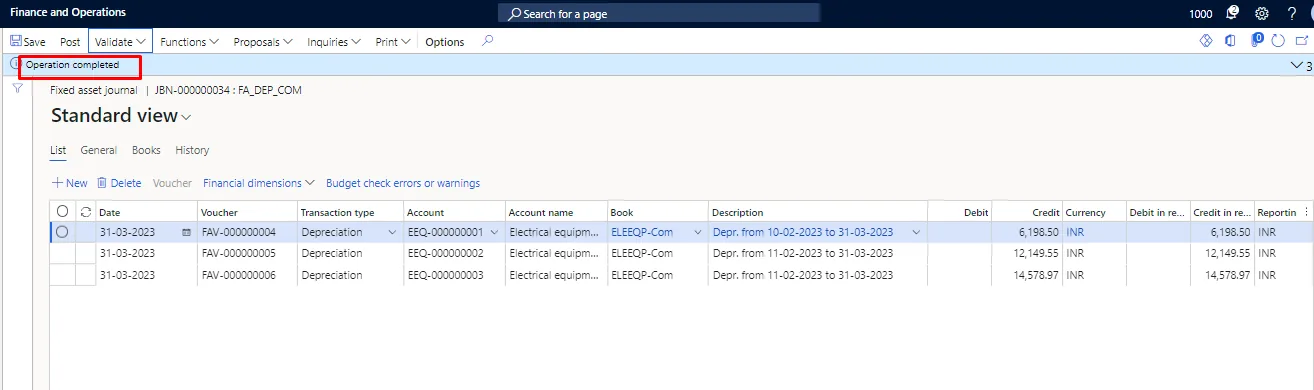
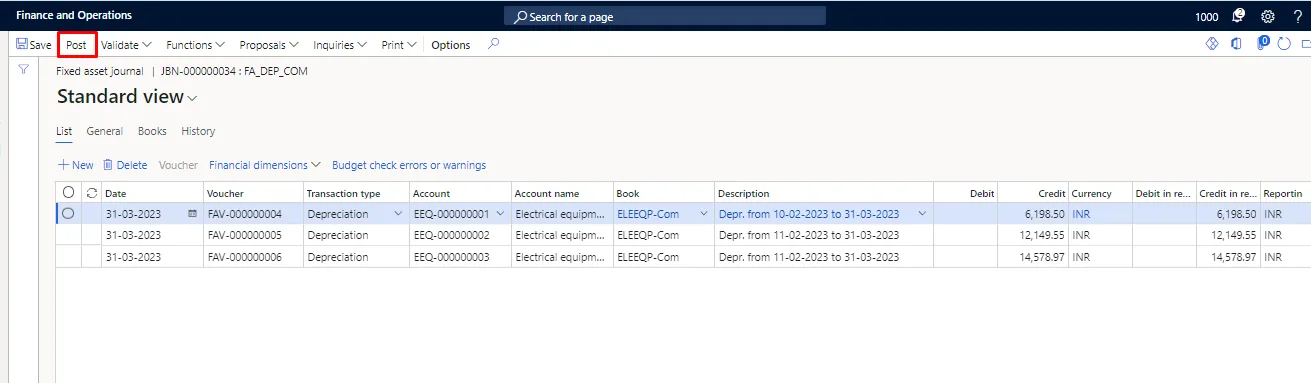
Once stimulated, post the fixed asset journal. For posting the journal, click on post button in the action pane.
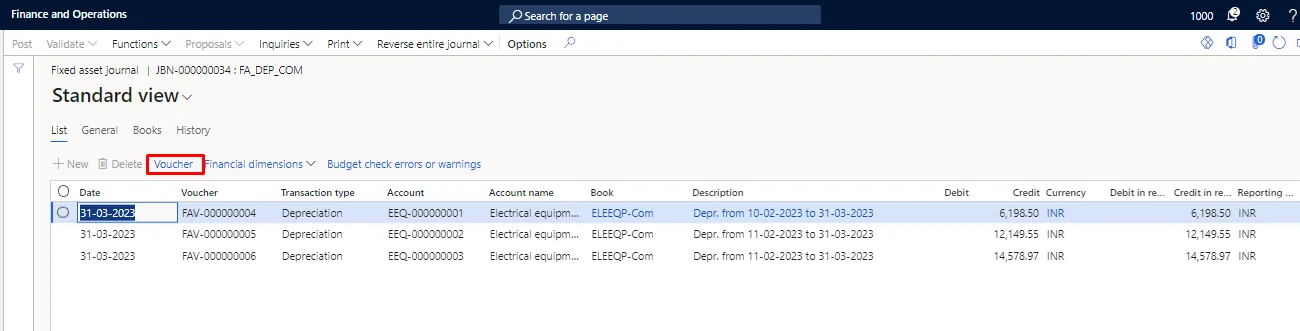
For viewing the voucher posted for acquisition, click on the voucher.
Posted voucher: In the below screenshot we can see that the system has posted the accounting entry in the current layer only as we can’t defined the derived book as Income Tax for the depreciation because the depreciation as per Company Act & Income Tax Act is different.

Valuation of the Fixed asset
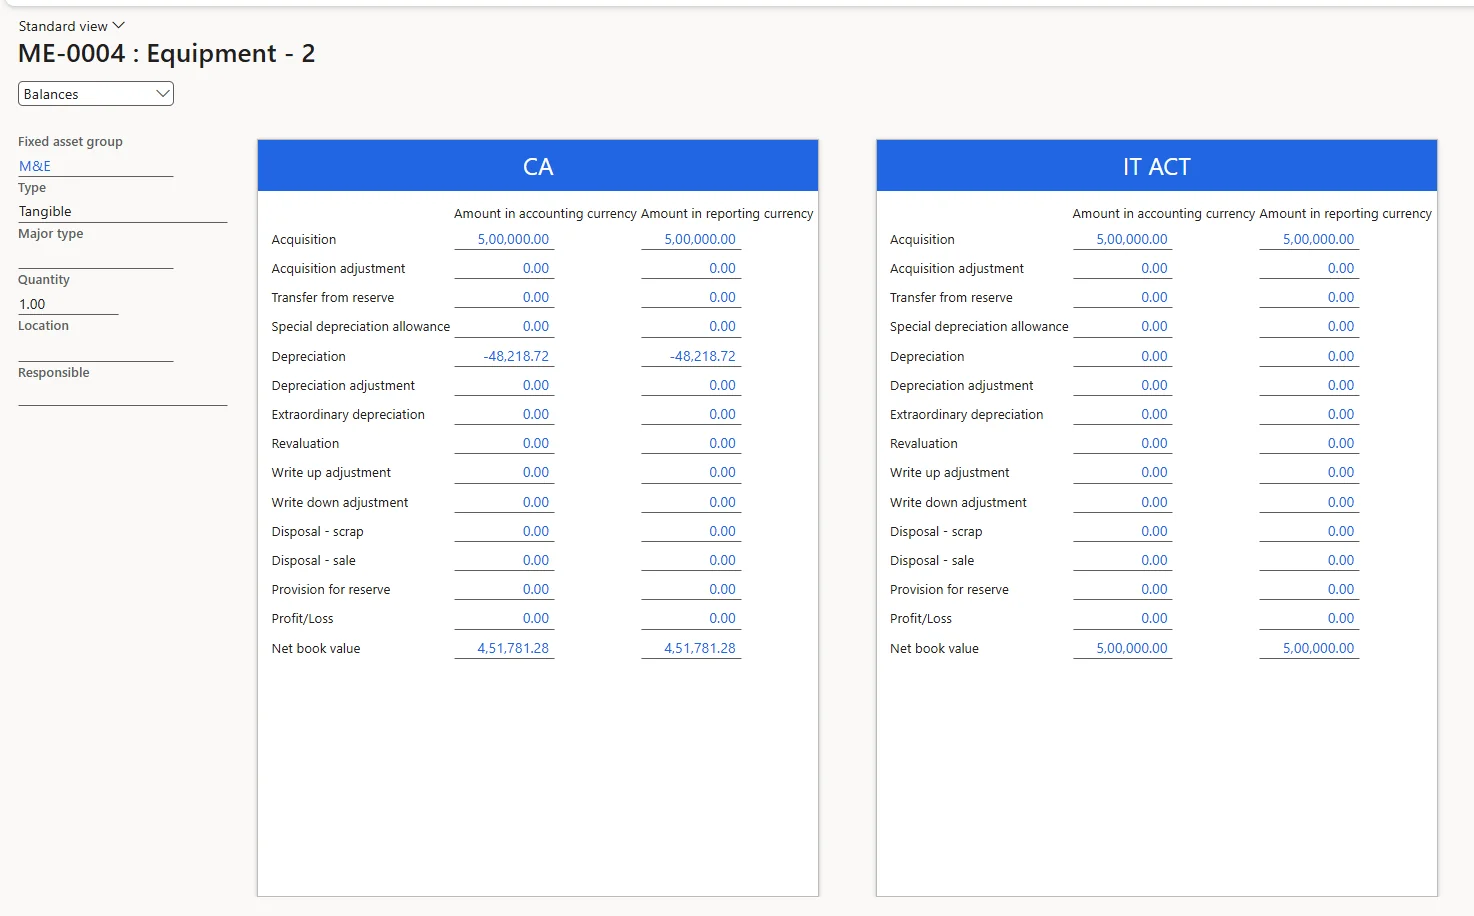
Depreciation on Fixed Assets for Income Tax Act Book
Step 1: Creation of Fixed asset journal
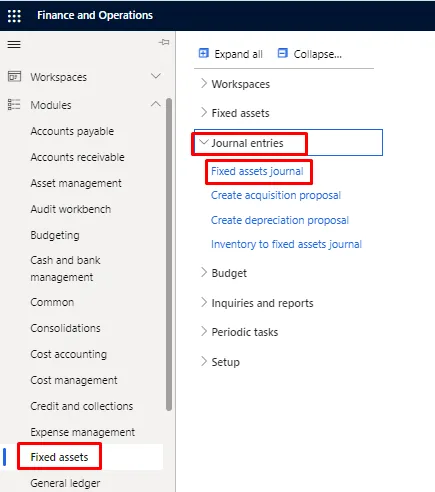
For creating the fixed asset journal, follow the below path.
Path: - Fixed Assets > Journal entries > Fixed assets journal
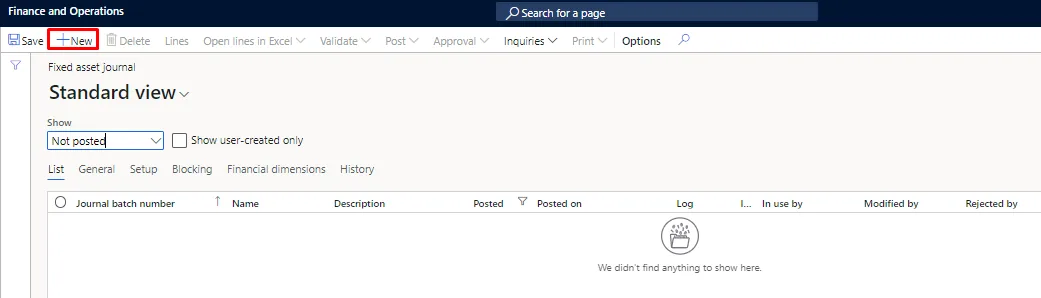
Click on New button.
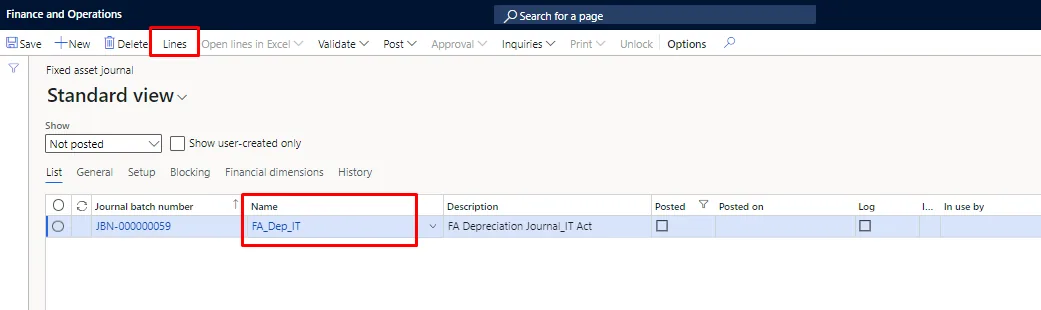
Select the journal lines & then click on lines.
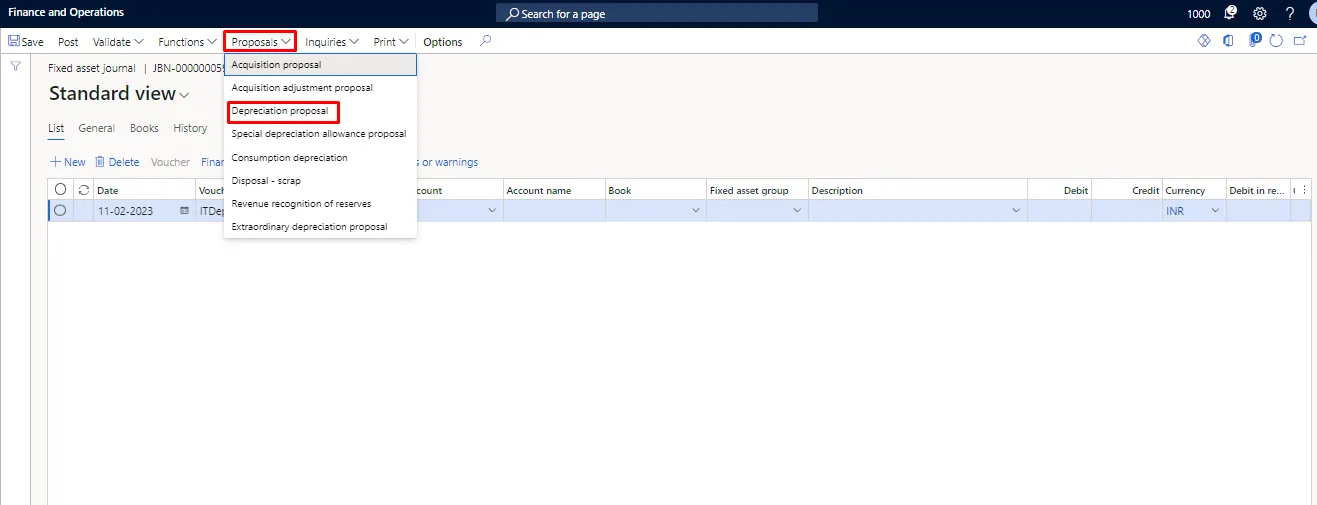
Step 2: Creation of Depreciation proposal
After clicking on the lines tab as defined above, below screen will appear. Click on ‘Depreciation proposal’ under the proposal tab in action pane.
Enter the necessary details & then click on ok button. As we are posting depreciation for Income Tax Act book, we have filter the depreciation proposal for ‘Tax’ posting layer as shown below.
Note: - As per the Income Tax Act, depreciation is calculated on the WDV of a Block of assets. “Block of asset” means a group of assets falling within a class of assets.
We have filtered the ‘M&E’ group. In ‘M&E’, we have two assets & their WDV as per Income Tax Act are mentioned below: -
Asset | Group | WDV Amount |
ME-0003 | M&E | 2,00,000.00 |
ME-0004 | M&E | 5,00,000.00 |
Total |
| 7,00,000.00 |
As both the above mentioned assets are purchased & put to use for less than 180 days, half depreciation should be calculated i.e., 15%/2 = 7.5% of 7,00,000 amounting to Rs. 52,500. The system has calculated Rs. 52,500.80 for the period 07-10-2026 to 31-03-2027.
Once clicked on ok button for creating depreciation proposal, below screen will appear in which the depreciation lines will be created FA group wise upto the period defined in the ‘to date’ field. In below screenshot we can see that the amount of depreciation calculated by the system is correct.
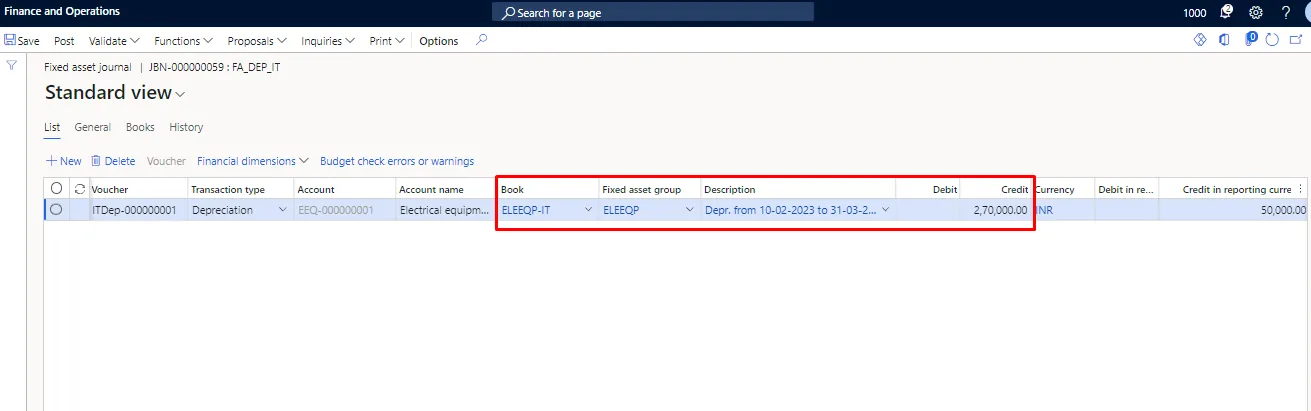
Issue in above depreciation line: -
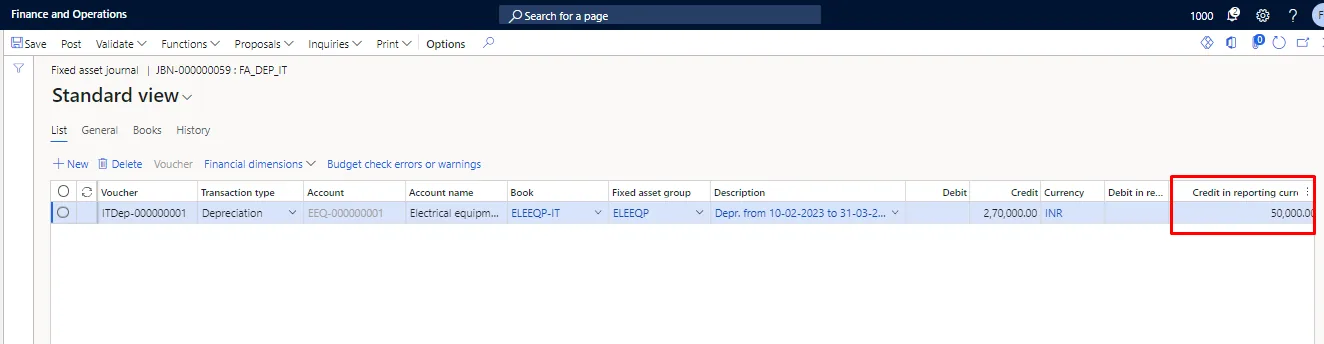
- Credit in reporting currency amount is coming different than credit in accounting currency on running depreciation proposal for asset group.
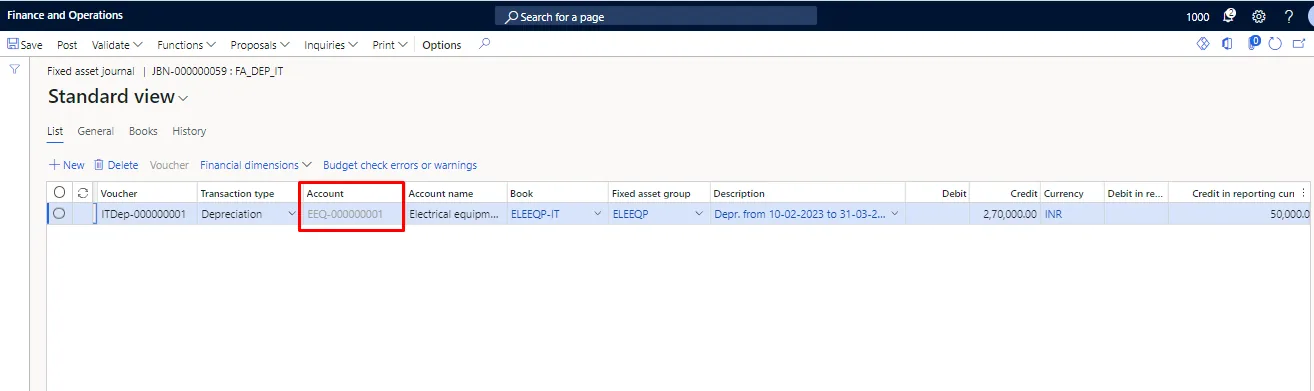
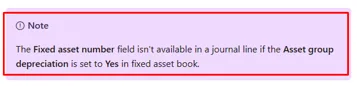
- FA number is not visible on journal line if asset group depreciation is set to Yes on asset book.
Workaround for issue1: Copy the amount in credit field. Clear the amount in credit field, Save the journal, then paste the amount in credit field and again save it. Amount in credit in reporting currency field will get changed.
Note: Credit in reporting currency field is not editable.
Step 3: Validate and post the Fixed asset journal.
After updating the depreciation amount in reporting field as per the above steps, validate the fixed asset journal & then post it.
For validating the journal, click on ‘simulate posting’ under the validate tab in the action pane.
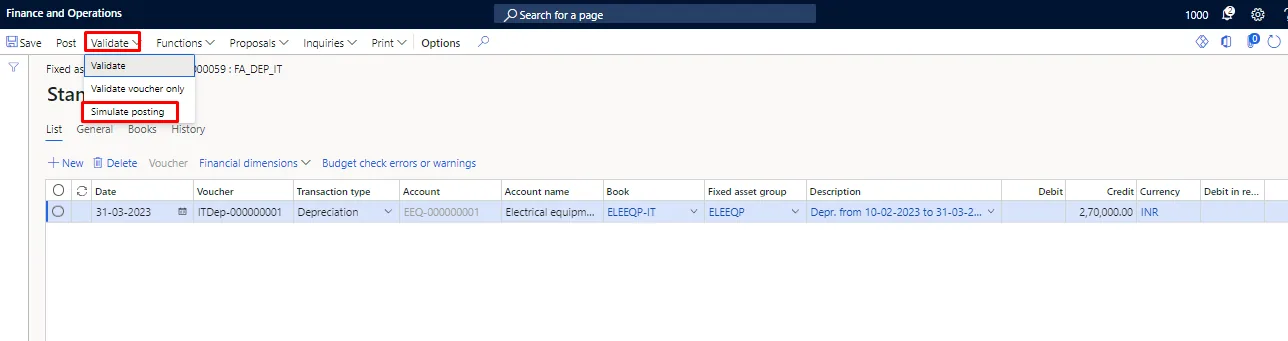
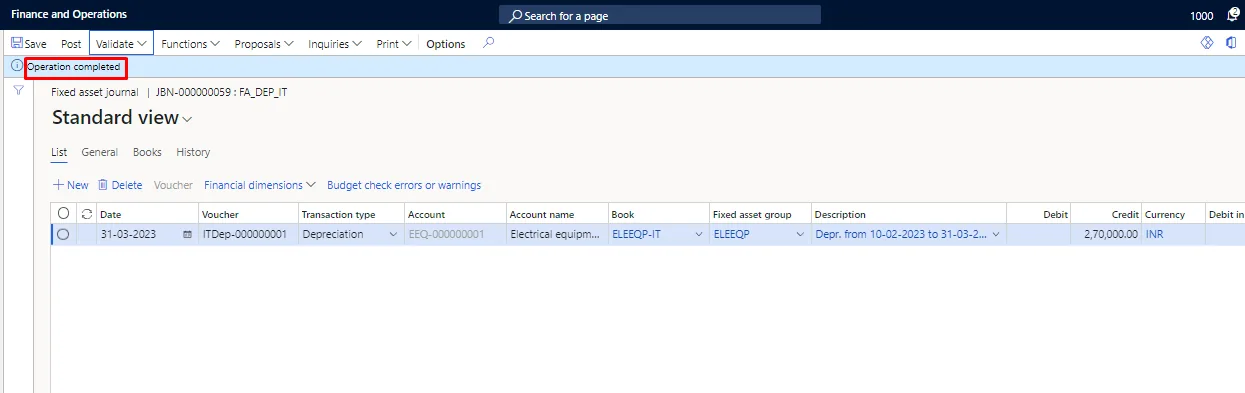
Once simulated, the system will reflect the error if any otherwise the operation will be completed.
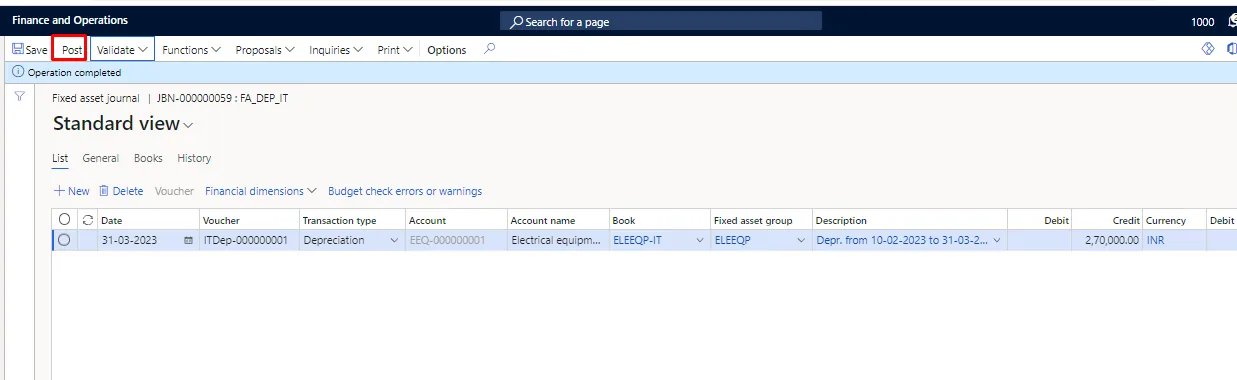
Once stimulated, post the fixed asset journal. For posting the journal, click on post button in the action pane.
For viewing the voucher posted for acquisition, click on the voucher.
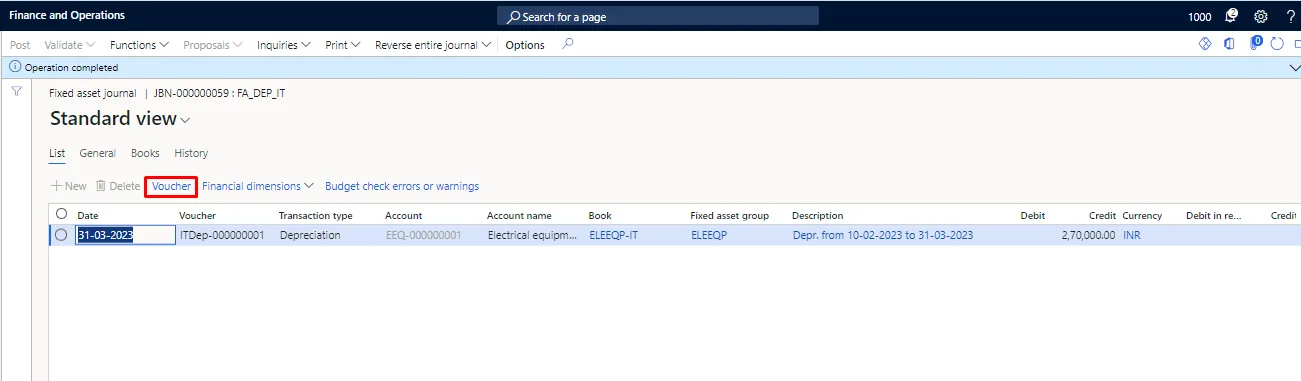
Posted voucher: In the below screenshot we can see that the system has posted the accounting entry in the Tax layer only as we had filter the depreciation proposal for the Income Tax Book only.

Valuation of the Fixed asset
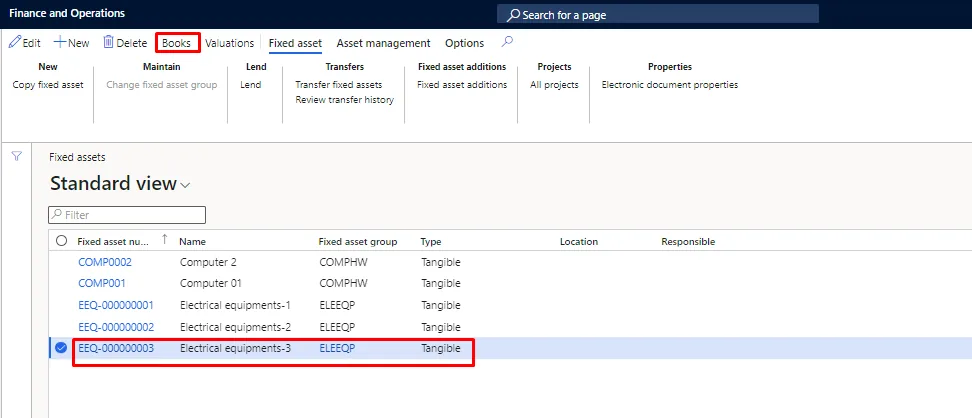
For viewing the valuation as per the Income Tax Act, we will have to view the WDV for block of the asset. Go to the fixed asset module, select one of the Fixed asset falling under the block of the assets and then click on book button.
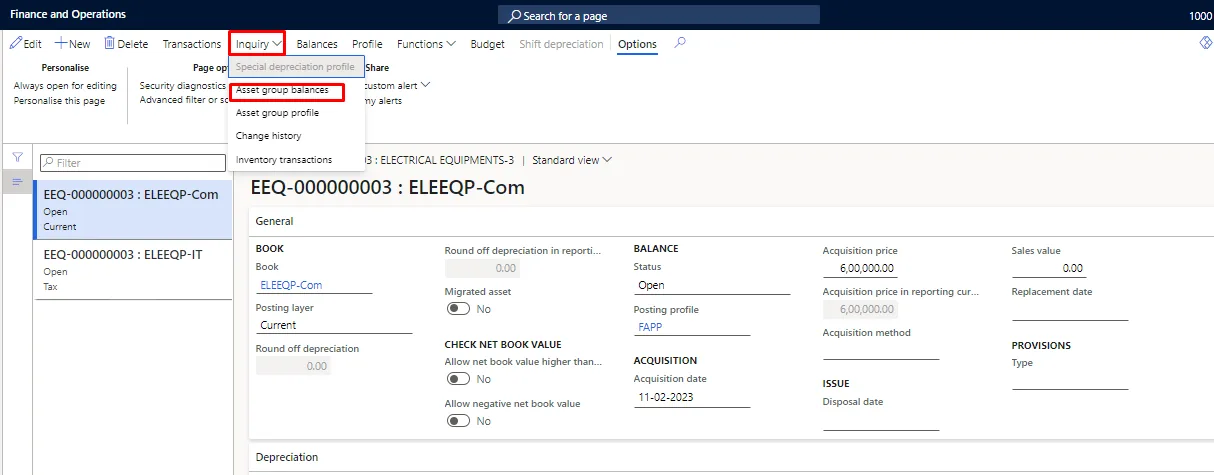
Click on ‘Asset group bances’ under the inquiry tab in action pane.
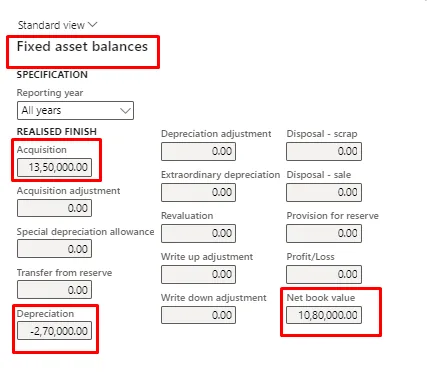
Below screen will appear where we can see the WDV of the block of the assets.
Disposal of Fixed Assets
A fixed asset can be disposed of either by selling it to a customer or by scrapping it. Both options are explained below.
Fixed asset Disposal - Sale
The fixed asset can be sold in D365 using free text invoice.
Scenario:
- Fixed Asset Number – ME-0003 – Equipment - 1
- Sales Amount – 1,75,000 INR (plus GST at 18% of 31,500 INR)
- Net Book Value (Company Act) – 1,80,712.16 INR
- Loss amount will be – 5,712.16 INR
- Customer – INMF-000001 – Wingtip Toys India Ltd.
For creating free text invoice, follow the below mentioned path.
Path: Accounts receivable🡪 Invoices🡪 All free text invoices
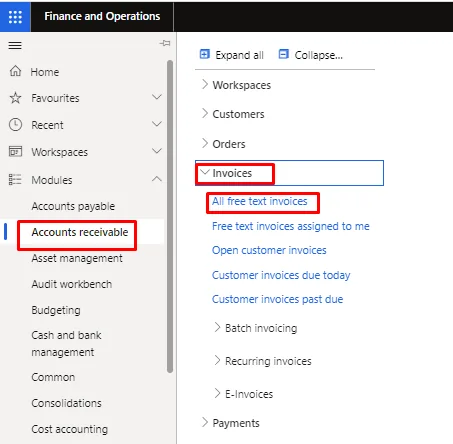
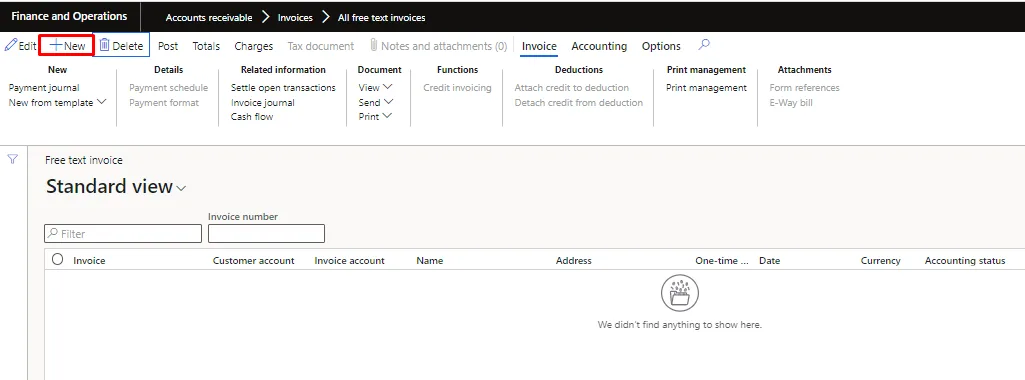
Below screen will appear. Click on new.
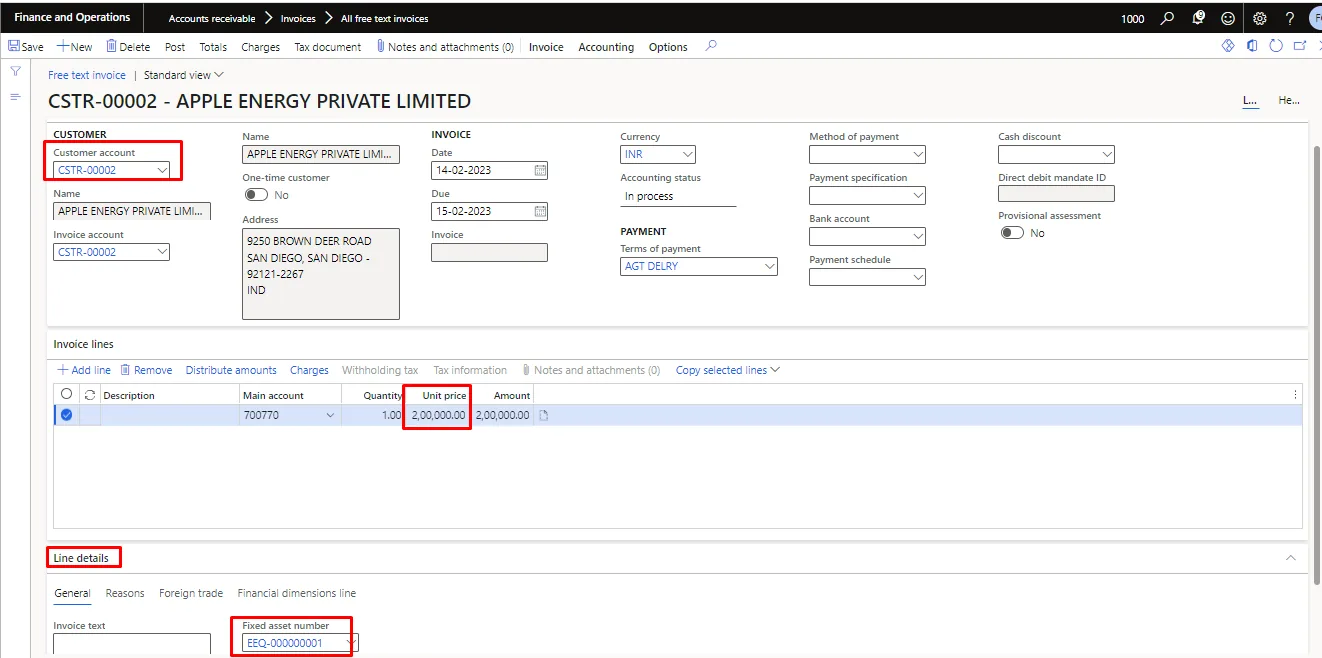
Select Customer account. Select the fixed asset number in line details and enter the Unit price.
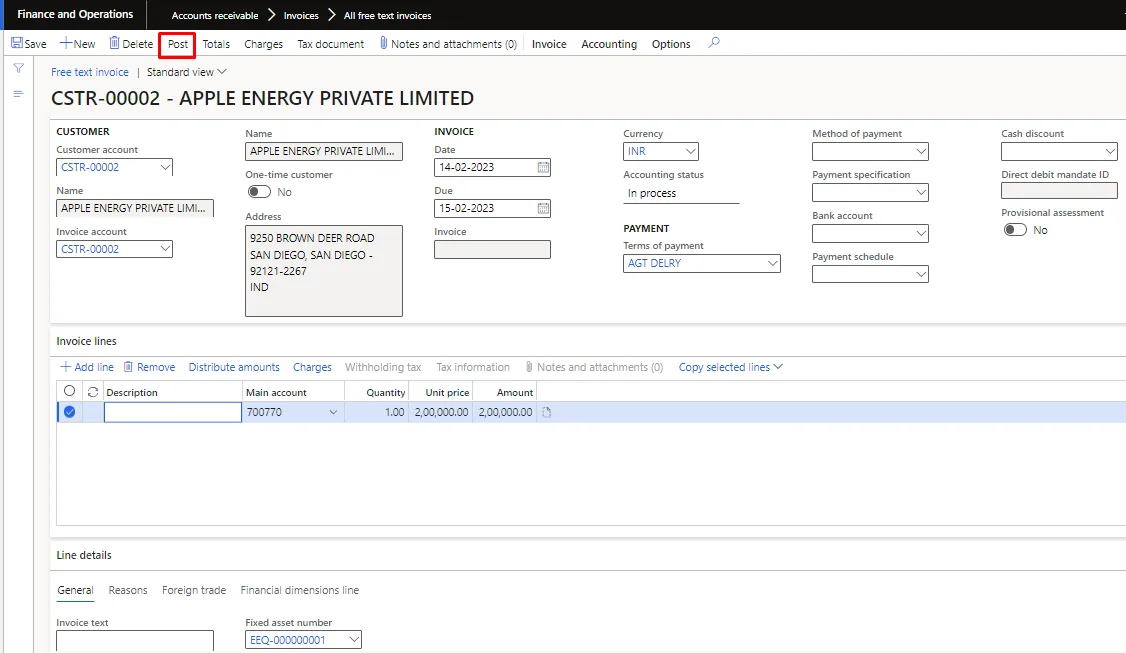
After filling all the necessary details, post the free text invoice by clicking on post button at the action pane.
For viewing the posted voucher, click on Invoice journal under the Invoice tab in action pane.
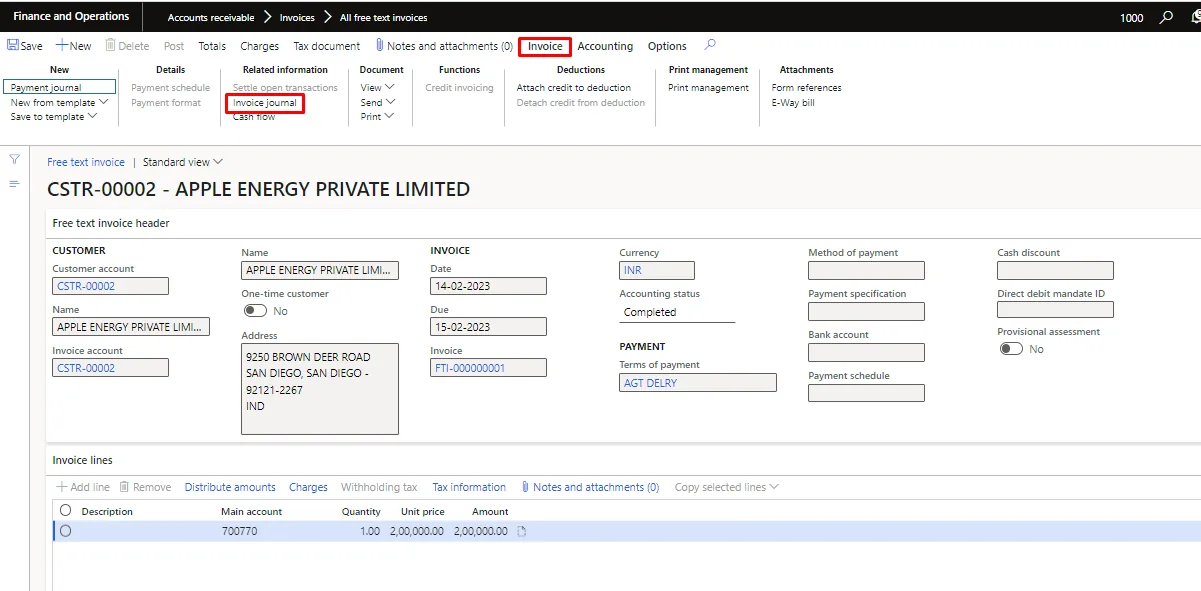
Below screen will appear. Click on voucher.
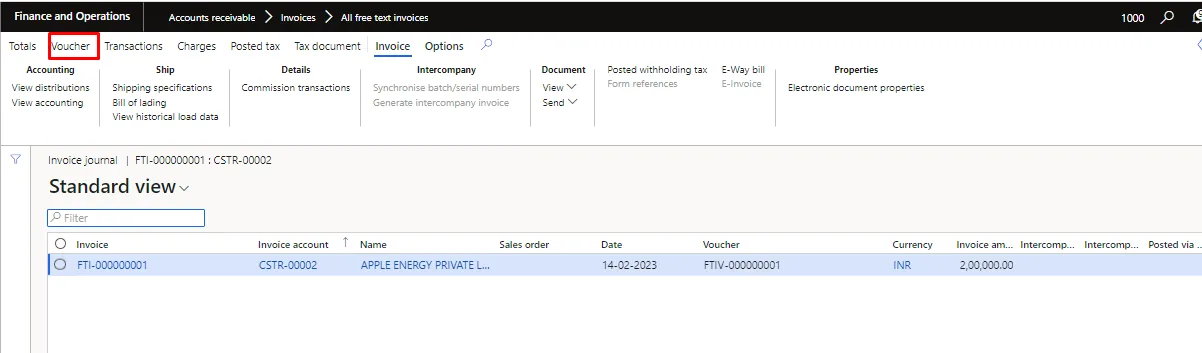
Posted voucher: - In the below screenshot we can see that the system has posted the accounting entry in the current layer as well as the tax layer based on which the fixed asset has been sold in both the Books i.e., Company Act & Income Tax Act.
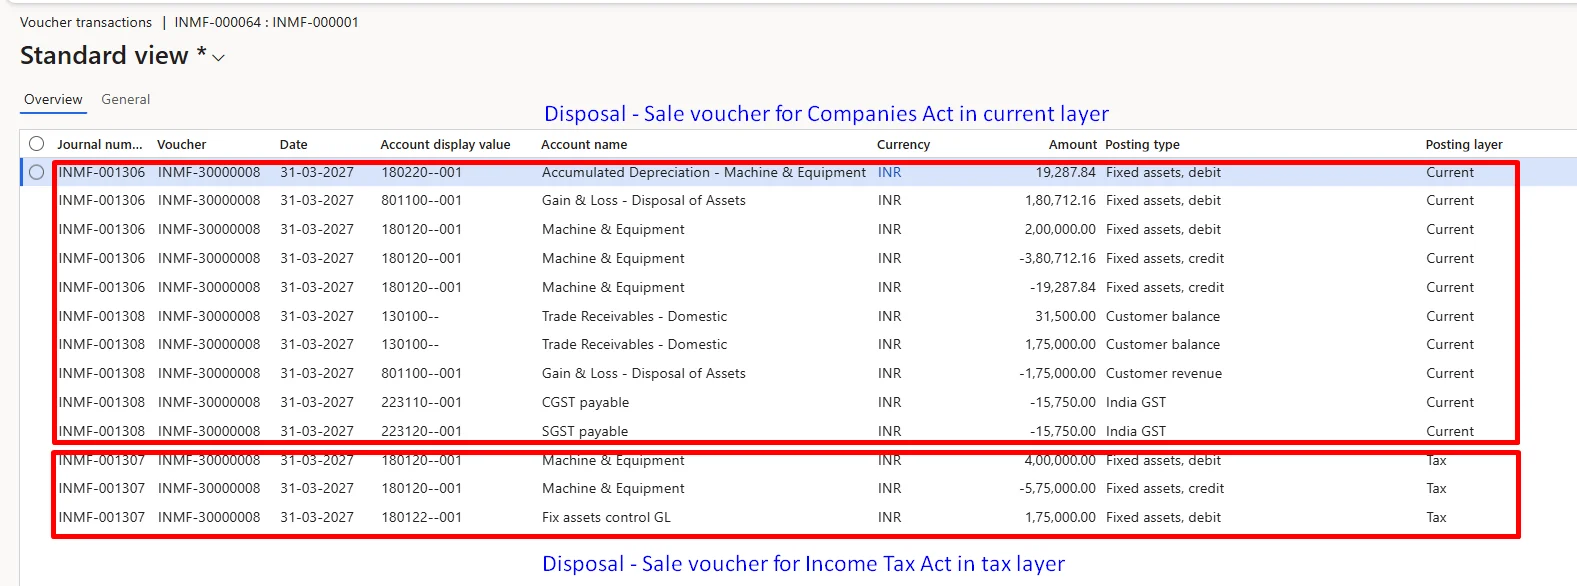
Pivot tables of the posted voucher are given below for better understanding.
Pivot table of voucher posted for Company Act Book
Main account | Account name | Debit | Credit | Net |
130100 | Trade Receivables - Domestic | 2,06,500.00 | 2,06,500.00 | |
180120 | Machine & Equipment | 2,00,000.00 | 4,00,000.00 | -2,00,000.00 |
180220 | Accumulated Depreciation - Machine & Equipment | 19,287.84 | 19,287.84 | |
223110 | CGST payable | 15,750.00 | -15,750.00 | |
223120 | SGST payable | 15,750.00 | -15,750.00 | |
801100 | Gain & Loss - Disposal of Assets | 1,80,712.16 | 1,75,000.00 | 5,712.16 |
Total | 6,06,500.00 | 6,06,500.00 | - |
Here at the above table, we can see that the system has posted the loss on sale of fixed asset (Company Act) by Rs. 5,712.16/- & the same was in our scenario. The net book value of 1,80,712.16 is debited to Gain & Loss – Disposal of Assets and the sale value of 1,75,000.00 is credited to the same account.
Pivot table of voucher posted for Income Tax Act Book
Main account | Account name | Debit | Credit | Net |
180120 | Machine & Equipment | 4,00,000.00 | 5,75,000.00 | -1,75,000.00 |
180122 | Fix assets control GL | 1,75,000.00 | 1,75,000.00 | |
Total | 5,75,000.00 | 5,75,000.00 | - |
Here at the above table, we can see that the system has not posted any loss on sale of fixed asset (Income Tax Act) & which is correct as per the Income Tax provision & the sale proceeds will be reduced from the WDV of the block of the assets.
Valuation as per Company Act for the Individual Asset
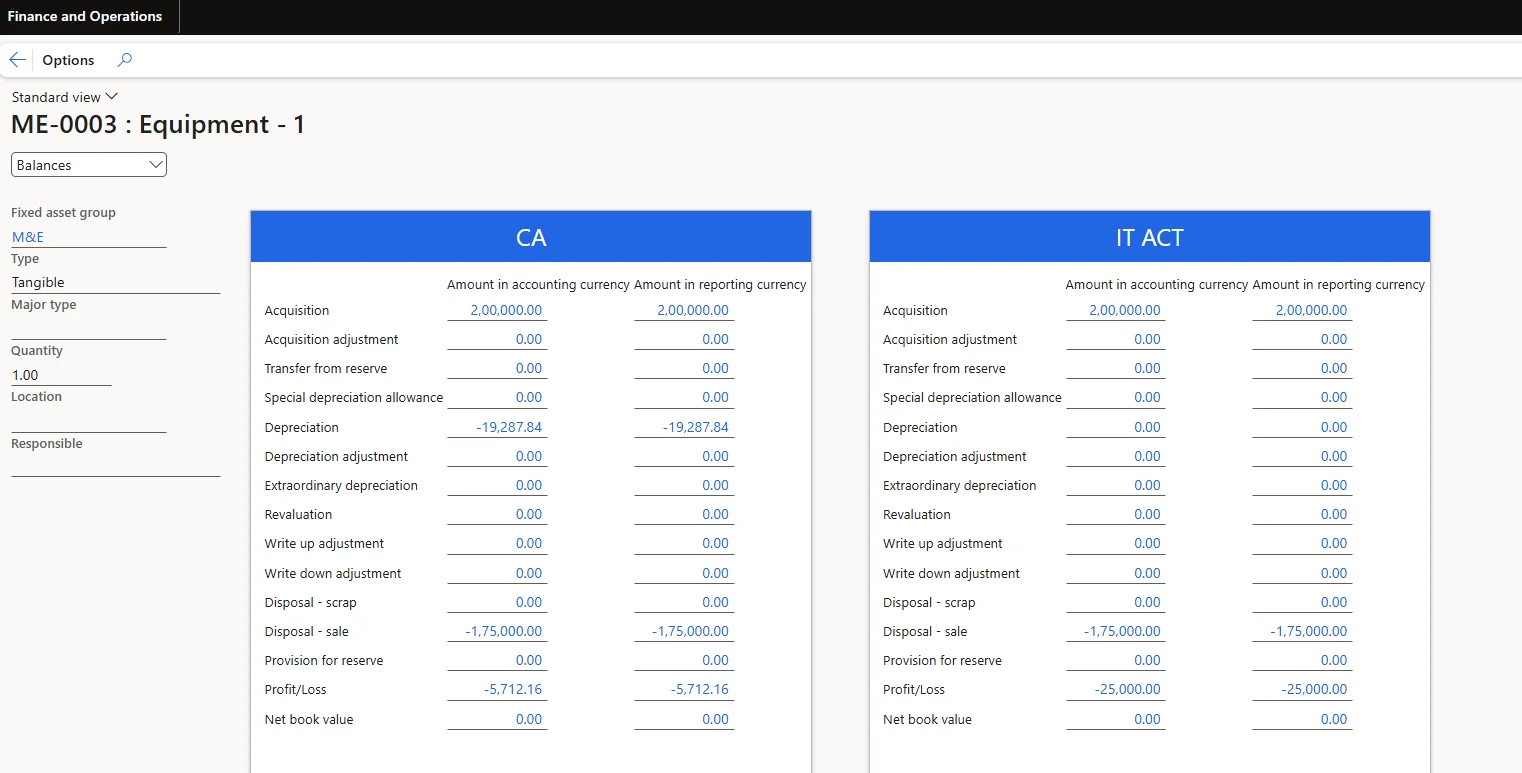
Valuation as per Income Tax Act for the Block of Assets
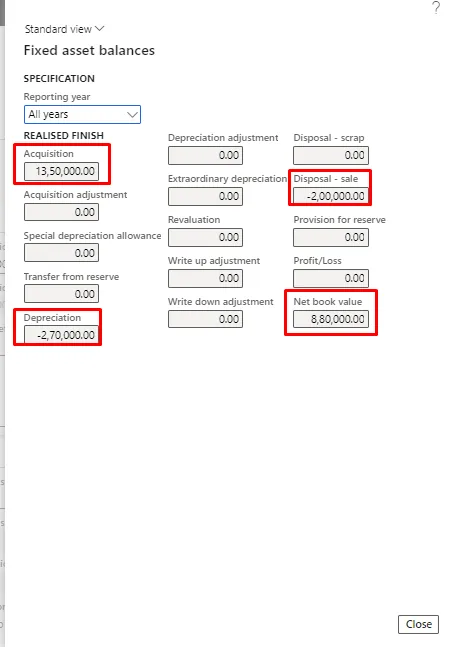
Income Tax provision are mentioned below for the reference.
Section 50 – Capital Gain on Sale of Depreciable Assets
If the person sells a capital asset that forms part of the block of assets on which depreciation has been allowed as per the provisions of the Income Tax Act, the income from such sales is a capital gain.
The calculation of capital gain or loss arising on the sale of depreciable assets can be divided into two categories:
- Where some assets are sold from the blocks of assets.
- Where all assets of the block are transferred. And the block of assets ceases to exist.
a. Calculation of capital gain where part of the block of assets is transferred:
Situation I
When net sale consideration on such asset’s sale is reduced from the written down value (opening WDV + cost of assets acquired if any) of the block of the assets.
And the written down value of the block of the asset becomes Nil (Note: The written down value can be Nil but not negative).
Then the income from such transfer of capital asset shall be considered to be a short-term capital gain.
Computation of short-term capital gain:
| Sale consideration | xxx |
Less | Opening written down value of the block | xxx |
Less | Actual cost of any asset acquired during the financial year | xxx |
| Short-term capital gain | xxx |
Situation II
When net sale consideration on such asset’s sale is reduced from the written down value (opening WDV + cost of assets acquired if any) of the block of the assets.
And the written down value of the block of asset is not Nil.
There is no capital gain on transfer of assets.
Hence, normal depreciation will be allowed.
b. Calculation of capital gain where all the assets of the block are transferred:
Situation III
If the whole of the block of asset is sold and the sale consideration is less than the written down value (opening WDV + cost of assets acquired if any) of the block of assets.
Then there is short-term capital loss on sale of block of asset.
And no depreciation shall be allowed from such block of assets.
Computation of short-term capital loss:
| Opening written down value of the block | xxx |
Add | Actual cost of any asset acquired | xxx |
Less | Sale consideration | xxx |
| Short-term capital loss | xxx |
Situation IV
If whole of the block of assets is sold and the sale consideration is more than the written down value (opening WDV + cost of assets acquired if any) of the block of assets.
Then income from such sale of block of asset is short-term capital gain.
Computation of short-term capital gain:
| Sale consideration | xxx |
Add | Opening written down value of the block | xxx |
Less | Actual cost of the Asset acquired | xxx |
| Short-term capital gain | xxx |
Note: Capital gain or loss on the transfer of depreciable assets is always treated as short-term capital gain or loss.
Fixed asset Disposal - scrap
The fixed asset can be scrapped in D365 using Fixed Asset journal.
Scenario:
- Fixed Asset Number – EEQ-000000002– Electrical equipments-2
- Scrapped
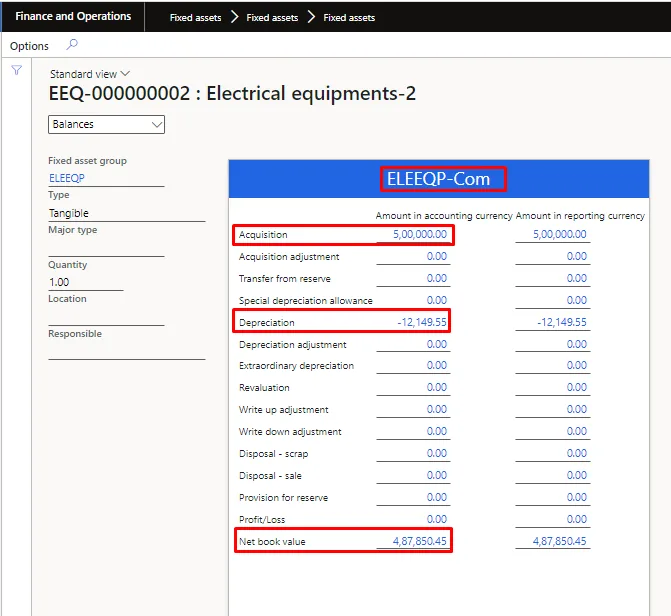
- Net Book Value – 4,87,850.45 INR
- Loss amount will be – 4,87,850.45 INR
Valuation of Fixed Asset
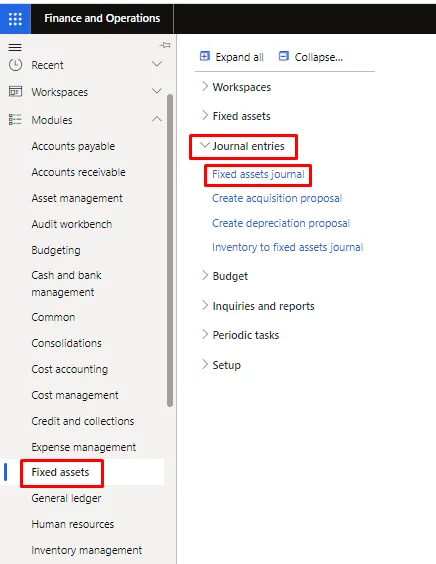
Path: Journal Entries → Fixed asset journal.
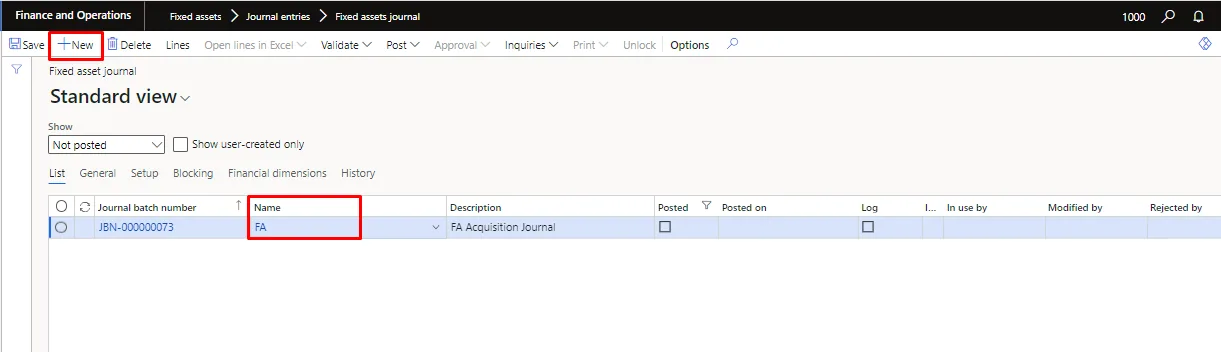
Click on New and Select the fixed asset journal name of disposal.
Click on lines.
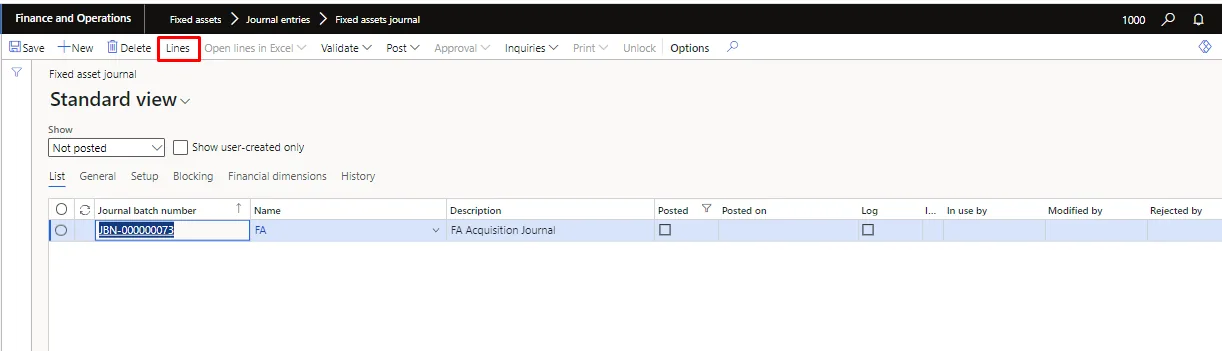
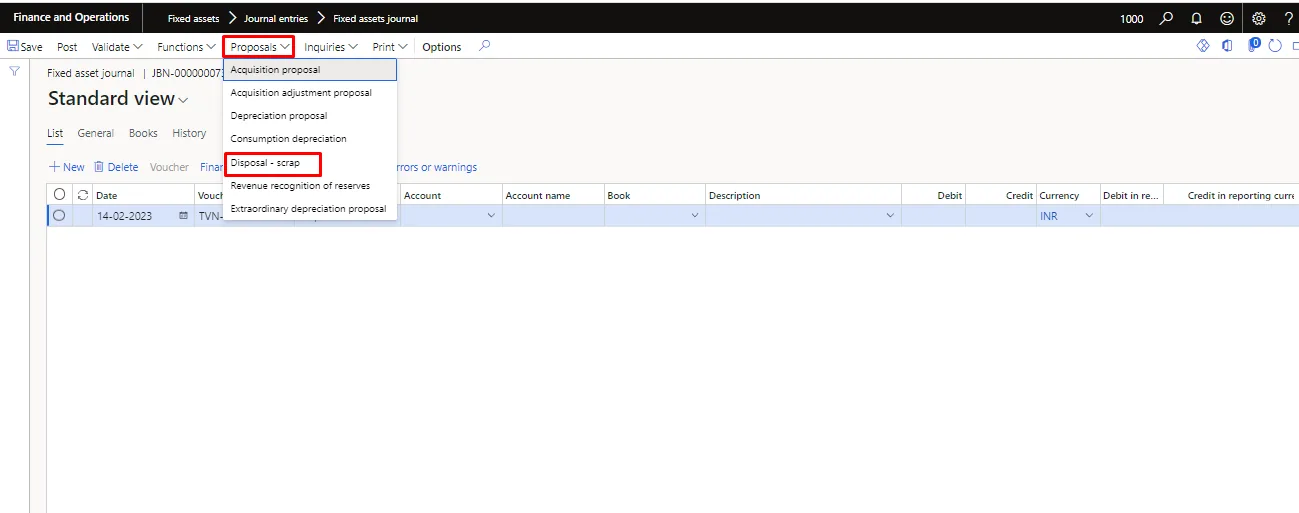
Below screen will appear. Click on ‘Disposal-scrap’ under Proposals tab in action pane.
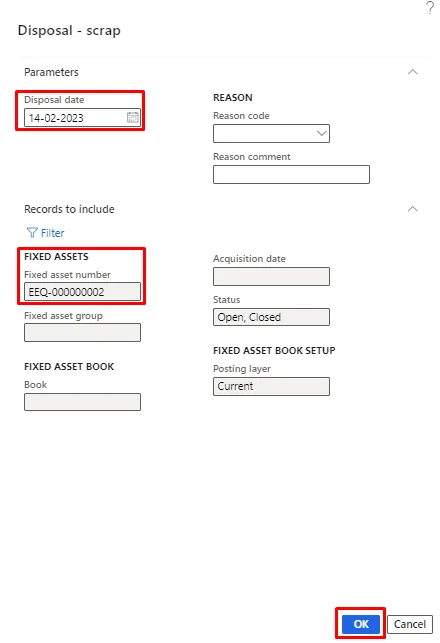
Fill “Disposal date”, select “Fixed asset number” under filter and press “Ok”.
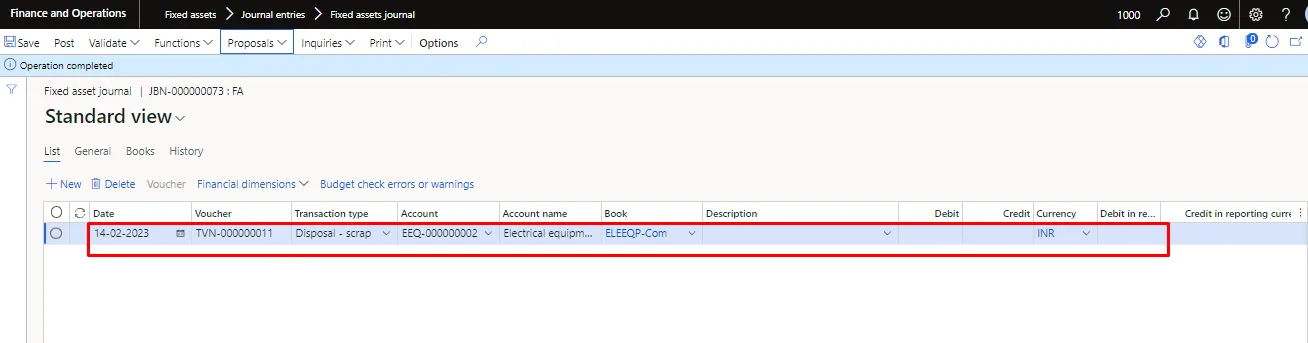
Once clicked on ok button, the system will create a line in the journal.
Validate and post the FA journal.
For validating the FA journal, follow the below path.
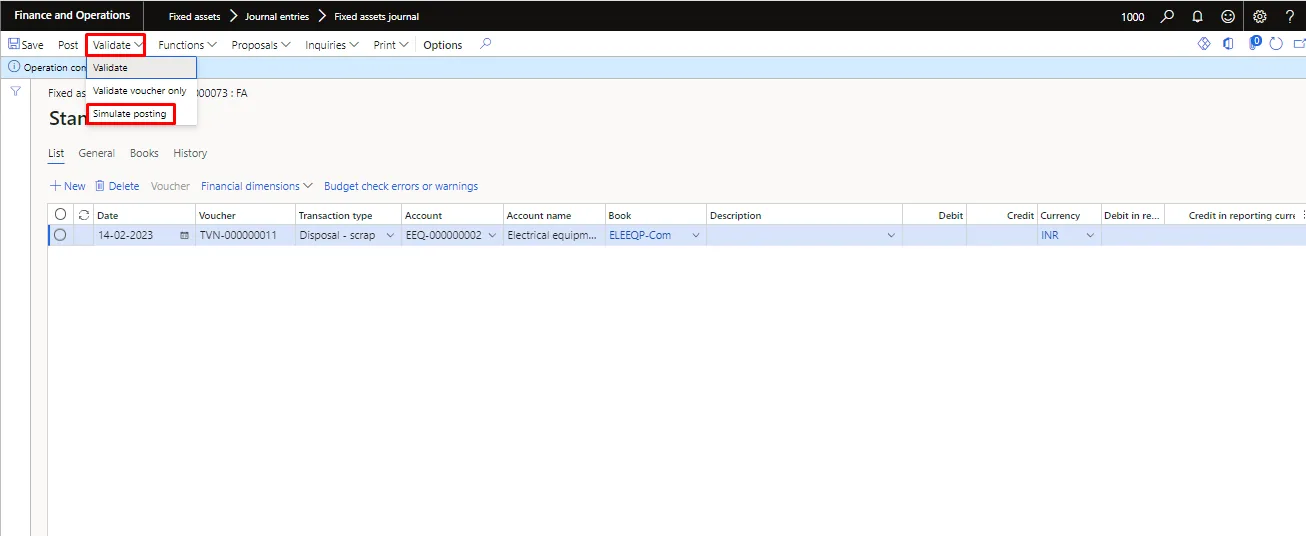
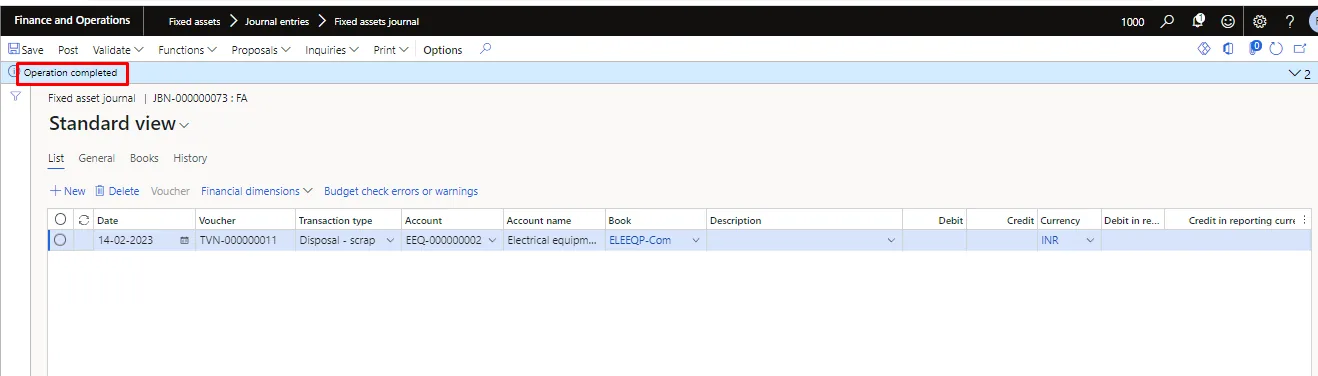
Voucher got validated.
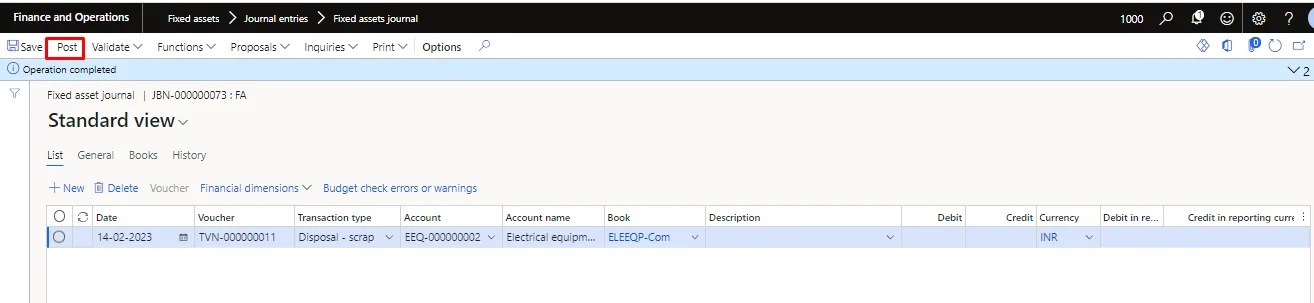
Post the FA journal by clicking on Post button at the action pane.
For viewing the posted voucher, click on voucher.
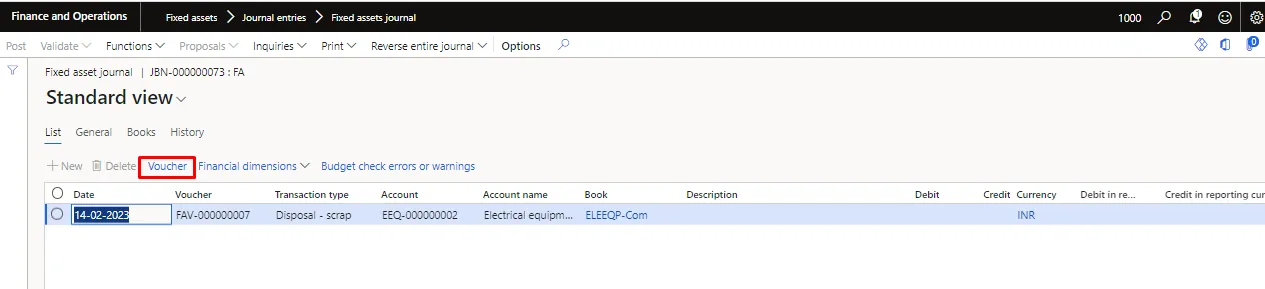
Posted voucher
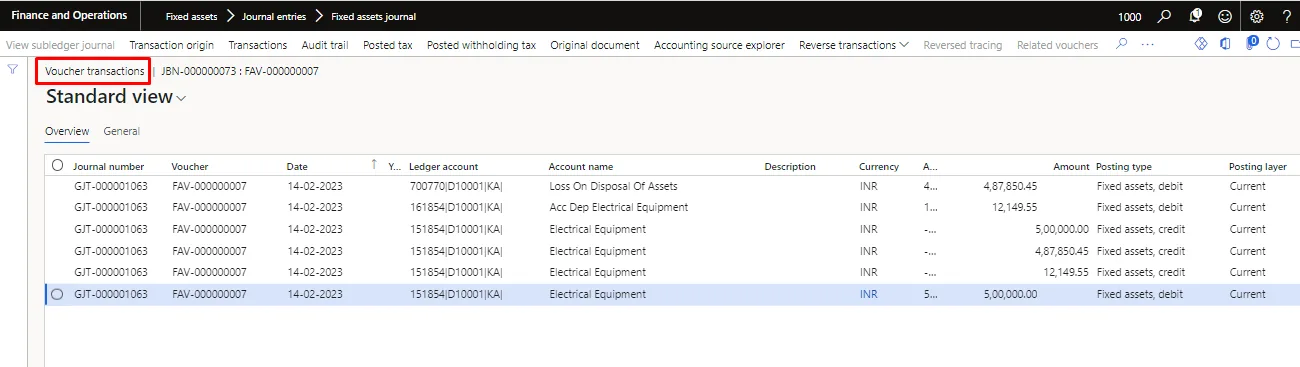
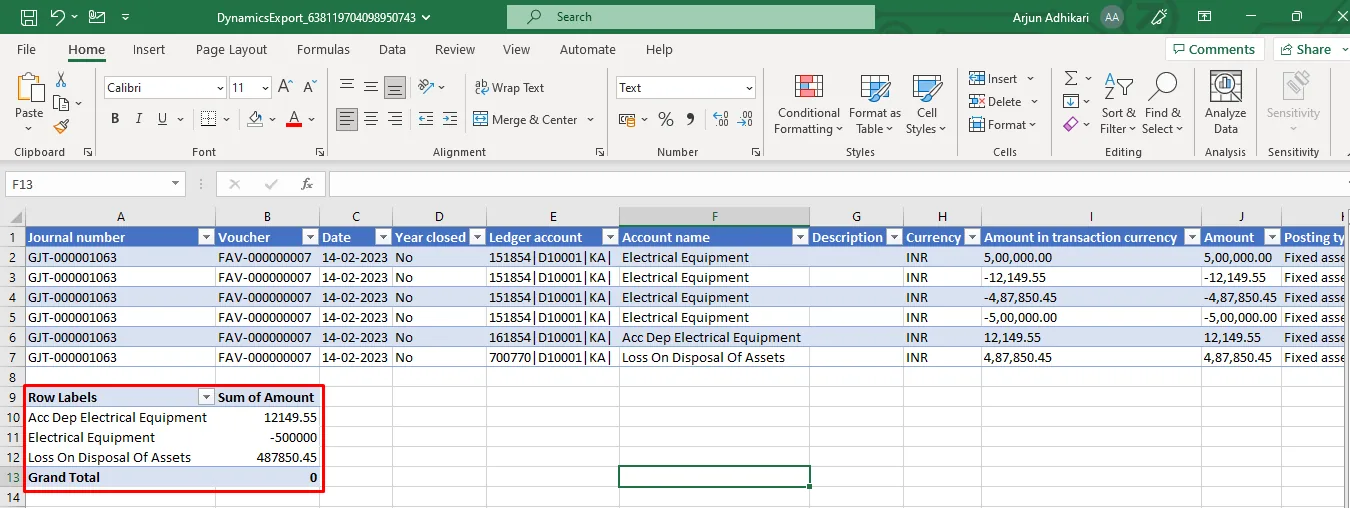
Pivot table of the posted voucher. Loss of Rs. 4,87,850.45 got posted on scrapping the fixed asset.
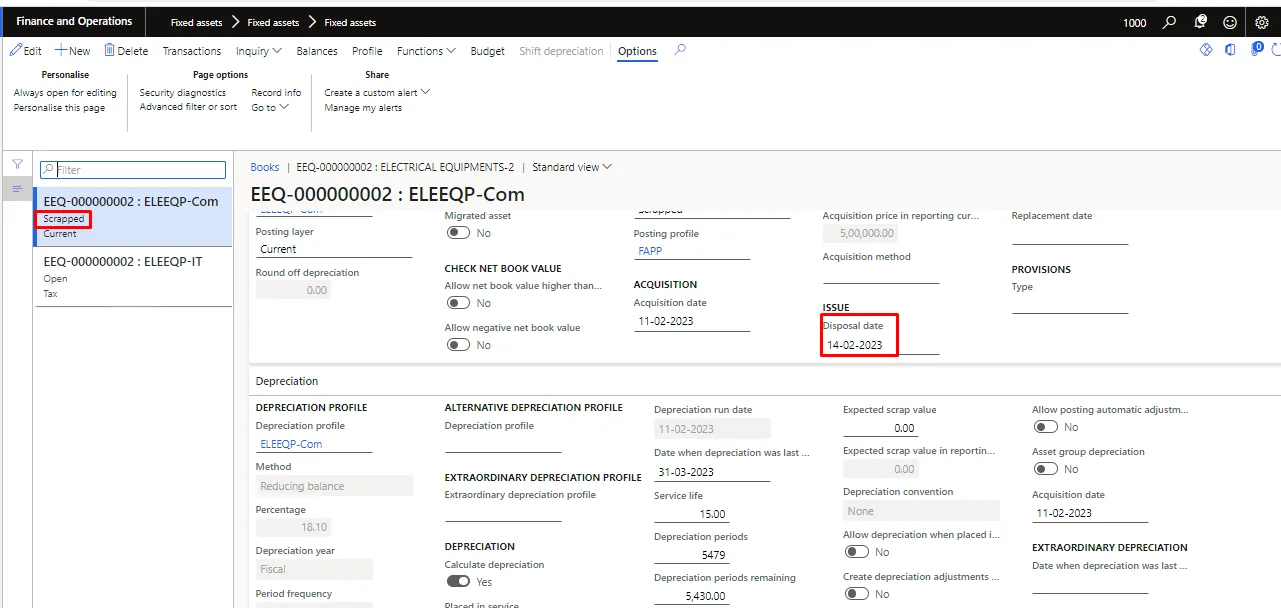
Note: - Once the FA is scrapped the system will update the “Status” and “Disposal date” in the Book of Fixed asset.
Fixed asset roll forward
The fixed asset roll forward report shows the movement of fixed asset values for a period, i.e., opening balance, acquisitions, depreciation, disposals and closing balance, for each fixed asset and book.
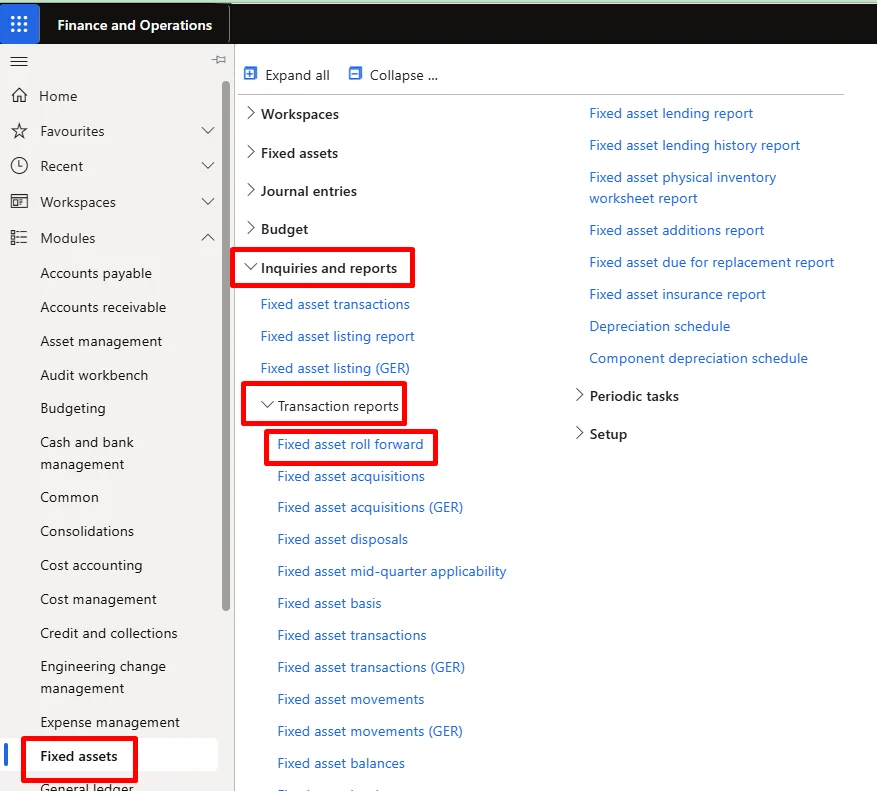
Path: Fixed assets > Inquiries and reports > Transaction reports > Fixed asset roll forward
Enter the from date & to date, select the currency & format mapping, filter the records by fixed asset group or book if required & then click on ok.
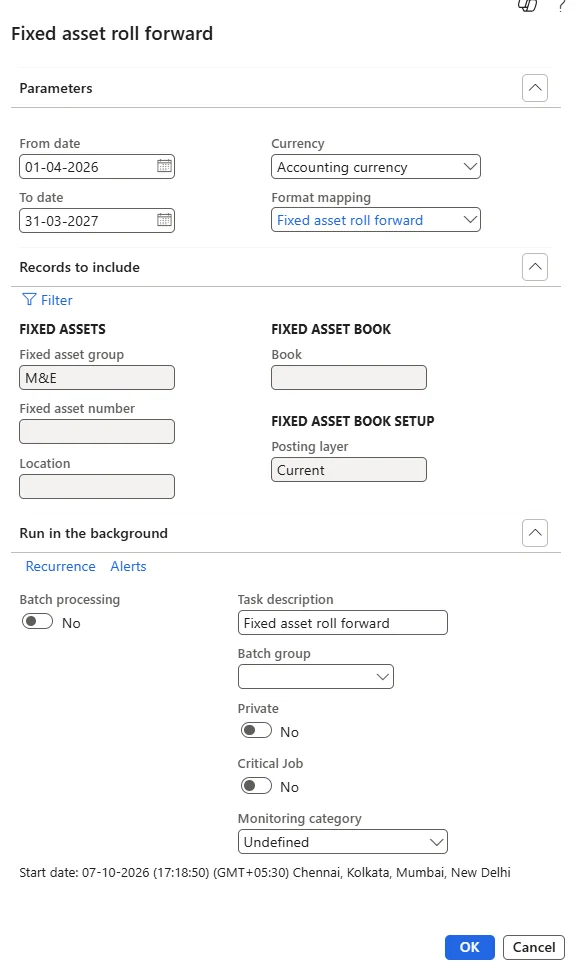
Fixed asset roll forward for the Company Act book (CA) for the period 01-04-2026 to 31-03-2027 for fixed asset group M&E:
Fixed asset | Name | Depreciation method | Placed in service | Acquisitions | Disposals (cost) | Depreciation | Depreciation on disposal | Net book value at disposal | Sale value | Profit/Loss | Closing net book value |
ME-0003 | Equipment - 1 | Reducing balance | 07-10-2026 | 2,00,000.00 | -2,00,000.00 | -19,287.84 | 19,287.84 | 1,80,712.16 | -1,75,000.00 | -5,712.16 | - |
ME-0004 | Equipment - 2 | Reducing balance | 07-10-2026 | 5,00,000.00 | - | -48,218.72 | - | - | - | - | 4,51,781.28 |
Total | 7,00,000.00 | -2,00,000.00 | -67,506.56 | 19,287.84 | 1,80,712.16 | -1,75,000.00 | -5,712.16 | 4,51,781.28 |
ME-0003 was acquired and sold within the year, so it closes with a nil balance after recording a loss of 5,712.16 on disposal. ME-0004 closes with a net book value of 4,51,781.28 after depreciation of 48,218.72.
Fixed asset transfer
Transfer an asset from one financial dimension to another, such as one business unit to another business unit or one department to another department. Perform the following steps to transfer the asset –
Open the Fixed asset. For selecting & opening the Fixed asset in the system, follow the below path.
Path: Fixed assets🡪 Fixed assets🡪 Fixed assets
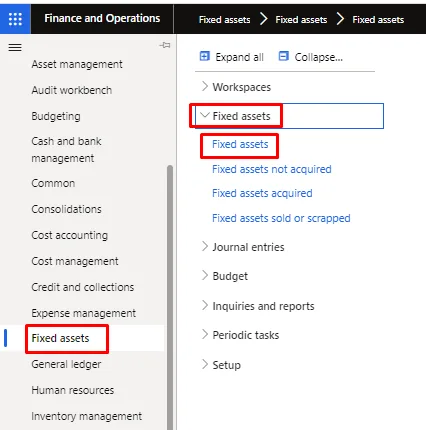
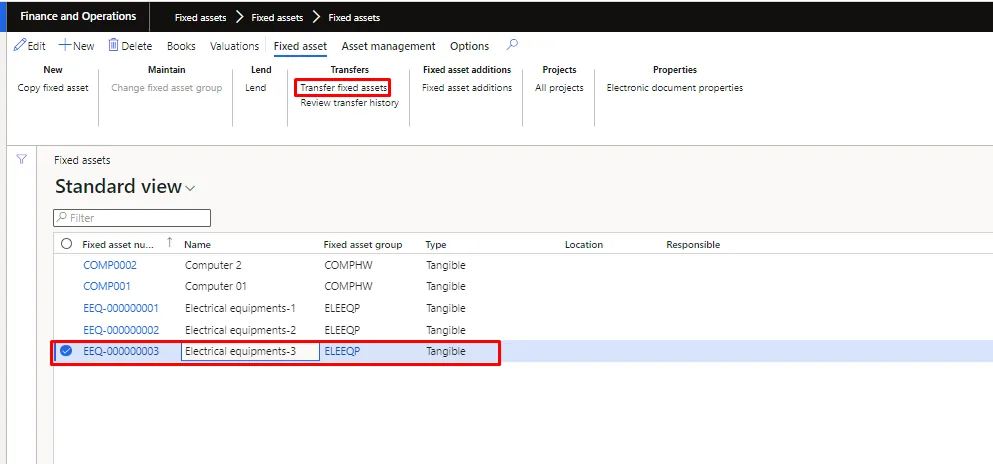
Below screen will appear. Select the fixed asset and click on ‘Transfer fixed assets’.
Below screen will appear. The ‘value at transfer’ will be non-editable and will be closing WDV as on date.
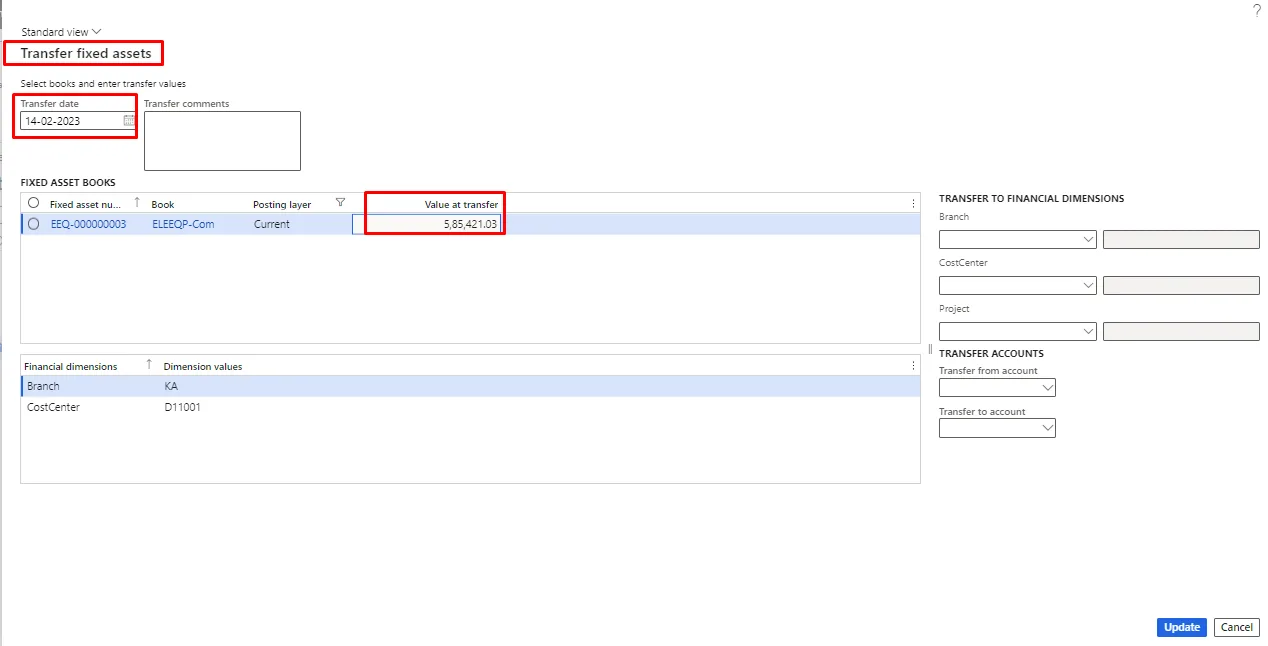
The user will be able to see the current financial dimensions for the fixed asset. The user can select new “Business unit” or other dimensions. If the Company is required to change the current main account of the Fixed asset, select main accounts in “Transfer from account” and “Transfer to account” in “TRANSFER ACCOUNTS”. This will update dimensions in FA card and transfer the main account amount to new main account. Once the dimensions have been updated, click on ‘update’ button.
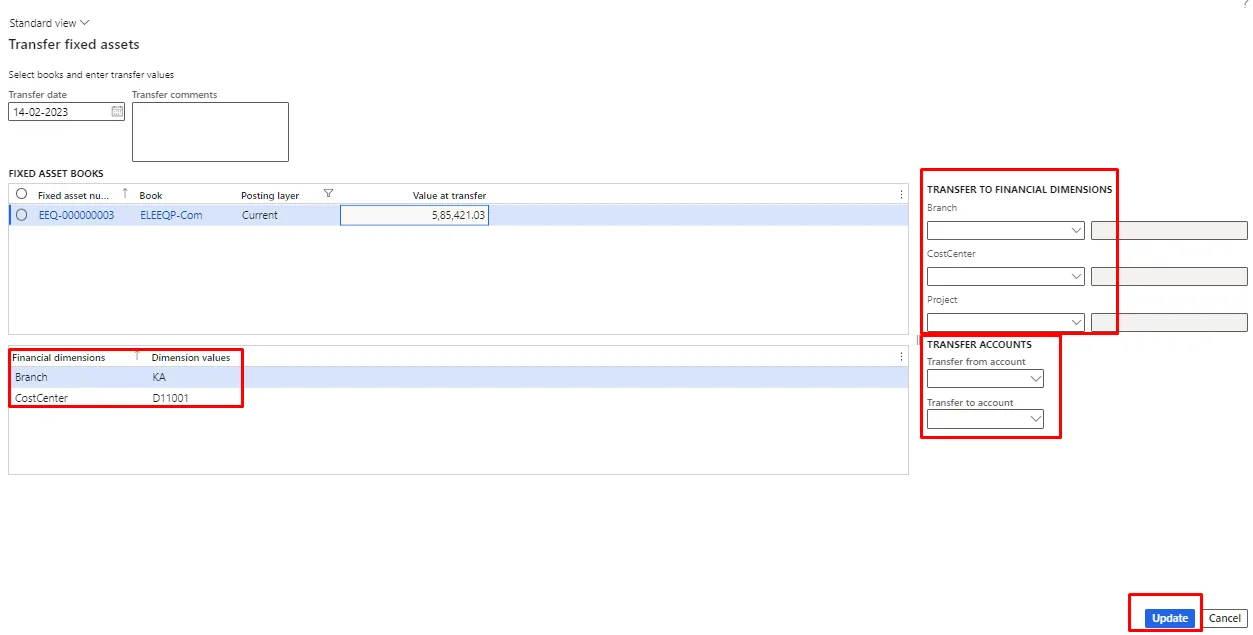
Fixed asset transfer to another “Business Unit” having different GSTIN number.
In such of Fixed asset transfer to different site having different GST number, GST needs to be calculated on transfer of fixed asset. There is no direct fitment in the system for this type of scenario.
Workaround is there to handle such scenario: -
- The assets will be transferred to other Branch/Site as mentioned above.
- For the transfer of GST input, an FA item will be created by positive adjustment and will be transferred to said location from stock transfer order having IGST impact.
Step 1: Creation of Fixed asset item
An item will be created for Fixed asset so that the same can be selected at stock transfer order to transfer the Fixed asset & GST can be charged on the same transaction.
For creating the item, follow the below path.
Path: - Product Information management > Products > Released products
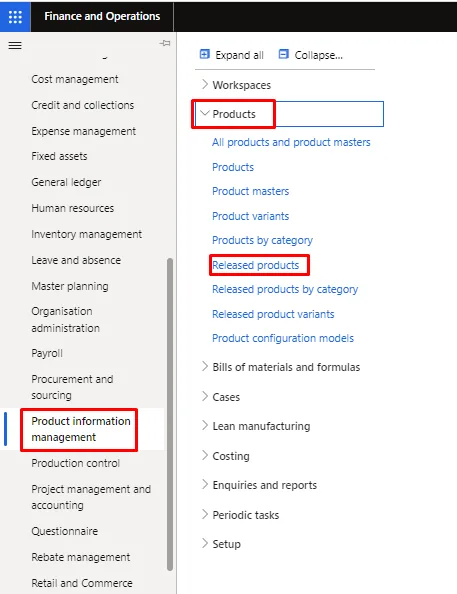
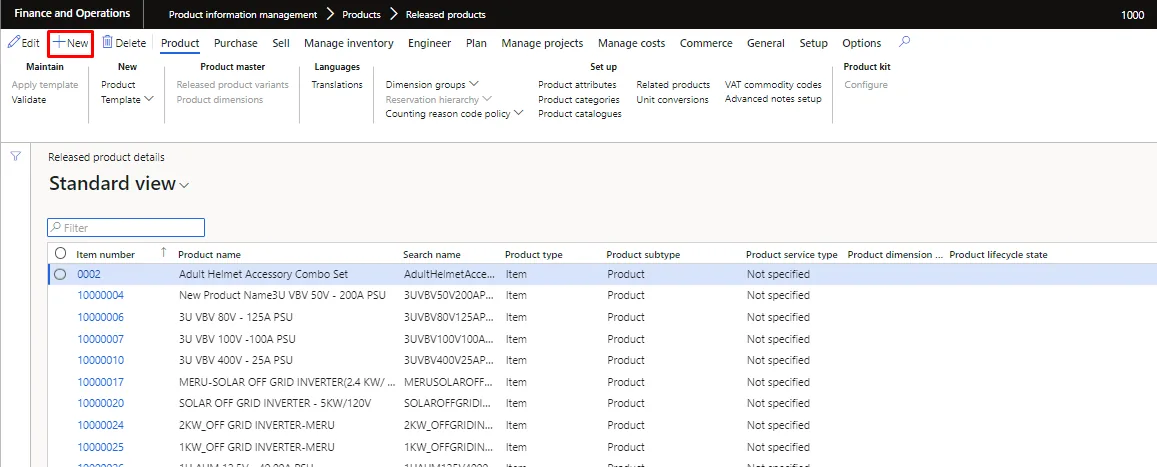
Below screen will appear. Click on new to create a new item.
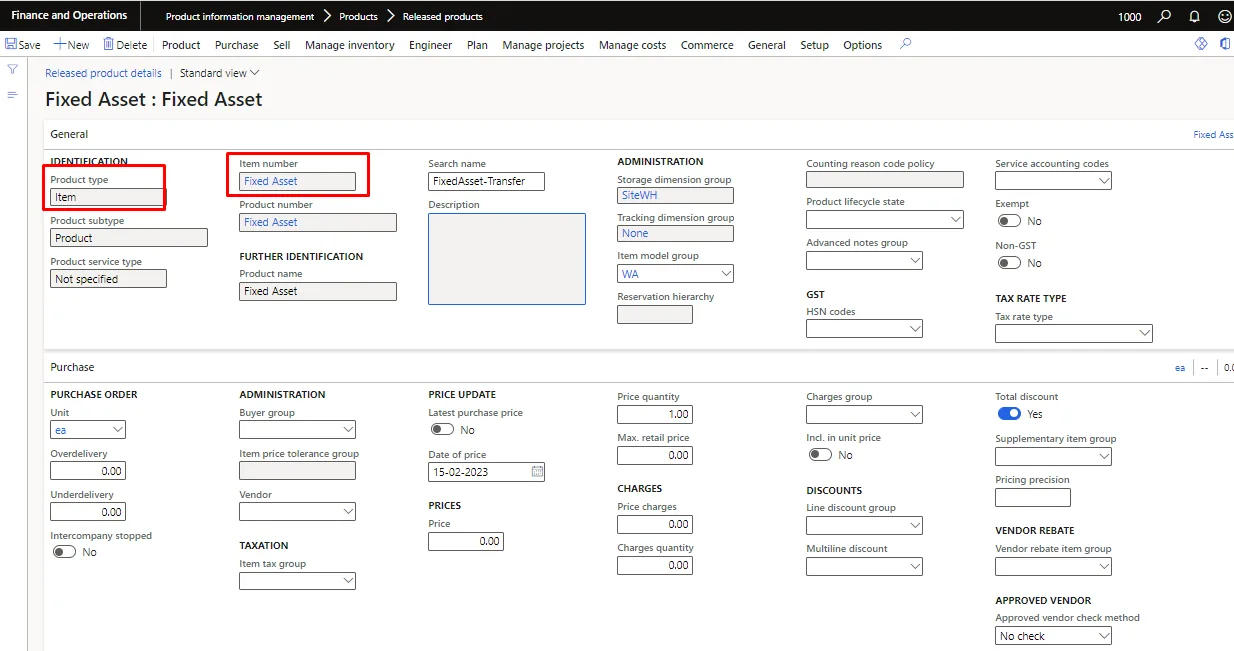
Create new item with name ‘fixed asset’. Keep the item model group as ‘stocked product’ so that the inventory adjustment can be performed for the same.
Step 2: Inventory adjustment
Inventory for the Fixed asset item will be increased through inventory adjustment journal.
Path: - Inventory management > Journal entries > Items > Inventory adjustment
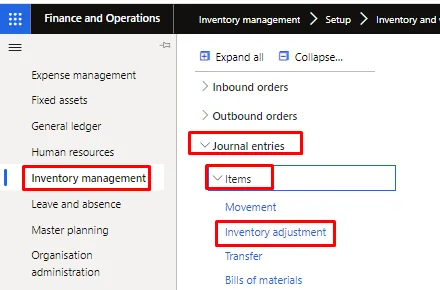
Below screen will appear. Click on new.
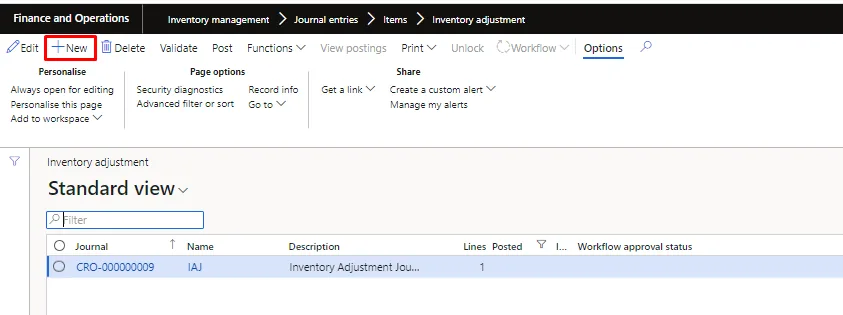
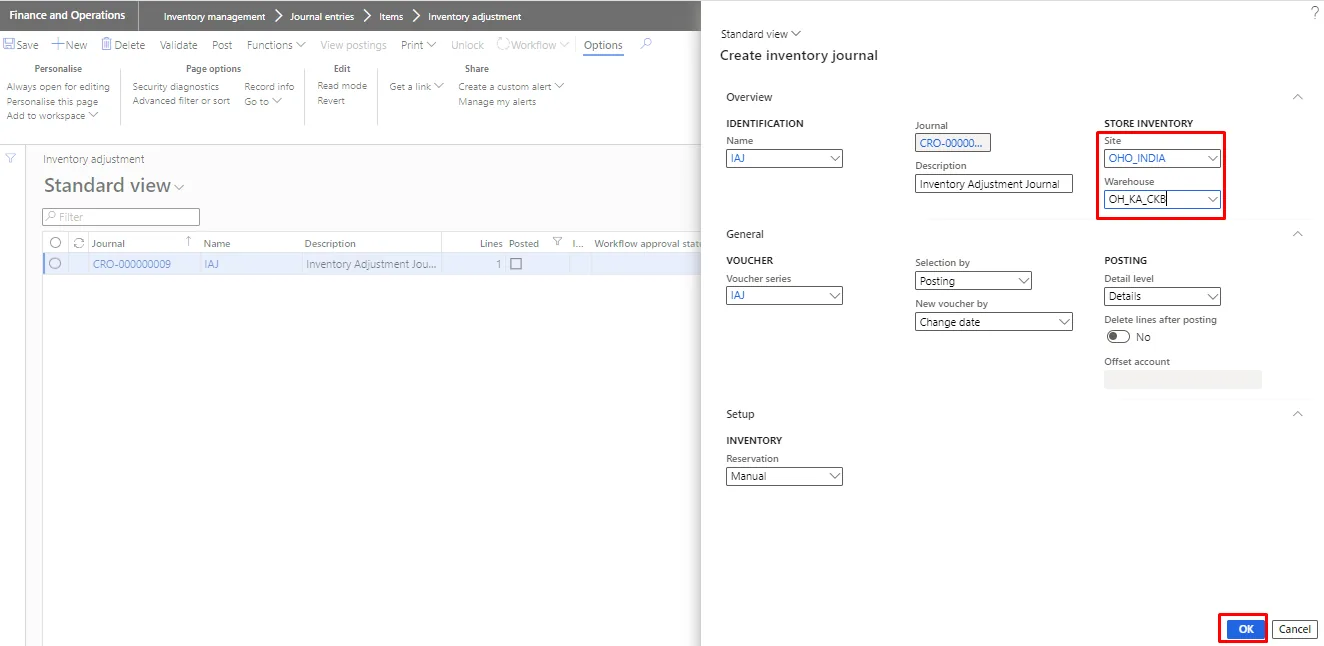
Select the site and warehouse where the inventory is to be adjusted and then click on ok button.
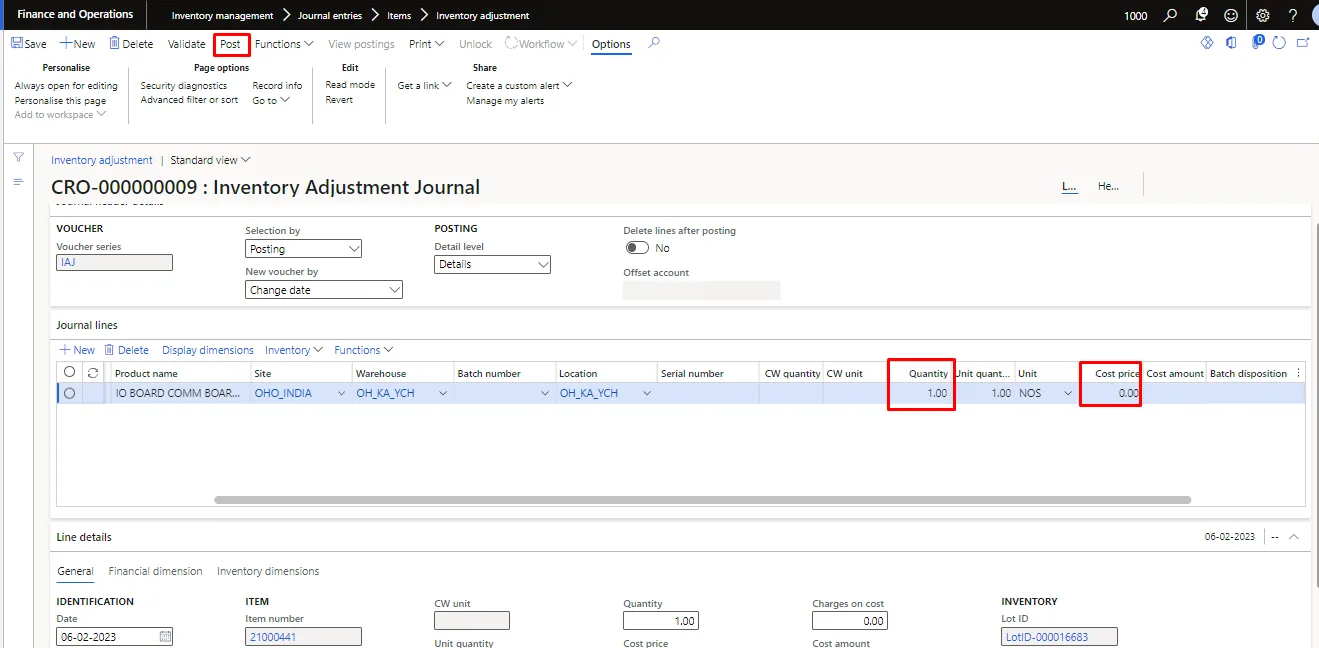
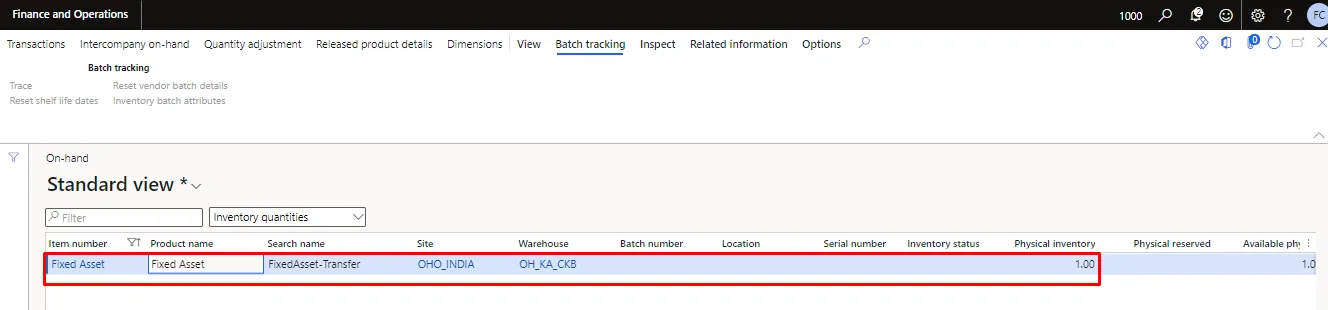
Enter the quantity as 1. Click on post button to post the inventory adjustment journal.
On Hand list of Fixed asset item
Step 3: Fixed asset transfer through transfer order
Once the Fixed asset inventory is increased through inventory adjustment journal, the same will be transferred to receiving location using stock transfer order.
Path for creating stock order: - Inventory management > Inbound orders > Transfer order.
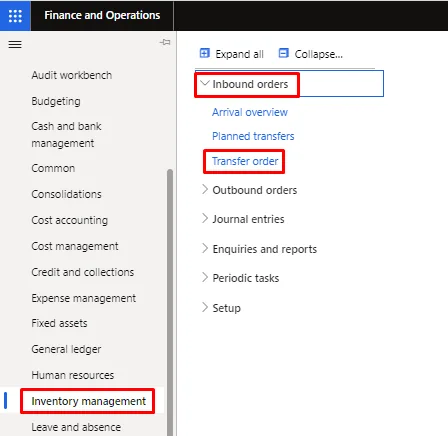
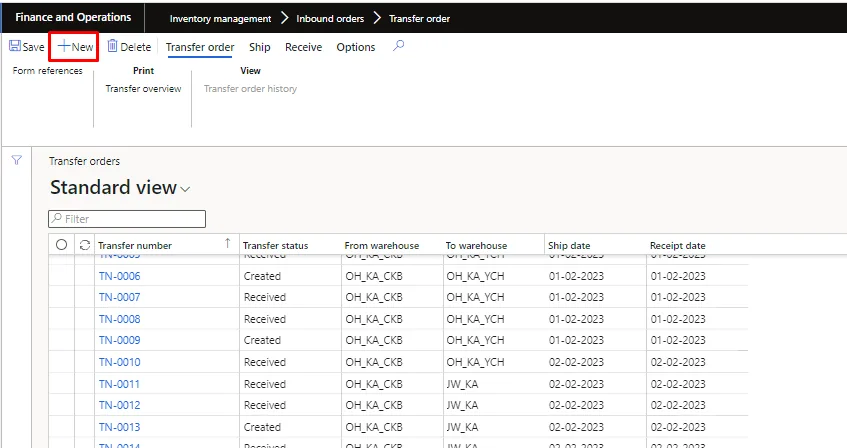
Below screen will appear. Click on new.
Select the transfer type as ‘stock transfer’. Select the from warehouse & to warehouse.
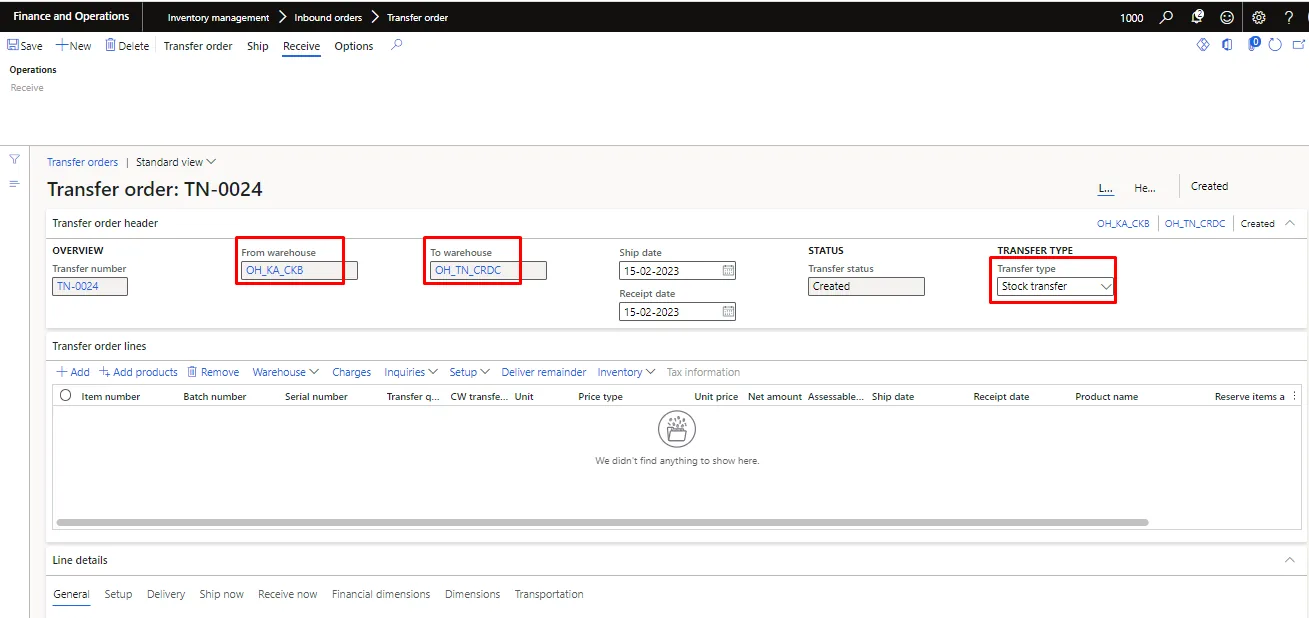
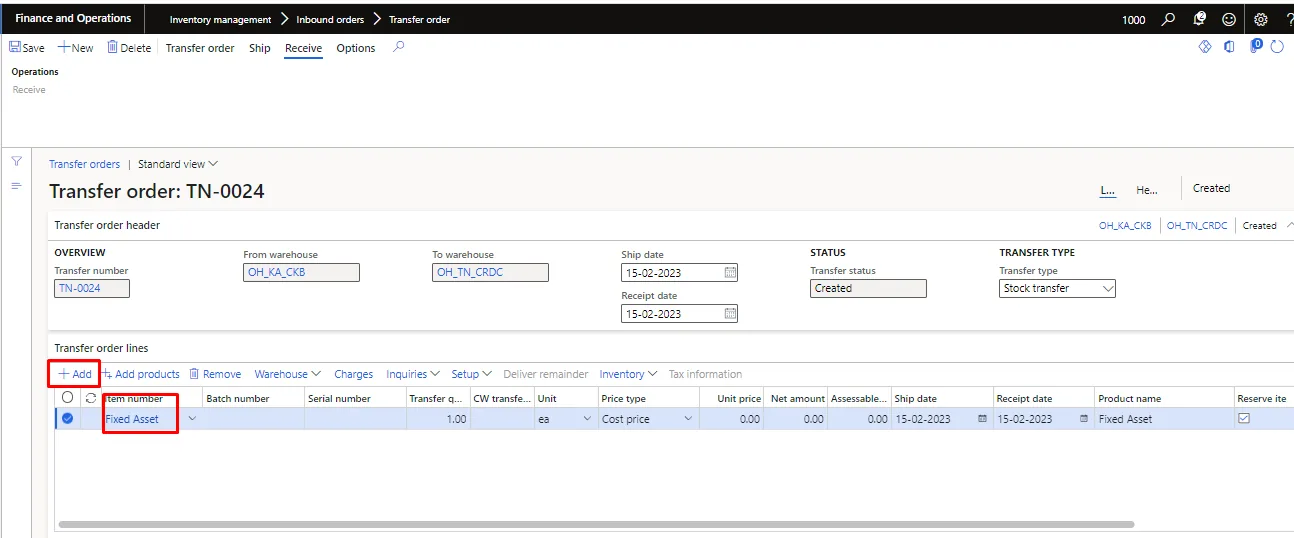
Click on add under the transfer order lines. Select the Fixed asset item whose inventory has been adjusted through inventory adjustment journal.
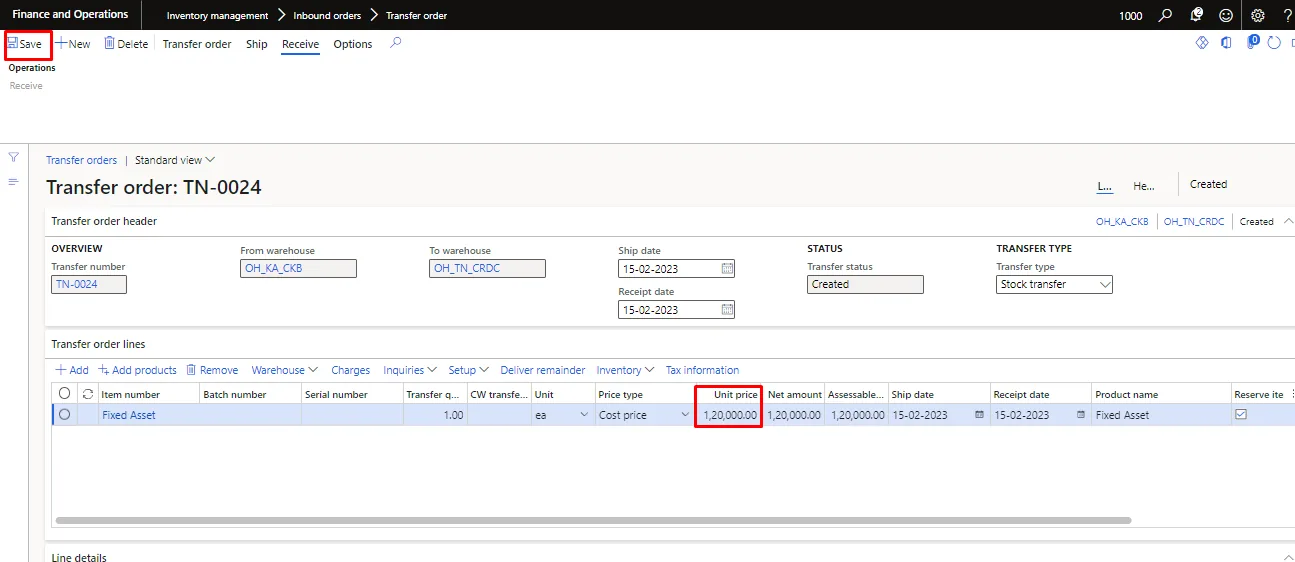
Enter the WDV of the fixed asset at the unit price & save the journal.
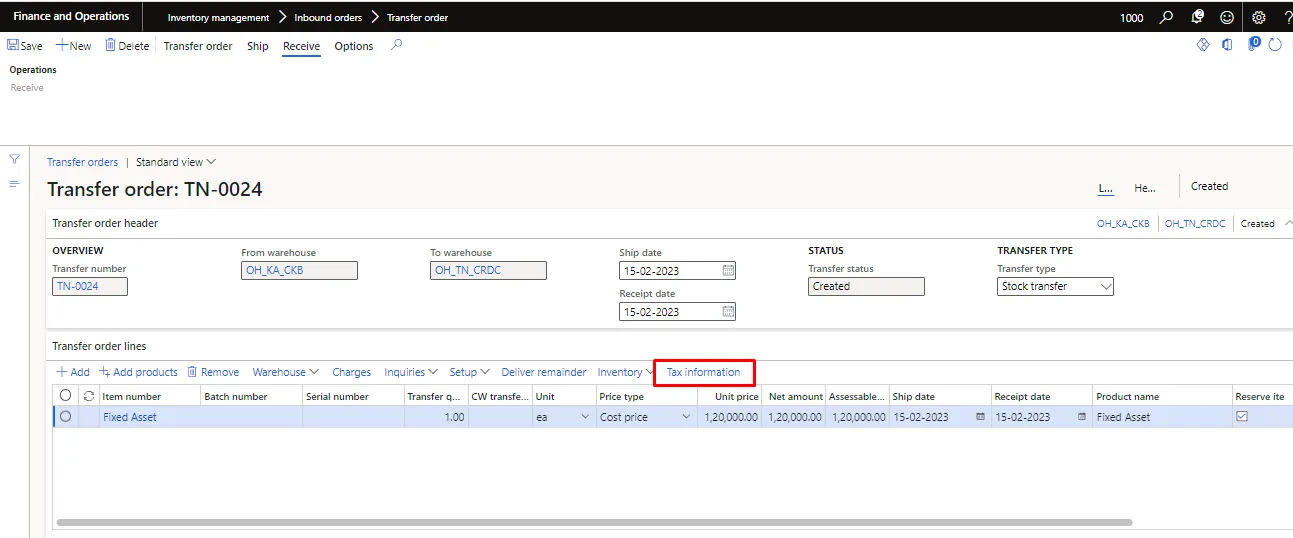
Once the journal is saved, tax information tab will be enabled.
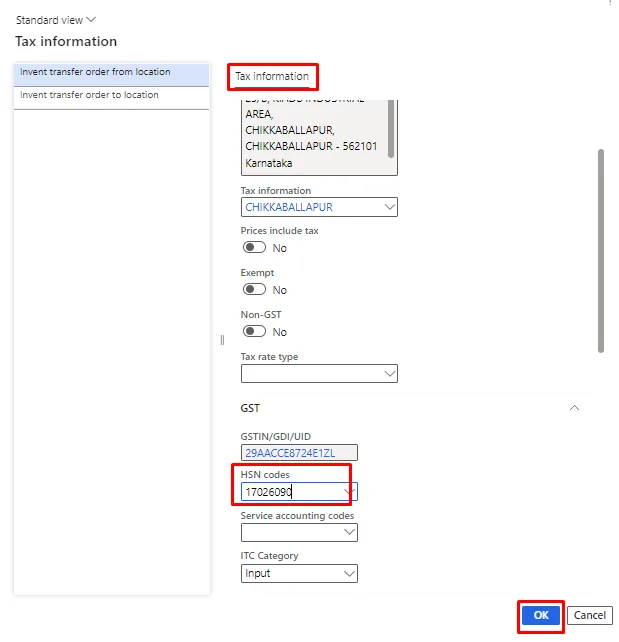
Click on ‘Tax information’ tab. Below screen will appear. Enter the HSN code and then click on ok button.
For viewing the ‘Tax document’ click on Tax document in the action pane.
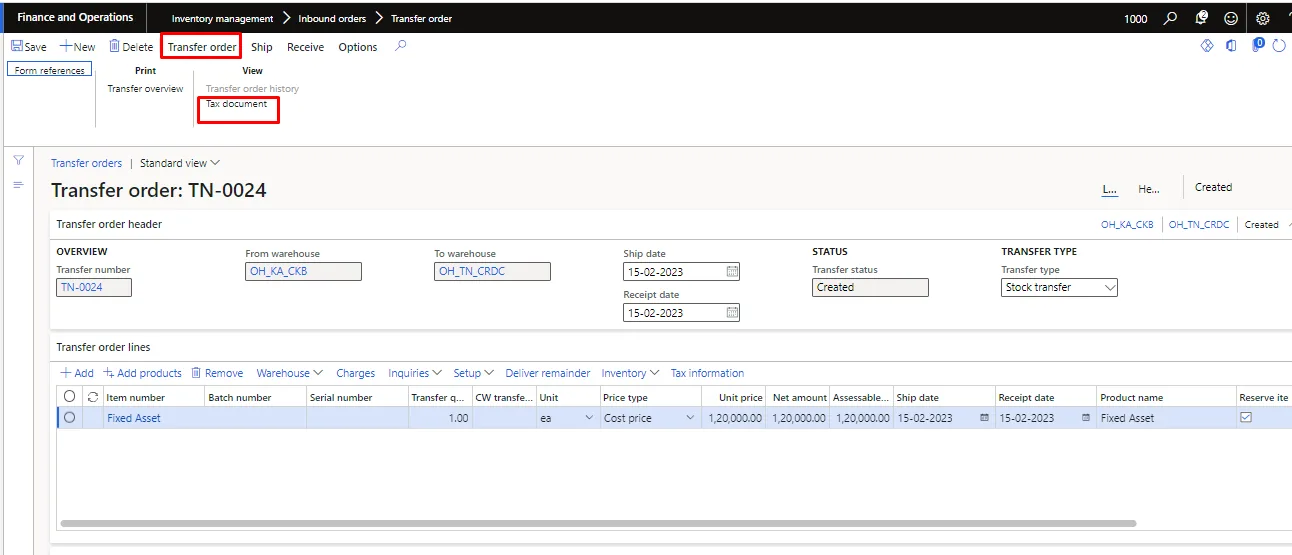
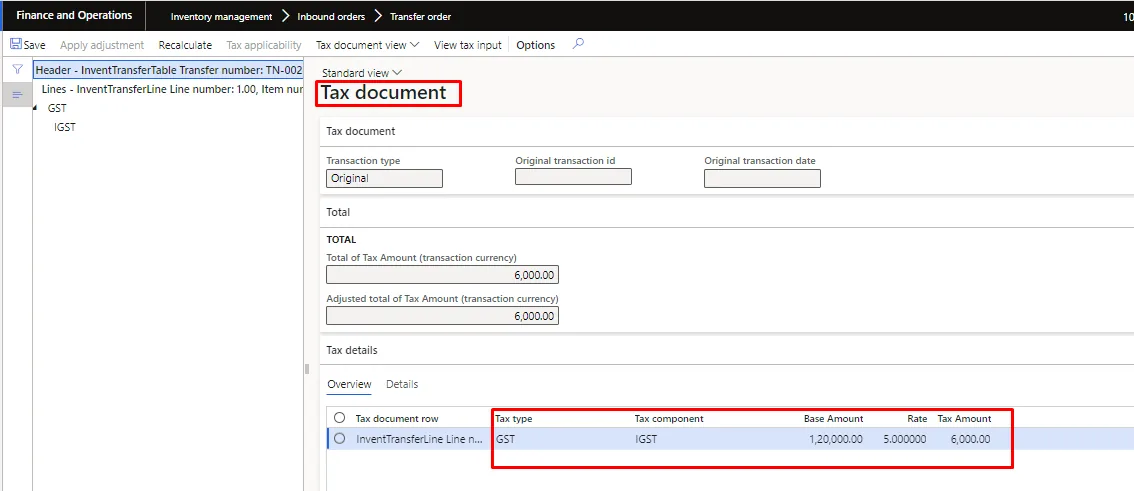
Tax document
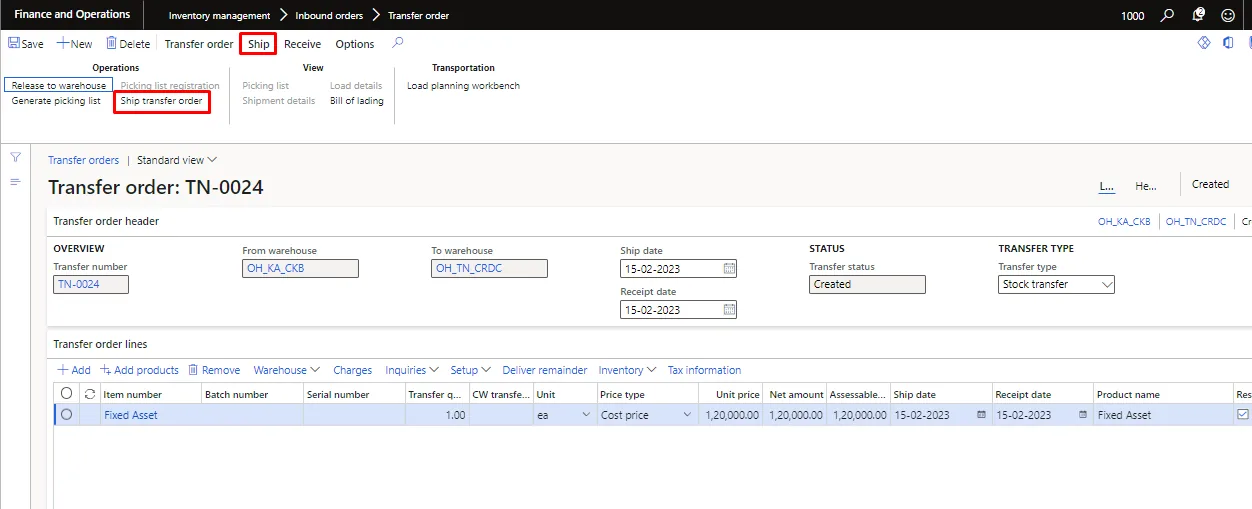
Once the tax information is verified, click on ‘ship transfer order’ to ship the transfer order.
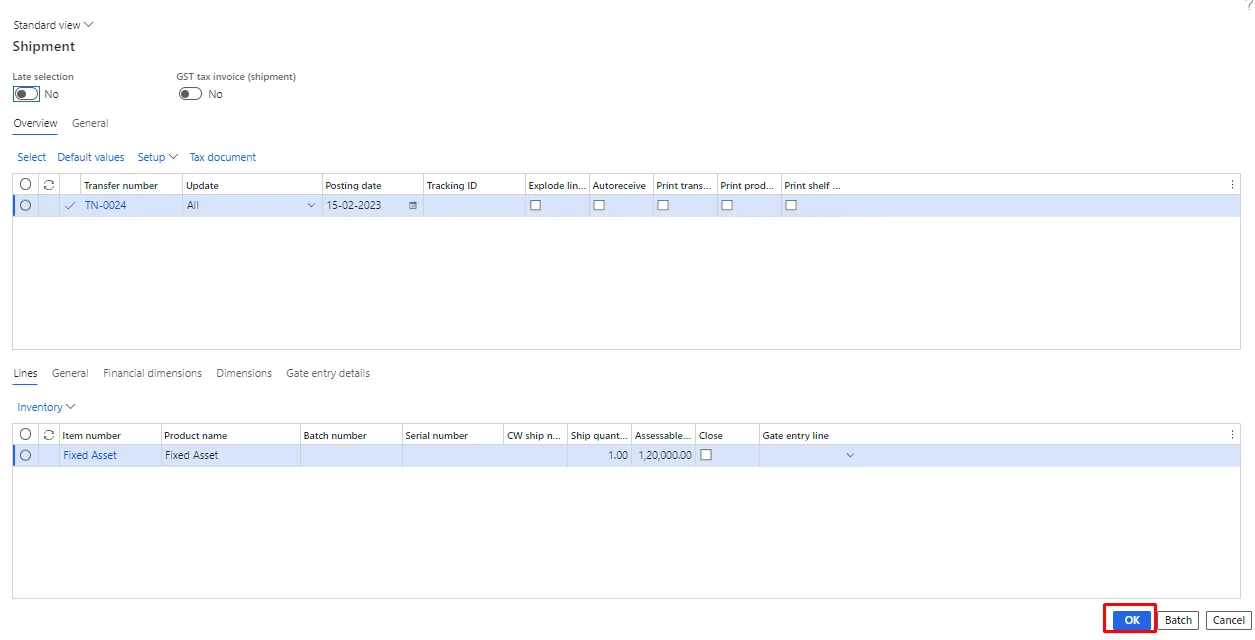
Below screen will appear. Click on ok.
Once the transfer order is shipped, the status of transfer order will change to ‘Shipped’.
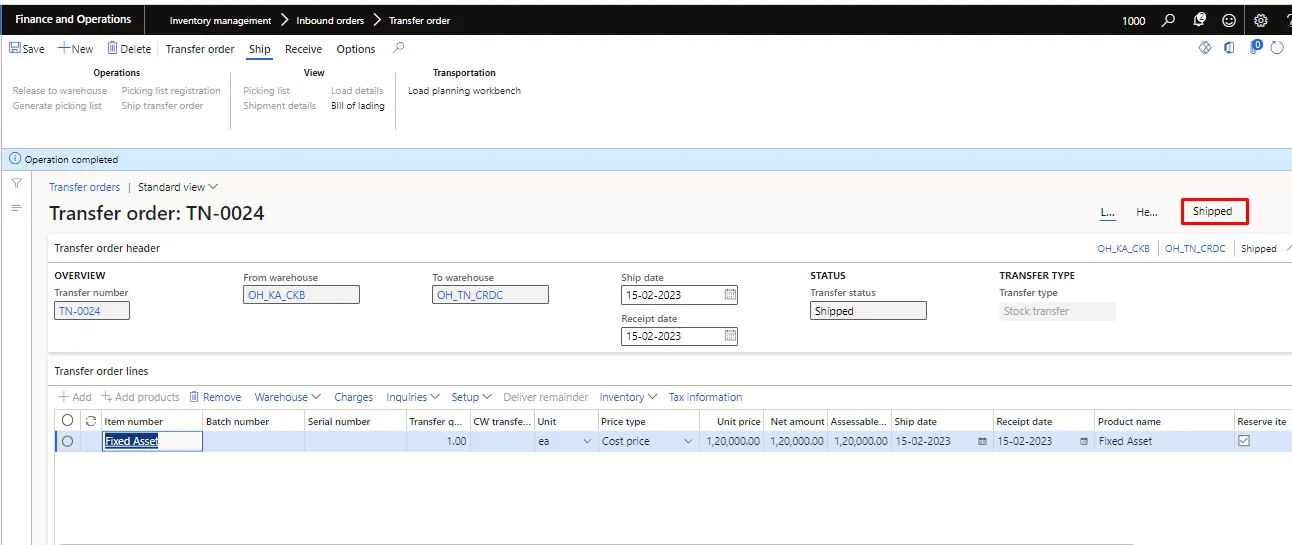
For viewing the posted voucher for shipment, click on transfer order history.
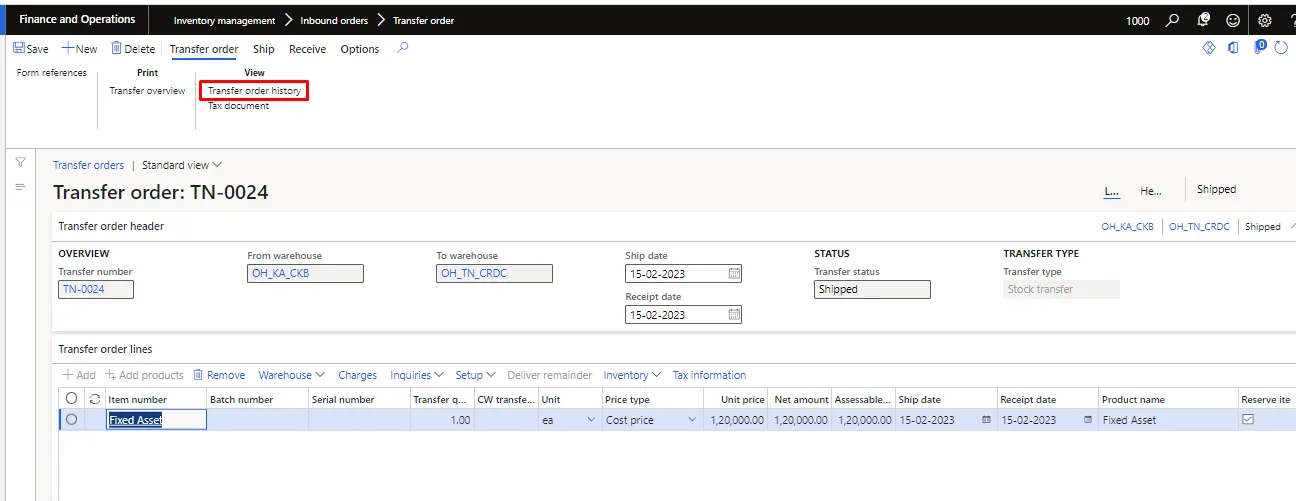
Below screen will appear. Click on voucher.
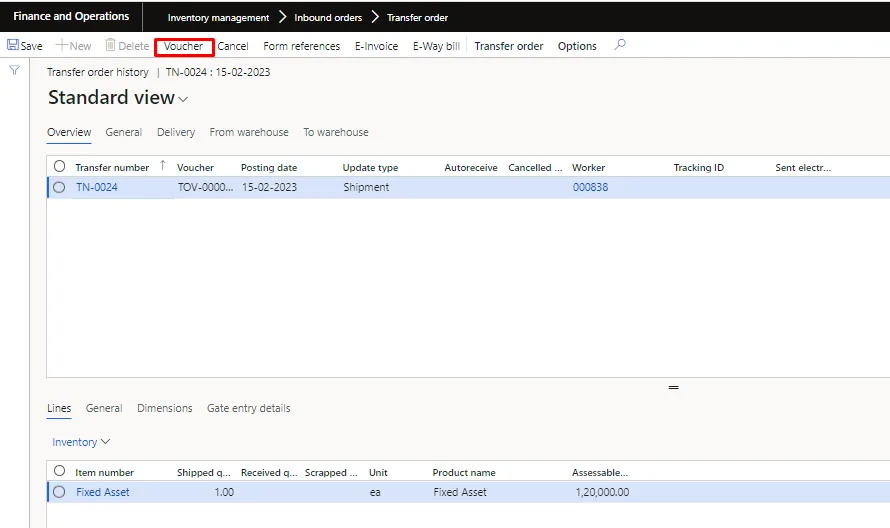
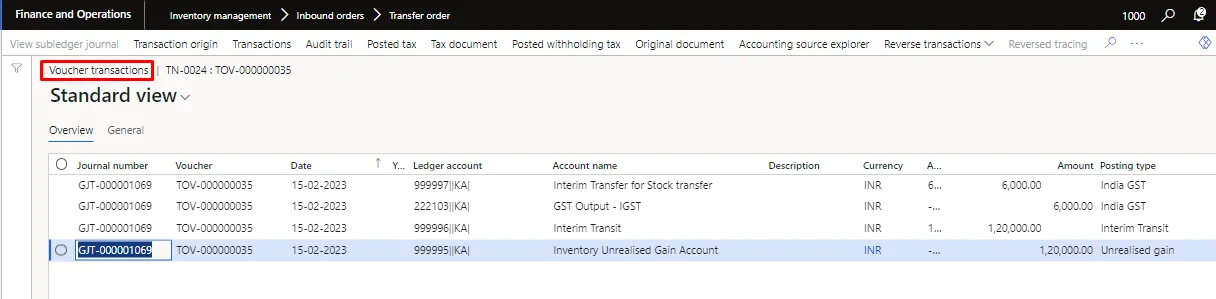
Voucher of the shipped transfer order
Receive the transfer order.
For receiving the transfer order, click on ‘Receive’ under the Receive tab.
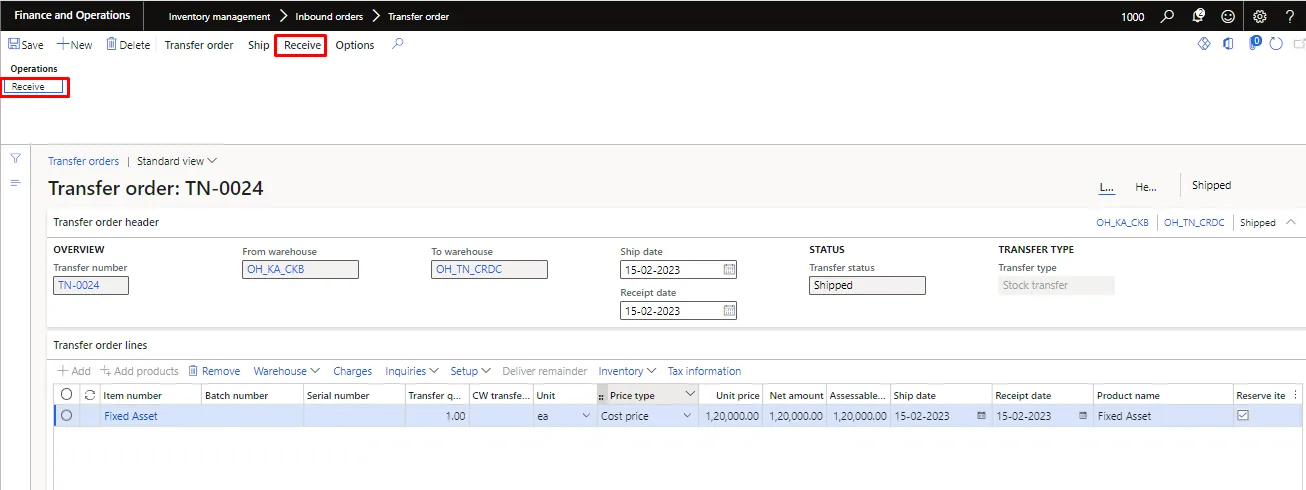
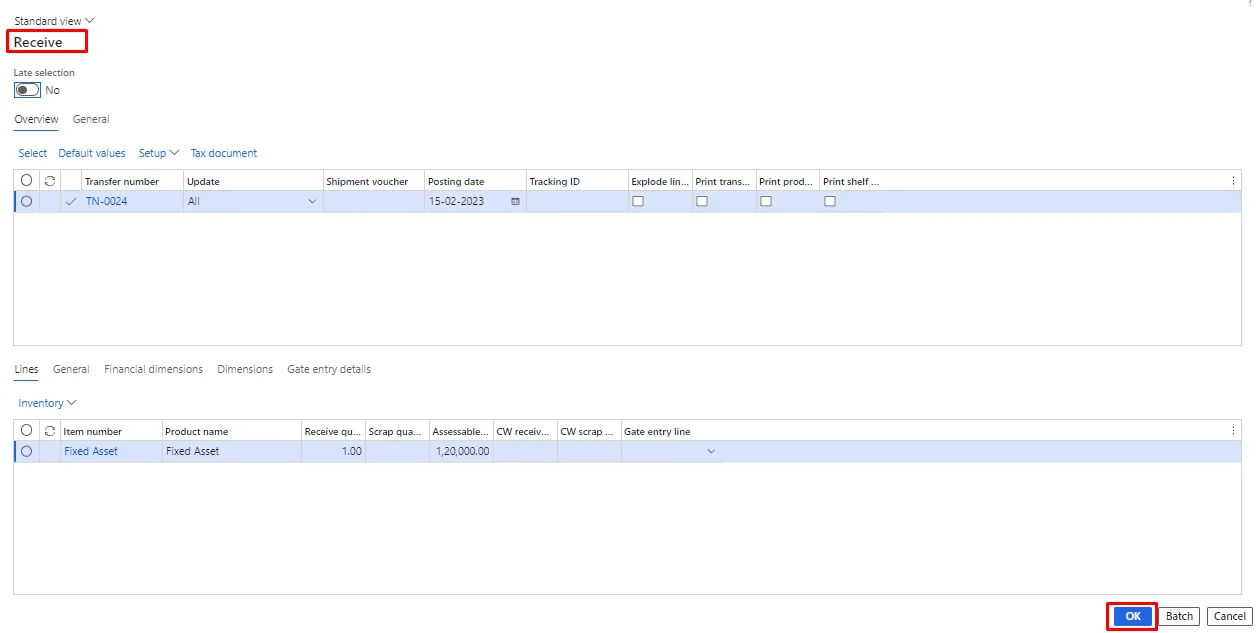
Below screen will appear. Click on ok.
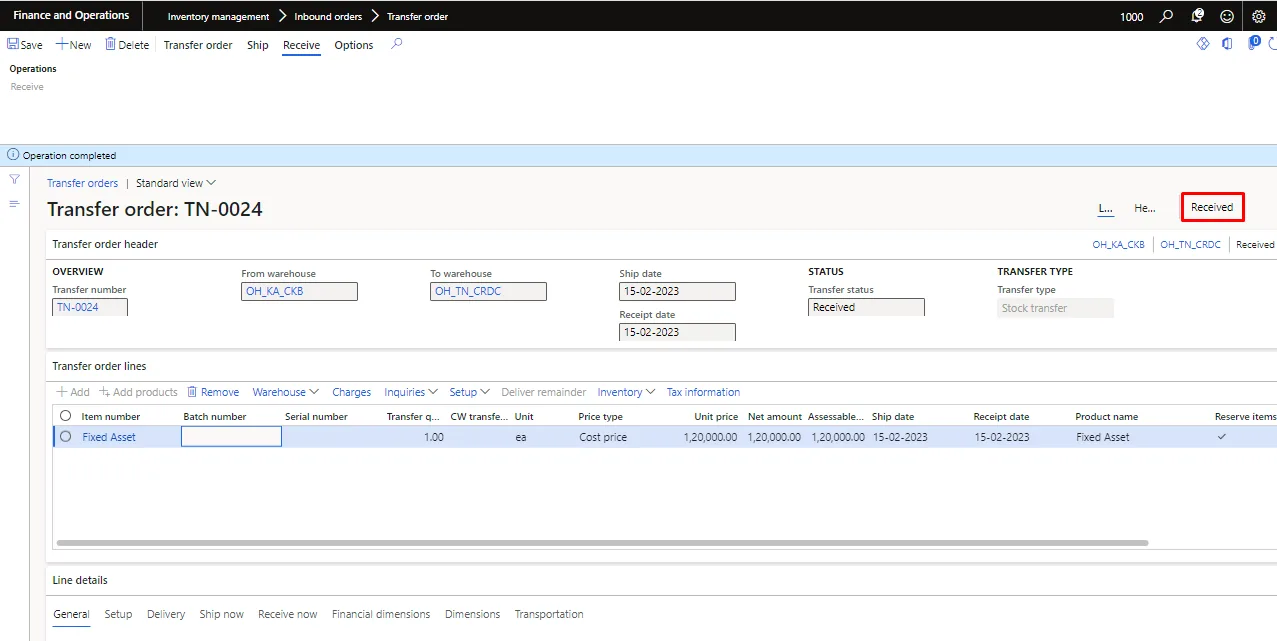
Once the transfer order is received, the status of transfer order will change to ‘received.
For viewing the posted voucher for receipt, click on transfer order history.
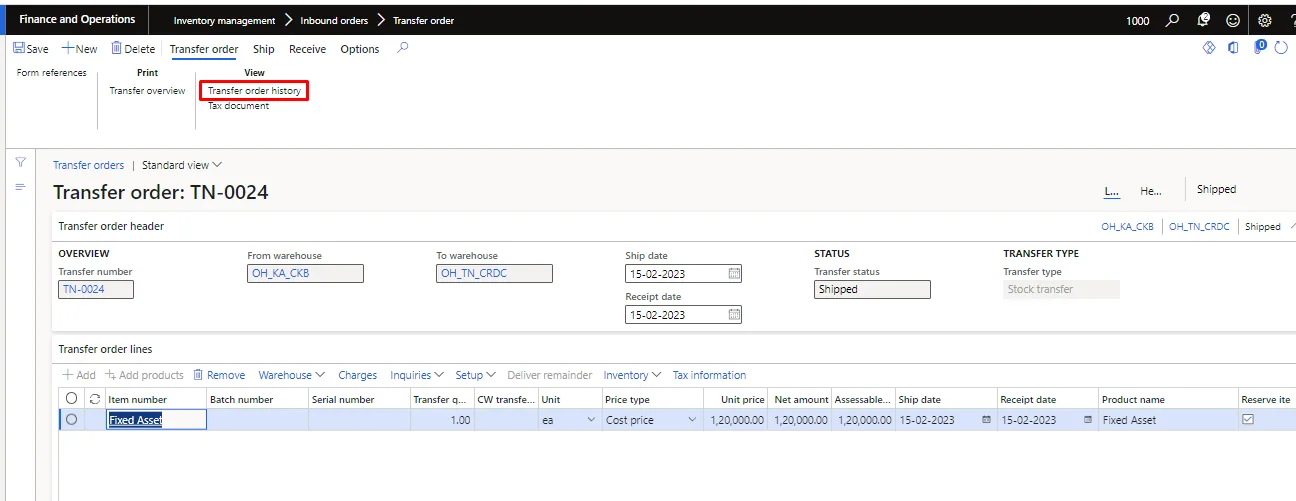
Below screen will appear. Click on voucher.
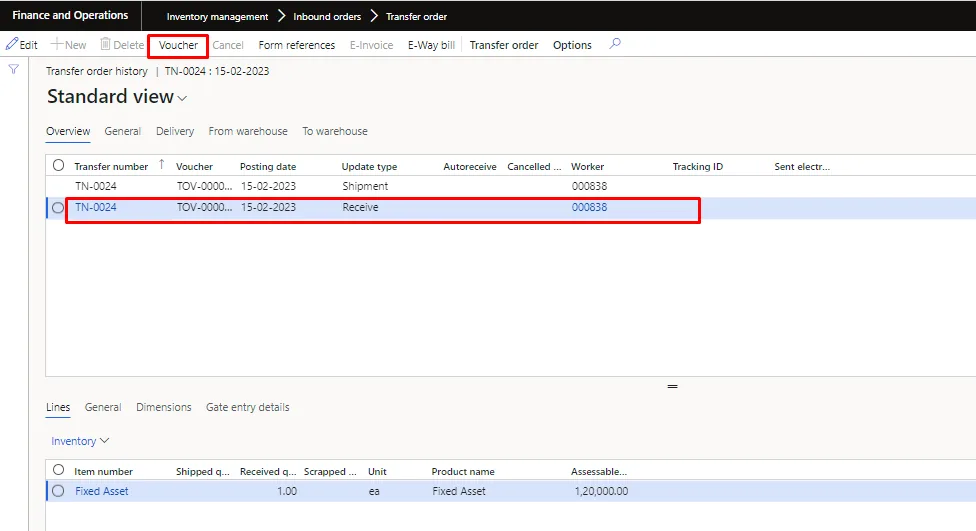
Posted voucher for receipt.
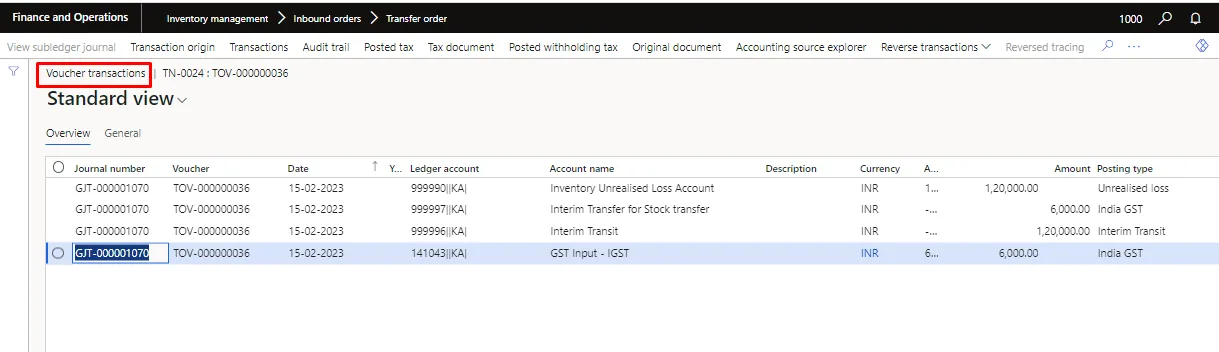
Note: - By using the above mentioned stock transfer process, the user will be able to post the transfer of fixed asset with GST impact on it.
Split a Fixed asset.
There may be few cases where the fixed asset needs to be split. For splitting a fixed asset in D365, new Fixed asset will be created.
Pre-requisite
- Existing Fixed Asset Book Status must be in ‘Open’ status, destination fixed asset status book should not be ‘Closed’.
- Fixed Asset Posting profile must be setup as per the general setup for Acquisition of destination asset and Acquisition Adjustment for the existing asset.
- A general Fixed Asset journal is required.
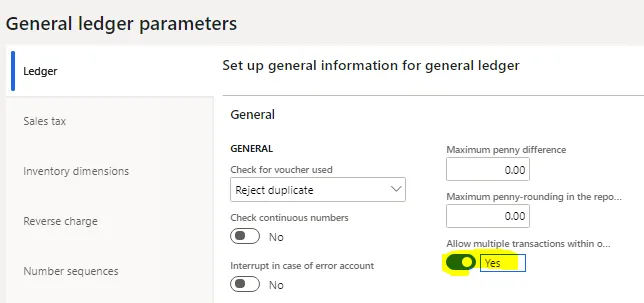
- Allow multiple transactions within one voucher must be enabled in General ledger parameter, see below.
Perform the following steps to split values of fixed asset into another fixed asset.
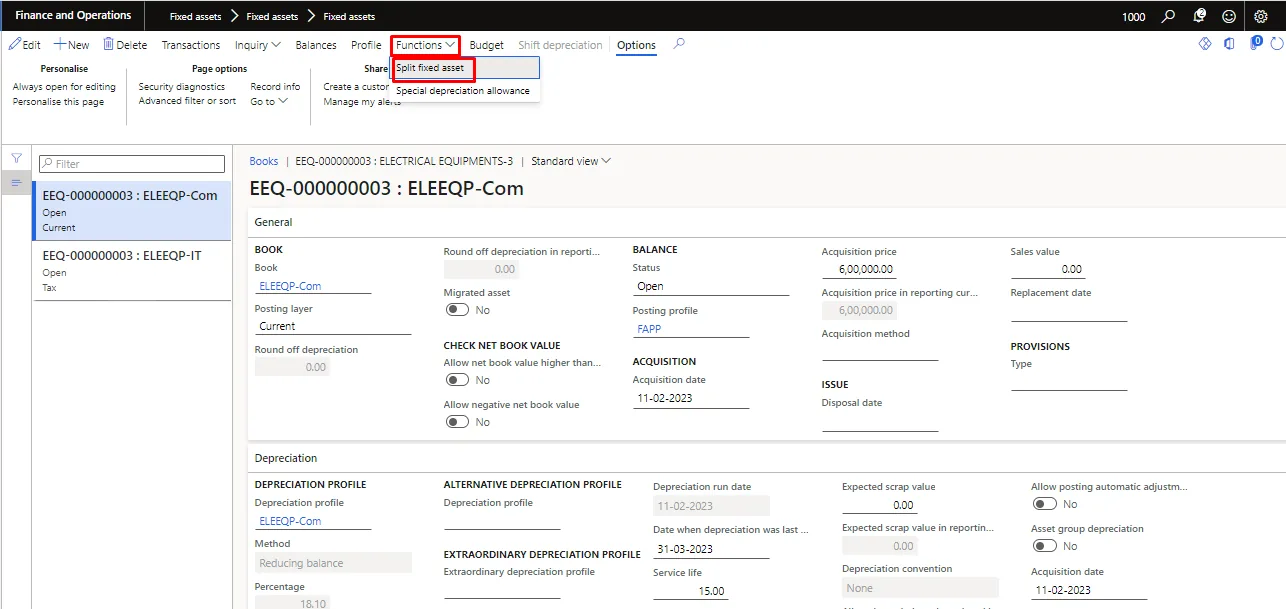
Select a “Fixed asset” and Press “Books”.
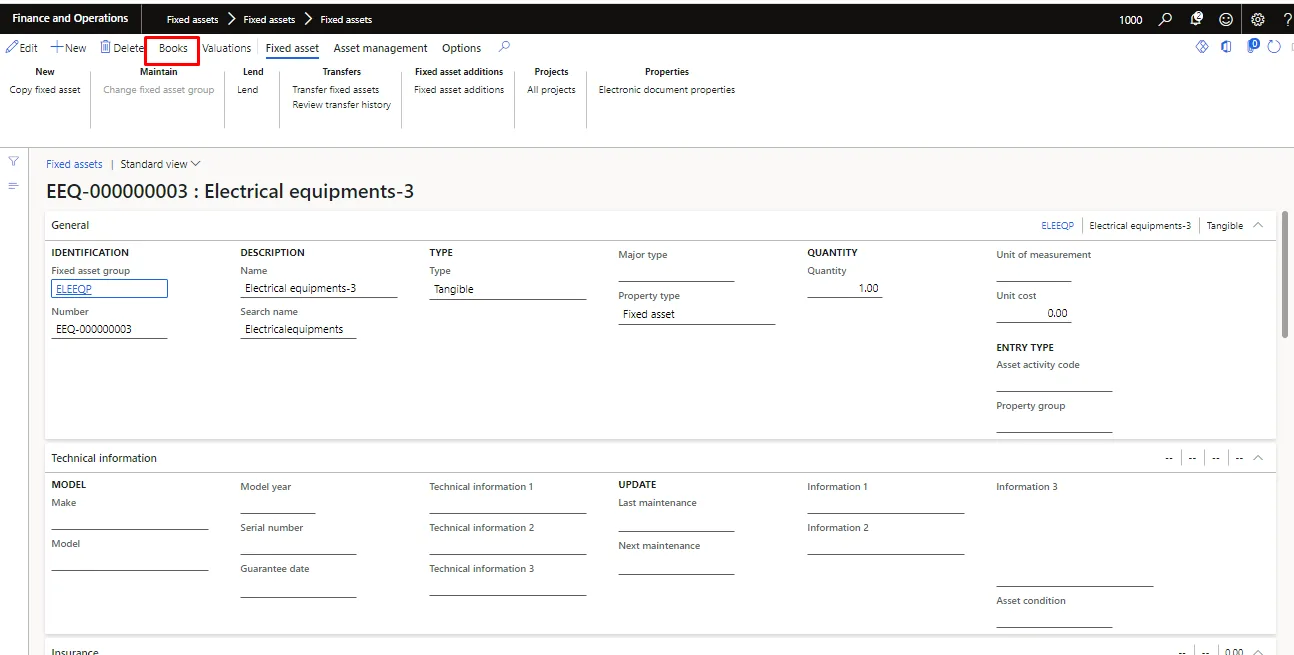
Then select “Split fixed asset” in “Functions” tab.
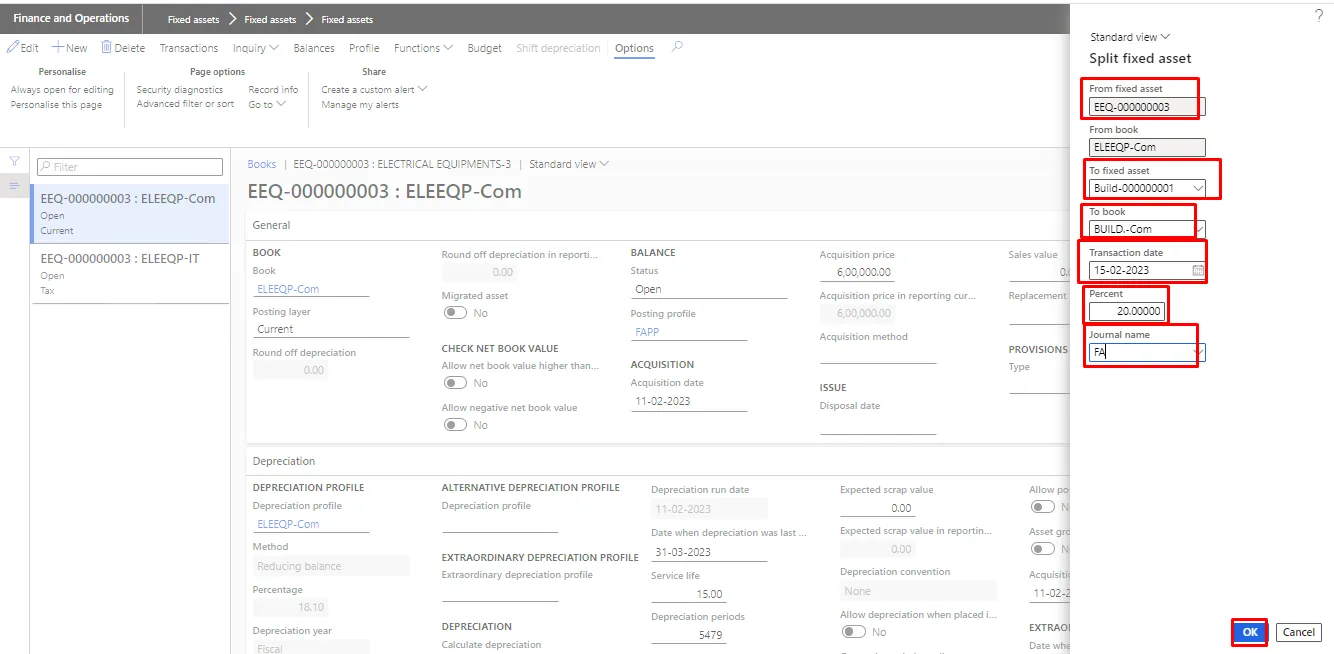
Below form will appear. Select “Fixed asset number” & book to which the value is to be split. Percentage to be defined for value to be split into another fixed asset. Fill “Journal name” in which unposted document will be created. Later which will be reviewed and posted.
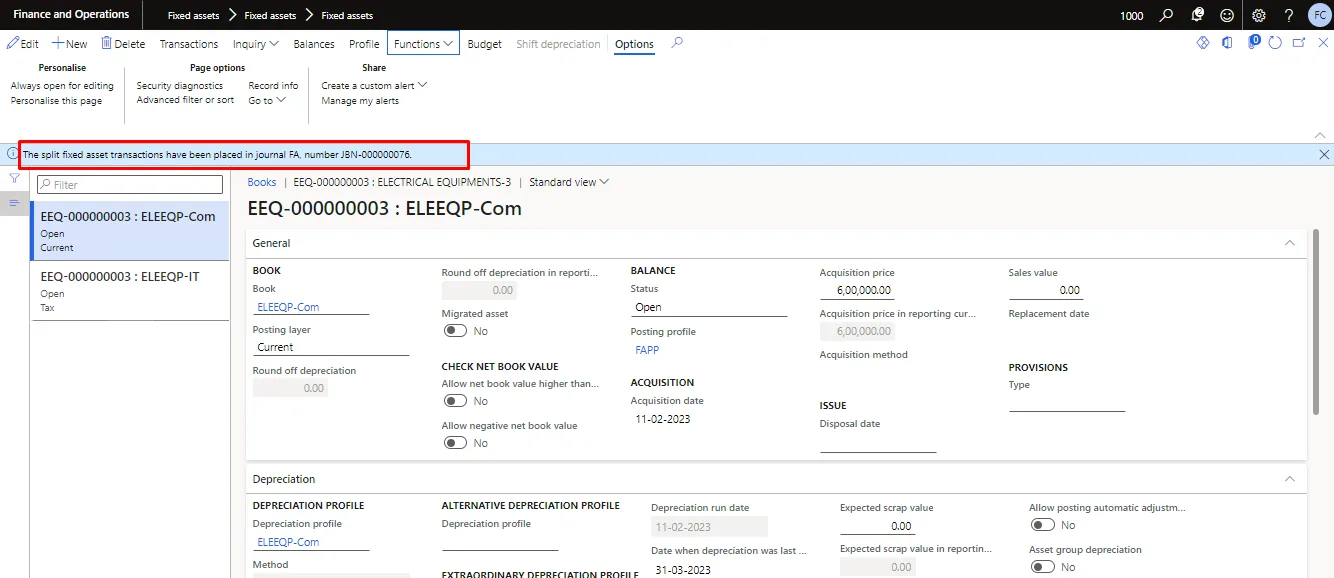
Below information message will appear where we can see the new FA journal created by the system.
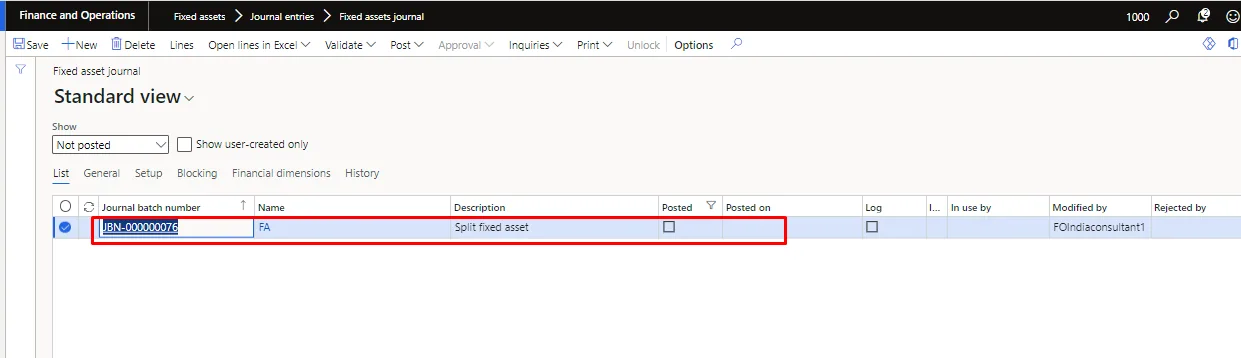
Open the FA journal. Follow the below path to open the FA journal.
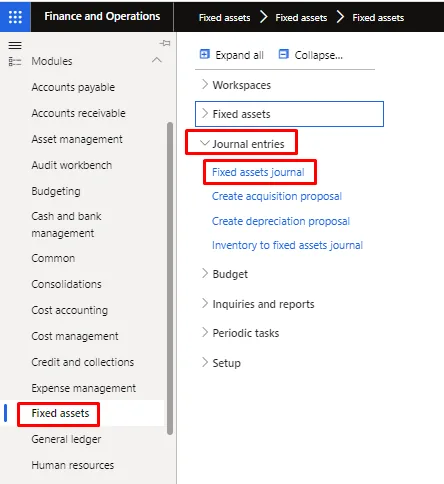
Below screen will appear. Select and open the concerend FA journal.
Below screen will appear.
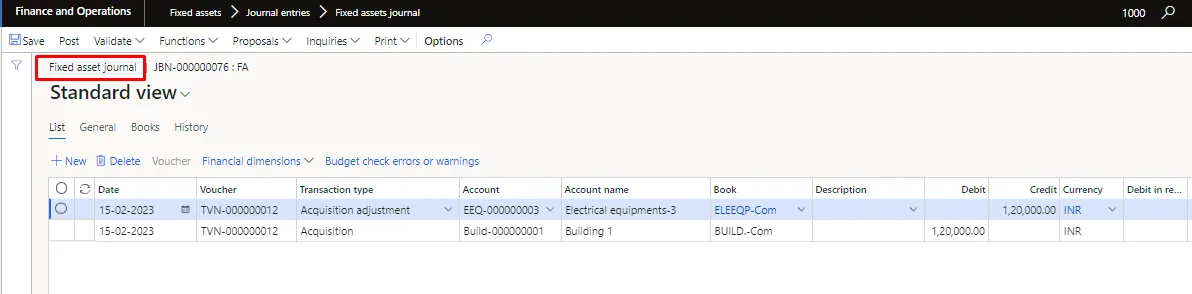
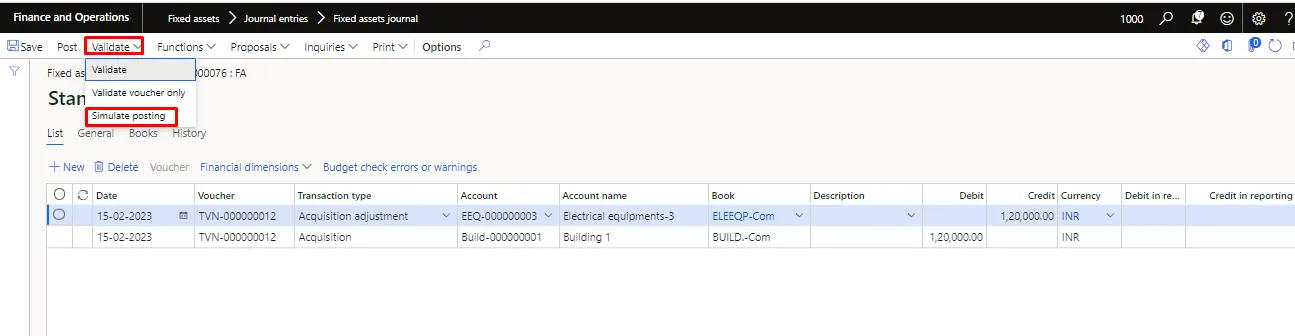
After verifying the FA journal lines, validate and post the FA journal. For validating the journal, click on ‘simulate posting’.
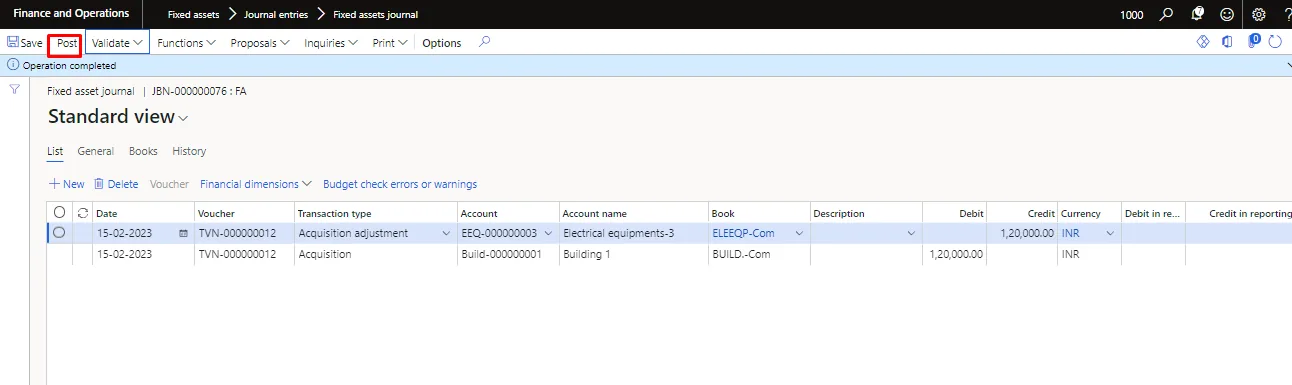
Once the journal lines is vaidated, click on post to post the FA journal.
For viewing the voucher, click on voucher tab.
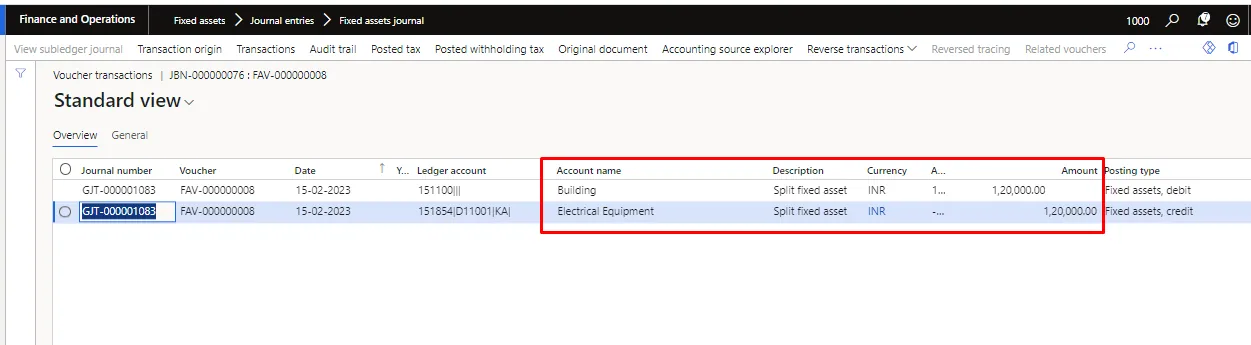
Posted voucher